Run integration tests with Spoke
Spoke is a tool for end-to-end Business Process testing. It provides fluent APIs for a developer to achieve typical testing goals. The framework is built on the JUnit 5 + AssertJ ecosystem, but the core module does not depend on it and can be used as a pure Java library.
Create integration tests with Spoke
The core idea of Spoke is test execution on the real Control Tower environment so that test results become reliable. First, let's understand the general sequence of test steps. To test a typical Business Process, high-level steps look as follows.
- Publish the Asset Bundle to Control Tower.
- Run a freshly created Business Process, providing the input data if required.
- Wait for the Business Process to finish execution.
- Download the output data and make sure it conforms to your expectations.
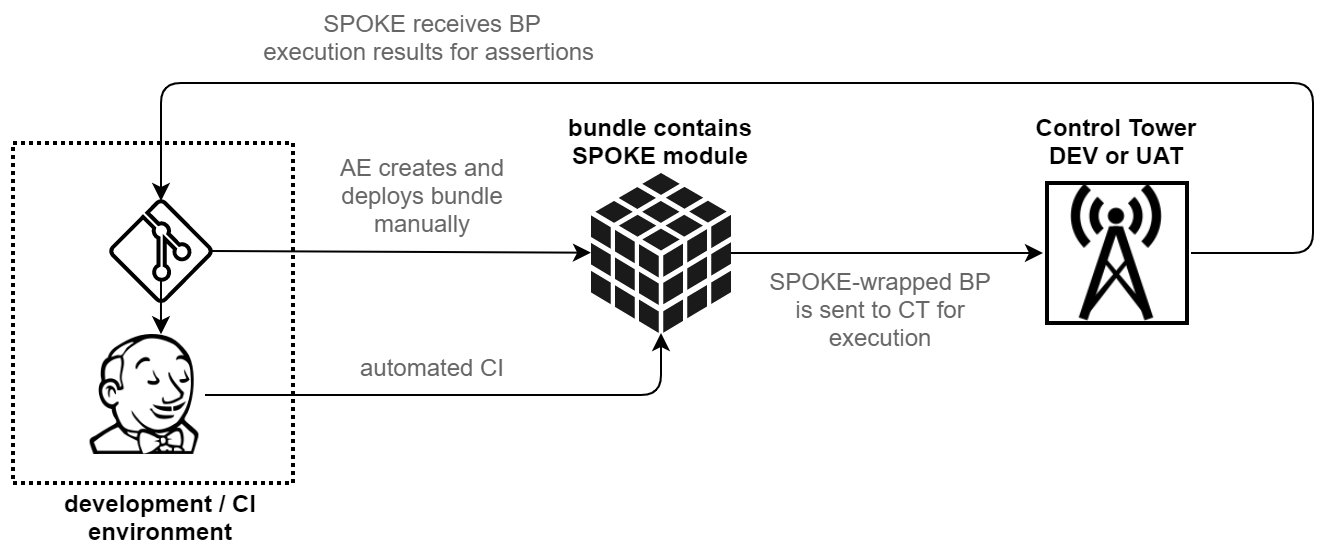
Created with Spoke, the sequence looks like this:
package org.spoketry.spoke;

import java.io.File;
import java.time.Duration;
import org.assertj.core.api.Assertions;
import org.junit.jupiter.api.Test;
import com.workfusion.spoke.configuration.Configuration;
import com.workfusion.spoke.Await;
import com.workfusion.spoke.ControlTower;
import com.workfusion.spoke.InputData;
import com.workfusion.spoke.bp.BusinessProcessResult;
import com.workfusion.spoke.bundle.AssetBundle;

public class AppTest {

    @Test
    void shouldRunBPAndFetchTheResults() {
        // given
        final ControlTower controlTower = ControlTower
                .createConfigured(Configuration.fromFile("control-tower.properties"));        // configuring our Control Tower URL and credentials
                                                                                              // note that path to file is relative to the root of the test module
        // when
        final BusinessProcessResult result = controlTower
                .importAssetBundle(AssetBundle.fromFile("my-package.zip"))                    // 1. publishing bundle
                .getBusinessProcessByZipName("my-bp.zip")                                     // 2. choosing business process - this is BP artifact name which
                                                                                              //    exists in 'business-process' folder of my-package.zip bundle
                .run(new InputData(new File("input.csv")))                                    // 3. running business process with input data
                                                                                              //    note that path to file is relative to the root of the test module
                .waitFor(Await.atMost(Duration.ofMinutes(5)))                                 // 4. waiting...
                .untilFinished();                                                             //    for business process to finish execution

        // then
        Assertions.assertThat(result.expectSuccessful()
                .getOutputDataAsString())
                .contains("something that should be here");                                   // 5. Asserting output data
    }

}
This basic test case takes some time to run depending on the Bundle size, network connection, and Control Tower performance, but it is already doing the job. Let's look at this scenario in detail.
Configuration
Configure Control Tower connection
com.workfusion.spoke.ControlTower is an entry point to the Spoke framework. This class encapsulates all the network interactions with the Control Tower instance. There are several ways to create it with the help of different static factory methods, depending on how you store your configuration.
The configuration for the Control Tower connection consists of four properties:
apiRootis based on the Control Tower instance URL, typically looking like "https://yourserver.com/workfusion/api"authenticationEndpointis, for example, "https://yourserver.com/workfusion/api/dologin"usernameandpasswordare credentials to be used for all Control Tower interactions
The easiest (and the least flexible) way to provide it is the ControlTower.create() method that takes all the four properties as arguments. This method is designed only for quick proof-of-concept implementations and should not be used outside of this context.
Mind not to keep credentials in the source code. Do not store credentials to production instances in code repositories.
Now, the right way to configure the ControlTower object is to use the ControlTower.createConfigured() method, which takes what static methods of the com.workfusion.spoke.configuration.Configuration class are returning as an argument.
For example, you can do:
ControlTower.createConfigured(Configuration.fromFile("filename.properties")); // load configuration from file by absolute path

ControlTower.createConfigured(Configuration.fromResource("/classpath-resource.properties")); // load configuration from classpath resource

ControlTower.createConfigured(Configuration.fromFileSpecifiedIn("SYSTEM_PROPERTY_NAME")); // load configuration from file,
                                                                                          // to which absolute path is specified in system property

ControlTower.createConfigured(Configuration.fromFileSpecifiedInSystemProperty()); // same as previous; uses default system property named 'spoke.configuration'
Most of these methods are self-describing. In the end, each of them expects to find a property file that should contain the configuration. This file contains the four already discussed keys:
apiRoot=<your value>
authenticationEndpoint=<your value>
username=<your value>
password=<your value>
The example of configuration to execute tests on TESLA Control Tower:
apiRoot=https://tesla.workfusion.com/workfusion/api
authenticationEndpoint=https://tesla.workfusion.com/workfusion/api/dologin
username=API_USER
password=API_PASSWORD
The ability to load a file specified in the system property is most useful when tests are designed to run on a continuous integration server (for example, Jenkins), which is responsible for securely storing and providing configuration files.
A CI build can use a command like mvn clean deploy -Dspoke.configuration=path/to/property/file to provide the path to the managed configuration file. You can do the same locally, possibly with a different instance and/or credentials.
Regardless of the method used, you can override each configuration property through the system properties. For example, mvn deploy -Dspoke.apiRoot=new_value overrides apiRoot configured by other means.
Configure HTTP client
Via the configuration file, you can adjust the settings of the HTTP client that Spoke uses to connect to Control Tower. Currently, the following properties are supported:
http.timeout.read=<your-value> // to configure a read timeout
http.timeout.write=<your-value> // to configure a write timeout
http.timeout.call=<your-value> // to configure a call timeout
http.timeout.connect=<your-value> // to configure a connect timeout
For specifying all timeout properties, use the ISO-8601 duration format. In this format, for example,
http.timeout.read=PT5M sets a read timeout of 5 minutes, and http.timeout.call=PT15S defines a call timeout of 15 seconds.
Configure multiple servers
In some cases, it can be useful to store configurations for different servers in a single file. For example, if you have two environments named "alpha" and "beta", create a file looking like this:
alpha.apiRoot=...
alpha.authenticationEndpoint=...
alpha.username=...
alpha.password=...

beta.apiRoot=...
beta.authenticationEndpoint=...
beta.username=...
beta.password=...
To specify which environment Control Tower should use, configure it in the following way:
ControlTower.createConfigured(Configuration.fromFile("filename.properties").withPrefix("alpha")); // will use keys with prefix 'alpha.', ignoring all others
All the methods from the com.workfusion.spoke.configuration.Configuration class can be followed by withPrefix(). You can override the prefixed keys by the system properties like usual: mvn deploy -Dspoke.alpha.apiRoot=new_value.
Upload Business Process Bundles
Having configured the Control Tower instance, you can upload your Bundle. As shown above, it is done like this: controlTower.importAssetBundle(AssetBundle.fromFile("name.zip")).
This method uploads the Bundle to the Control Tower server and waits until its import is completed. Any errors in this process result in a runtime exception, effectively failing a test.
Each upload creates separate Business Processes that do not interact with other instances of the same Business Process in any way.
Get existing AI Agent
After configuring Control Tower, you can get an AI Agent (or AI Digital Worker) from using the AI Digital Worker name and version. As shown above, it is done like this: controlTower.getDigitalWorkerByCodeAndVersion("usecasecode", "1.0.0", true)
The method only works with a multi-configuration AI Digital Worker. The last parameter in the method allows you to create a new AI Digital Worker variation and run any Business Process from it.
Run Business Processes
When the Bundle is imported, API returns the instance of the com.workfusion.spoke.ImportedAssetBundle class. You can use it to select a specific Business Process to run. Currently, you can select a Business Process by its zip name using
com.workfusion.spoke.ImportedAssetBundle.getBusinessProcessByZipName().
Anyway, you will receive the instance of com.workfusion.spoke.bp.BusinessProcess, which contains a set of run() methods with different combinations of parameters. Calling run() without parameters starts Business Process execution without input data.
To pass input data for Business Process execution, create the com.workfusion.spoke.InputData object. You can:
- Call
new InputData(new File("name.csv"))ornew InputData(Paths.get("name.csv"))if you have a CSV file at hand. - Call
InputData.of("header", "value1", "value2", .. "valueN")to create simple input data with one column and any number of records on the fly.
There is a version of run() that takes both the input data and the com.workfusion.spoke.Await instance that you can use to specify the maximum time to wait for the input data to upload. The example for working with Await can be found at line 11 of the Basic test case example.
Change type of Business Process input
Since version 1.0.149, Spoke allows to change the type of input for a given Business Process:
runWithoutInputData()makes Control Tower run a Business Process without input data as if you select the No Data checkbox on the UI.runWithInputFromExternalSource()makes Control Tower run a Business Process and get data sent through REST API as if you select the Streaming Records from External Sources checkbox on the UI.
Setting expectations
After the BusinessProcess.run() method starts execution, it returns the BusinessProcessRun instance that can be used to interact with the
execution process. For example, you can call BusinessProcessRun.stop(), which is useful in the try-finally statement.
Most often, though, you have to wait for execution to reach some expected state. To do this, specify how long you are willing to wait and what state you are waiting for.
Line 11 from the Basic test case example, BusinessProcessRun.waitFor(Await.atMost(Duration.ofMinutes(5)), defines your maximum wait time as 5 minutes and returns the BusinessProcessExpectations instance that contains methods to set the expected state.
Expectations for Business Process
BusinessProcessExpectations.untilFinished() is a method that blocks until Business Process execution ends, or the maximum wait time specified earlier is overdue (or execution fails with some error, in which case an exception is raised). You can use the returned BusinessProcessResult object to check if the execution was successful and to access the Business Process output.
Running multiple Business Processes asynchronously
Since version 1.0.140, Spoke introduced convenience API to run a Business Process asynchronously. The BusinessProcess.runAndExpectSuccessAsync() method runs a given Business Process and returns CompletableFuture<BusinessProcessSuccessfulResult> that can be used to query a result.
This way, you can start multiple BPs in parallel:
        CompletableFuture<BusinessProcessSuccessfulResult> future1 = importedAssetBundle
                .getBusinessProcessByZipName("BP1.zip")
                .runAndExpectSuccessAsync(waitCondition);

        CompletableFuture<BusinessProcessSuccessfulResult> future2 = importedAssetBundle
                .getBusinessProcessByZipName("B2.zip")
                .runAndExpectSuccessAsync(waitCondition);

        BusinessProcessSuccessfulResult result1 = future1.get(); // will wait until BP1 finishes
        BusinessProcessSuccessfulResult result2 = future2.get(); // will wait until BP2 finishes
Under the hood these methods use CompletableFuture.supplyAsync(). You can use CompletableFuture to build your own asynchronous solution of any desired complexity.
Expectations for single step
BusinessProcessExpectations.untilStep("step name") returns the StepExpectations object that can be used to wait for the state of a specific Business Process step. For example, StepExpectations.hasPendingSubmissions() waits until the specified number of records reaches this step.
Perform tests with multi BP Asset Bundle
In ODF 2, the implementation is based on four Business Processes by default. Mocking steps in different Business Processes, running them one by one, and writing separate expectations for each of them becomes a normal situation.
See a Spoke test example for a multi BP Asset Bundle below:
import java.time.Duration;

import org.junit.jupiter.api.DisplayName;
import org.junit.jupiter.api.Test;

import com.workfusion.odf2.demo.DemoOdfModule;
import com.workfusion.odf2.spoke.MockOdfStep;
import com.workfusion.spoke.Await;
import com.workfusion.spoke.ControlTower;
import com.workfusion.spoke.ImportedAssetBundle;
import com.workfusion.spoke.bp.BusinessProcessSuccessfulResult;
import com.workfusion.spoke.bundle.AssetBundle;
import com.workfusion.spoke.configuration.Configuration;
import com.workfusion.spoke.junit.mdc.TestNameToMDC;
import com.workfusion.spoke.mock.MockStep;

import static org.assertj.core.api.Assertions.assertThat;

@TestNameToMDC
public class MultiBpTest {

    private static final Await DEFAULT_DURATION = Await.atMost(Duration.ofMinutes(5)).checkingEvery(Duration.ofSeconds(15));

    @Test
    @DisplayName("Should run all bp for test")
    public void shouldRunAllBpForTest() {
        final ControlTower controlTower = ControlTower.createConfigured(Configuration.fromFileSpecifiedInSystemProperty()
                .orElse(Configuration.fromFileInUserHome("spoke-it.properties")));

        final AssetBundle assetBundle = AssetBundle.fromFile("../odf2-demo-bundle/target/odf2-demo-bundle-1.0.zip")
                .withBusinessProcess("[ODF2+Demo]+Data+Intake+03-3-2021.zip",
                        MockStep.named("odf2-demo-bcb v1.0 (email-monitor)")
                                .fromString(MockOdfStep.withCodeFromResource("/EmailProviderTask.groovy")
                                        .withModules(DemoOdfModule.class)
                                        .build()))
                .withBusinessProcess("[ODF2+Demo]+Data+Processing+03-3-2021.zip",
                        MockStep.named("odf2-demo-bcb v1.0 (email-converter)")
                                .fromString(MockOdfStep.withCodeFromResource("/EmailToInvoiceConverterTask.groovy")
                                        .withModules(DemoOdfModule.class)
                                        .build()));

        final ImportedAssetBundle importedAssetBundle = controlTower.importAssetBundle(assetBundle);

        final BusinessProcessSuccessfulResult intakeResult = importedAssetBundle
                .getBusinessProcessByZipName("[ODF2+Demo]+Data+Intake+03-3-2021.zip")
                .run()
                .waitFor(DEFAULT_DURATION).untilFinished()
                .expectSuccessful();

        assertThat(intakeResult.getCompletedSubmissions()).isEqualTo(3);

        final BusinessProcessSuccessfulResult processingResult = importedAssetBundle
                .getBusinessProcessByZipName("[ODF2+Demo]+Data+Processing+03-3-2021.zip")
                .run()
                .waitFor(DEFAULT_DURATION).untilFinished()
                .expectSuccessful();

        assertThat(processingResult.getCompletedSubmissions()).isEqualTo(3);
    }
}
Bundle modifications to straight-through test Business Process execution
As it happens, the behavior of real-life Business Processes depends not only on input data but also on configuration through ETL steps and human input through Manual Tasks. It is impossible to fully automate a test case if a Business Process waits for human input.
For such cases, provide some options to modify a Business Process before uploading it to Control Tower. All modifications are done using the com.workfusion.spoke.bundle.AssetBundle.with() method.
Any modification does not change your original bundle file. Spoke creates a temporary copy of your Bundle and deletes it afterward.
Replace machine and manual steps
A typical way of dealing with manual or long-running machine tasks is to replace those with the so-called mocks–Bot Tasks that imitate the desired behavior to test other parts of the Business Process. Let's look at the step mocking example below:
final BusinessProcessResult result = controlTower
            .importAssetBundle(AssetBundle.fromFile("my-package.zip")                                 // 1. publishing bundle modified with...
                .with(MockStep.named("some manual task").fromString("bot task to run instead")))      //    mock step replacing an existing one
            .getBusinessProcessByZipName("my-bp.zip")                                                 // 2. running business process...
            .run(new InputData(new File("input.csv")))                                                      with input data
            .waitFor(Await.atMost(Duration.ofMinutes(5)))                                             // 3. waiting...
            .untilFinished();                                                                         //    for business process to finish execution
Here, instead of importBundle(), the businessProcess() method is used. It provides API modification. The with() method can be used several times to apply all the desired changes. In this case, the com.workfusion.spoke.mock.MockStep instance replaces some hypothetical step named "some manual task" with a bot step provided as a string.
If your Asset Bundle contains more than one Business Process, you should specify what BP needs to be mocked using the BP zip filename in the .withBusinessProcess(ZIP_NAME, MOCK1, ..., MOCKN) call:
        // given
        final AssetBundle assetBundle = AssetBundle.fromResource(getClass(), "/bp/two-in-one-bundle.zip")
                .withBusinessProcess("Business+Process+1.zip",
                        MockStep.named("xxx").botTaskBuilder().exportSingleColumn("first_bp_first_mt_result", "77"),
                .withBusinessProcess("Business+Process+2.zip",
                        MockStep.named("yyy").botTaskBuilder().exportSingleColumn("second_bp_first_mt_result", "99"),
                        MockStep.named("www").fromString("bot task to run instead"));

        // when
        final ImportedAssetBundle importedAssetBundle = controlTower
                .importAssetBundle(assetBundle);

        final BusinessProcessSuccessfulResult firstResult = importedAssetBundle
                .getBusinessProcessByZipName("Business+Process+1.zip")
                .run()
                .waitFor(DEFAULT_DURATION)
                .untilFinished()
                .expectSuccessful();

        final BusinessProcessSuccessfulResult secondResult = importedAssetBundle
                .getBusinessProcessByZipName("Business+Process+2.zip")
                .run()
                .waitFor(DEFAULT_DURATION)
                .untilFinished()
                .expectSuccessful();
        // then
        // ...
Explore the com.workfusion.spoke.mock.MockStep class and other com.workfusion.spoke.mock.Modification interface implementations to find useful methods to load Bot Task code from different locations, or build it using simple com.workfusion.spoke.mock.MockStep.BotTaskBuilder.
Configure ETL steps
Similar to the previous example, you can use the com.workfusion.spoke.mock.MockEtlStep class to change an ETL step in your Business Process the same way as it changes when you select its options through the Control Tower UI. The following example of mocking an ETL step is pretty self-explanatory:
final BusinessProcessResult result = controlTower
            .importAssetBundle(AssetBundle.fromFile("my-package.zip")            // 1. publishing bundle modified with...
                .with(MockEtlStep.named("Settings")                              //    mock ETL step with desired answers
                        .withAnswer("setting_a", "some option")
                        .withAnswer("setting_b", "some other option")))
            .getBusinessProcessByZipName("my-bp.zip")                            // 2. running business process...
            .run(new InputData(new File("input.csv")))                                 with input data
            .waitFor(Await.atMost(Duration.ofMinutes(5)))                        // 3. waiting...
            .untilFinished();                                                    //    for business process to finish execution
Mock ODF 2 tasks
Spoke works with ODF 2-based Business Processes out-of-the-box, without any additional arrangements. However, mocking ODF 2 tasks can be a bit difficult. To help, ODF 2 offers a Spoke extension you can add to your project as a Maven dependency.
<dependency>
    <groupId>com.workfusion.odf2</groupId>
    <artifactId>odf2-spoke</artifactId>
    <version>${odf2.version}</version>
    <scope>test</scope>
</dependency>
The procedure of replacing any step in a Business Process with the ODF 2 task is similar to standard mocking.
controlTower.importAssetBundle(AssetBundle.fromFile("my-package.zip")
    with(MockStep.named("step-name").fromString(
        MockOdfStep.withCodeFromResource("/MockBotTask.groovy")
        .withModules(com.some.package.RequiredModule.class)
        .build()); // mock ODF2 step replacing an existing one
In this example, a step named "step-name" is replaced with some string content. The string content is built with the help of the com.workfusion.odf2.spoke.MockOdfStep helper class. It creates a step XML from some file named /MockBotTask.groovy located in the test resource root: src/test/resources.
The file from which the mock step is generated must contain a task written using ODF 2. It can look like any production ODF 2 task, with a couple of notable differences.
- A mock ODF 2 task must be written in Groovy, not in Java. Therefore, the example shows it as a Groovy file. This is because the task code is put directly into the Bot Task XML
<script>part, which expects Groovy code. There are no ways to bypass this limitation. - The file with the mock task can contain additional classes to be used by the task class. The Groovy filename must be equal to the name of the task class run by ODF 2.
- The
@Requiredannotation on the task class isn't processed. To add modules to the ODF 2 context for mock tasks, you can use the.withModules()method of theMockOdfStepclass, as shown in the example.
Let's assume that /MockBotTask.groovy contains the following code:
class MockBotTask implements InputProviderTask<Invoice> {

    private final InvoiceRepository invoiceRepository;

    @Inject
    SomeTask(InvoiceRepository invoiceRepository) {
        this.invoiceRepository = invoiceRepository
    }

    @Override
    Collection<Invoice> queryInputEntities() {
        return [ new Invoice() ]
    }

    @Override
    void saveInputEntity(Invoice input) {
        invoiceRepository.create(input)
    }
}
The Bot Task XML generated by the example code looks as follows:
<?xml version="1.0" encoding="UTF-8"?>
<config xmlns="http://web-harvest.sourceforge.net/schema/1.0/config" scriptlang="groovy">

    <script><![CDATA[
        import com.workfusion.odf2.core.Odf

        class MockBotTask implements InputProviderTask<Invoice> {

            private final InvoiceRepository invoiceRepository;

            @Inject
            SomeTask(InvoiceRepository invoiceRepository) {
                this.invoiceRepository = invoiceRepository
            }

            @Override
            Collection<Invoice> queryInputEntities() {
                return [new Invoice()]
            }

            @Override
            void saveInputEntity(Invoice input) {
                invoiceRepository.create(input)
            }
        }


        def odf = Odf.builder().withBinding(binding).withModules(com.some.package.RequiredModule.class).build()

        result = odf.runTask(MockBotTask)

        rows = result.getRows()
        columns = result.getColumns()
        ]]></script>

    <case>
        <if condition="${result.isPresent()}">
            <export include-original-data="false">
                <multi-column list="${rows}" split-results="${rows.size() > 1}">
                    <loop item="columnName">
                        <list>
                            <script return="columns"/>
                        </list>
                        <body>
                            <put-to-column-getter name="${columnName}" property="${columnName}"/>
                        </body>
                    </loop>
                </multi-column>
            </export>
        </if>
    </case>
</config>
It is almost the same XML as the ODF 2 compiler generates for a task like this. Though, it includes the task code itself. You can write such an XML yourself, but MockOdfStep makes it easier.
Mock JNW step
The mock JNW step process is similar to mock Bot and Manual Tasks. From an XML perspective, a JNW step has the same structure as a Bot Task. Spoke provides an API to change JNW step parameters or replace any step. See the sample code with a modification of the JNW step:
final BusinessProcessResult result = controlTower
            .importAssetBundle(AssetBundle.fromFile("my-package.zip")
                .with(MockStep.named("some java native worker task")
                    .jnwTaskBuilder()
                    .worker("com.workfusion.spoke:jnw-step-mock-worker:1.0.0")
                    .processor("processor-name")
                    .configuration("config as a simple string")
                    .template("template-name.ftl")
                    .build()))      //    mock step update an existing one
            .getBusinessProcessByZipName("my-bp.zip")
            .run(new InputData(new File("input.csv")))
            .waitFor(Await.atMost(Duration.ofMinutes(5)))
            .untilFinished();
To change some parameters in the JNW configuration, do not configure all the parameters. Spoke will only update the parameters you set in the constructor, and the remaining parameters are taken from the original step. For example, if you need to update only the <configuration> value, the code looks like this:
final BusinessProcessResult result = controlTower
            .importAssetBundle(AssetBundle.fromFile("my-package.zip")
                .with(MockStep.named("some java native worker task")
                    .jnwTaskBuilder()
                    .configuration("config as a simple string")
                    .build()))      //    mock step update an existing one
            .getBusinessProcessByZipName("my-bp.zip")
            .run(new InputData(new File("input.csv")))
            .waitFor(Await.atMost(Duration.ofMinutes(5)))
            .untilFinished();
To replace a Bot or Manual Task with a JNW step, set the worker and processor parameters, as JNW cannot work without this data. The code looks like this:
final BusinessProcessResult result = controlTower
            .importAssetBundle(AssetBundle.fromFile("my-package.zip")
                .with(MockStep.named("some machine or manual task")
                    .jnwTaskBuilder()
                    .worker("com.workfusion.spoke:jnw-step-mock-worker:1.0.0")
                    .processor("processor-name")
                    .configuration("config as a simple string")
                    .build()))      //    mock step update an existing one
            .getBusinessProcessByZipName("my-bp.zip")
            .run(new InputData(new File("input.csv")))
            .waitFor(Await.atMost(Duration.ofMinutes(5)))
            .untilFinished();
Provide AI Agent settings
Given your Automation uses the AI Digital Worker configuration framework to run a Business Process with non-default settings, Spoke provides you this possibility through the ConfigurationPayload Asset Bundle modification:
        // given
        final AssetBundle assetBundle = AssetBundle
                .fromResource(getClass(), "/bp/Json_Config_Check+v.1.zip")
                .with(ConfigurationPayload.fromFile(new File("mocked_configuration_payload.json")));
ConfigurationPayload adds the configuration_payload.json file to the Asset Bundle root. configuration_payload.json contains AI Digital Worker configuration data.
The ConfigurationPayload modification may use different sources to create the configuration data:
.fromFile(FILE)reads the file content and uses it as JSON configuration data..fromString(STRING)uses the string provided as JSON configuration data..fromObject(OBJECT_TO_SERIALIZE_TO_JSON)serializes the object into a JSON form and uses the JSON as configuration data.
Modify configuration JSON on the fly
The ConfigurationPayload modification provides a way to modify a JSON payload that will be applied to the Asset Bundle.
The ConfigurationPayload.transformJson() method accepts a Consumer<DocumentContext> that will be called on the DocumentContext object wrapping a JSON payload. DocumentContext is a class from the JsonPath library.
You can use it to manipulate JSON with XPath-like expressions. Any changes to DocumentContext are serialized into JSON and passed to other defined transformations and eventually to the Asset Bundle.
You can also use the ConfigurationPayload.transformStringContent() method to manipulate the JSON context as a string.
        // given
        final AssetBundle assetBundle = AssetBundle
                .fromResource(getClass(), "/bp/Json_Config_Check+v.1.zip")
                .with(ConfigurationPayload
                    .fromFile(new File("mocked_configuration_payload.json"))
                    .transformJson(json -> json
                                .set("$.some.nested.key", "new value")
                                .set("$.key", json.read("$.some.nested.key")) // will read freshly set 'new value'
                    .transformStringContent(s -> s.replace("new value", "other new value"))
                ));
Make your test deployment create new variation
Since Work.AI allows AI Agents to be present in multiple variations, it can be convenient to dedicate some variations for automated testing so that the original variation can be used for demonstration, manual testing, or other purposes.
To use the Asset Bundle as a named AI Digital Worker variant, SPOKE provides the VariationName bundle modification:
        final AssetBundle assetBundle_variation = AssetBundle
                .fromResource(getClass(), "/bp/Json_Config_Check+v.1.zip")
                .with(ConfigurationPayload.fromFile(getResource("bp/configuration_payload_variant.json")))
                .with(VariationName.asUnique());
VariationName modification provides three methods to create a variation:
VariationName.as(NAME)sets the fixed variation name. It may be helpful if you need each test run to use the same AI Digital Worker variation. Subsequent test runs will rewrite this variation configuration without adding a new one.VariantionName.asUnique()sets a random UUID as the variation name.VariationName.asNewByTimestamp()sets the current timestamp as the variation name.
Both asUnique() and asNewByTimestamp() methods create a new variation name each time the test runs. Therefore, each time a new separate variation is imported. It is recommended to track test runs on Control Tower, keeping each test run unaffected by the subsequent one.
To import a named AI Digital Worker variant, use a dedicated Control Tower bundle import API ControlTower#importDeltaBundle(AssetBundle):
        final ImportedAssetBundle importedAssetBundle_variation = controlTower
                .importDeltaBundle(assetBundle_variation);
Trying to import a named AI Digital Worker variation with the controlTower.importAssetBundle(assetBundle_variant) call leads to your AI Digital Worker variation replacing the existing AI Digital Worker default configuration and ignoring the provided VariationName.
Assert results
After Business Process execution finishes with some result, assert its correctness according to your test case. You can do it using any available Java unit testing library; Spoke uses AssertJ and provides the AssertJ-compatible API for assertions on result objects.
First of all, com.workfusion.spoke.bp.BusinessProcessResult has the expectSuccessfull() and expectUnsuccessfull() methods that check validity of the corresponding expectations and return, respectively, instances of com.workfusion.spoke.bp.BusinessProcessSuccessfulResult and com.workfusion.spoke.bp.BusinessProcessUnsuccessfulResult. These classes can be used to access execution results and output data. You can access the output data as a file, a string or a com.workfusion.spoke.csv.CsvData instance. CsvData allows you to work with this data as a table (using the Table class from the Google Guava library). The com.workfusion.spoke.assertj.SpokeAssertions.assertThat() method is used to write fluent assertions on it.
For step expectations, use com.workfusion.spoke.bp.StepOutcome to access relevant data, including input data for a step. To assert it fluently, apply com.workfusion.spoke.assertj.SpokeAssertions.assertThat().
You can also convert BusinessProcessSuccessfulResult to a framework-specific result upon which your bundle is built. Both ODF and ODF 2 frameworks provide results that help to extract and assert respective framework-specific data.
Assert ODF results
Make sure the odf-spoke module from the ODF framework is added to your test module's pom.xml:
<dependency>
    <groupId>com.workfusion.odf</groupId>
    <artifactId>odf-spoke</artifactId>
    <scope>test</scope>
</dependency>
Then, you can convert BusinessProcessSuccessfulResult into com.workfusion.odf.spoke.OdfBusinessProcessSuccessfulResult by using the convertTo method. OdfBusinessProcessSuccessfulResult has access to all data provided by BusinessProcessSuccessfulResult and adds the following methods:
List<Transaction> getTransactions()returns all transactions created by the tested Business Process.List<Document> getDocuments()returns all documents created by the tested Business Process.
See a Spoke test example that uses OdfBusinessProcessSuccessfulResult below:
AssetBundle assetBundle = AssetBundle.fromFile("ODF_Based_Package.zip");

OdfBusinessProcessSuccessfulResult odfSpecificResult = controlTower.importAssetBundle(assetBundle)
        .getBusinessProcessByZipName("ODF_Based_BP.zip")
        .run()
        .waitFor(DEFAULT_DURATION)
        .untilFinished()
        .expectSuccessful()
        .convertTo(OdfBusinessProcessSuccessfulResult.class);

// asserting transactions created by the ODF_Based_BP.zip file
List<Transaction> transactions = odfSpecificResult.getTransactions();
assertThat(transactions).hasSize(5);

// asserting documents created by the ODF_Based_BP.zip file
List<Document> documents = odfSpecificResult.getDocuments();
assertThat(actualResult.getDocuments()).hasSize(10);
Assert ODF 2 results
Make sure the odf2-spoke module from the ODF 2 framework is added to your test module's pom.xml:
<dependency>
    <groupId>com.workfusion.odf2</groupId>
    <artifactId>odf2-spoke</artifactId>
    <scope>test</scope>
</dependency>
Then, you can convert BusinessProcessSuccessfulResult into com.workfusion.odf2.spoke.Odf2BusinessProcessSuccessfulResult by using the convertTo method. Odf2BusinessProcessSuccessfulResult has access to all data provided by BusinessProcessSuccessfulResult and adds the following methods:
Stream<Map<String, String>> getTransactionalOutput()returns the transactional output (transaction-related records only).Stream<Map<String, String>> getNonTransactionalOutput()returns the non-transactional output (non-transaction-related records only).Stream<String> getTransactionIds()returns all transaction IDs created by the tested Business Process.List<Transaction> getTransactions(AssetBundle assetBundle)returns all transaction objects created by the tested Business Process. The method acceptsAssetBundle assetBundlethat is a bundle ZIP file to define the transaction Data Store name as it states in the migration script.List<Transaction> getTransactions(String datastoreName)returns all transaction objects created by the tested Business Process. The method acceptsString datastoreNamethat is a transaction Data Store name from which the data should be extracted.
See a Spoke test example that uses Odf2BusinessProcessSuccessfulResult below:
AssetBundle assetBundle = AssetBundle.fromFile("ODF2_Based_Package.zip");

Odf2BusinessProcessSuccessfulResult odf2SpecificResult = controlTower.importAssetBundle(assetBundle)
        .getBusinessProcessByZipName("ODF2_Based_BP.zip")
        .run()
        .waitFor(DEFAULT_DURATION)
        .untilFinished()
        .expectSuccessful()
        .convertTo(Odf2BusinessProcessSuccessfulResult.class);

// asserting transactions created by the ODF2_Based_BP.zip file
List<Transaction> transactions = odf2SpecificResult.getTransactions(assetBundle);
assertThat(transactions).hasSize(5)
        .extracting(Transaction::getStatus)
        .containsOnly("COMPLETED");
Work with Data Stores
Spoke allows you to manipulate Data Stores state right from your test. It may be helpful when you prepare some test data on the Data Store level before a Business Process execution or, which is the most typical, assert a Data Store state after your Business Process completed the execution.
To start working with Data Stores from Spoke, obtain an instance of the com.workfusion.spoke.datastore.RemoteDatastore interface. After you create a ControlTower object, you can get RemoteDatastore using the getRemoteDatastore method:
ControlTower controlTower = ControlTower.createConfigured(fromFile(CONFIGURATION_FILE));
RemoteDatastore datastore = controlTower.getRemoteDatastore();
RemoteDatastore is built on top of and limited to the Control Tower's Data Store REST API. Make sure to get acquainted with the corresponding article.
RemoteDatastore provides the following methods:
List<Map<String, String>> select(String query, int maxRows)selects data from a Data Store according to the provided SQL query.String query: SQL select query to be executed. Mind that a Data Store name in your SQL query must start with theds_prefix.int maxRows: fetch row count limit.
The method returns requested Data Store rows in the form of
List<Map>where each list entry represents a single Data Store row. A row isMapwhere a key is a column name and a value is a respective row value.List<Map<String, String>> records = controlTower.getRemoteDatastore().select("SELECT column_name FROM ds_datastore_name;", 10);<T> List<T> select(String query, int maxRows, EntityMapper<T> entityMapper)selects data from a Data Store according to the provided SQL query and converts it into a Java object.String query: SQL select query to be executed. Mind that a Data Store name in your SQL query must start with theds_prefix.int maxRows: fetch row count limit.EntityMapper<T> entityMapper: mapper that converts raw data to a Java object of theTtype.
The method returns requested data in the form of a Java object according to the provided mapper.
List<UserEntity> entities = controlTower.getRemoteDatastore().select("SELECT uuid FROM ds_datastore_name;", 5, values -> {
    UserEntity entity = new UserEntity();
    entity.setUuid(UUID.fromString(values.get("uuid")));
    return entity;
});
boolean createOrUpdate(CreateOrUpdateRequest request)creates a new Data Store or updates it if the specified Data Store already exists.CreateOrUpdateRequest request: request to be executed.
The method returns
trueif the server responds with a successful status or throwsRemoteDatastoreExceptioncontaining corresponding errors.CreateOrUpdateRequest request = new CreateOrUpdateRequest("datastore_name")
.withColumn("column_text", ColumnType.TEXT)
.withColumn("column_int", ColumnType.INTEGER)
.withColumn("column_date", ColumnType.DATE)
.withColumn("column_time", ColumnType.TIMESTAMP);
boolean result = controlTower.getRemoteDatastore().createOrUpdate(request);long insert(InsertRequest request)inserts a new row into a Data Store.InsertRequest request: request to be executed.
The method returns the system ID of the newly created record.
InsertRequest request = new InsertRequest("datastore_name")
        .withRow("column_text", "text value")
        .withRow("column_int", 123)
        .withRow("column_date", new Date())
        .withRow("column_time", new Timestamp(new Date().getTime()));

long sysId = controlTower.getRemoteDatastore().insert(request);
boolean executeQuery(String query)executes a raw SQL query.String query: SQL query to be executed.
The method returns
trueif the server responds with a successful status or throwsRemoteDatastoreExceptioncontaining corresponding errors.boolean result = controlTower.getRemoteDatastore().executeQuery("DELETE FROM ds_datastore_name;");
Use Data Stores in ODF 2
When working with the ODF 2 framework, sometimes, it is hard to come up with the exact Data Store's name since it usually templates with an AI Digital Worker code and Data Model version, which is usually a subject of change. To handle this situation, the ODF 2 framework provides a utility class called com.workfusion.odf2.spoke.Odf2TableName. This class helps to define the exact runtime table name by the given entity. The class requires AssetBundle to be provided, from which it reads the meta-info.json file and receives the necessary settings associated with the Asset Bundle you work with.
AssetBundle assetBundle = AssetBundle.fromFile("ODF2_Based_Package.zip");

Odf2TableName tableName = new Odf2TableName(assetBundle);
String sqlQuery = String.format("SELECT * FROM %s;", tableName.get(ErrorEntity.class));

List<ErrorEntity> entities = controlTower.getRemoteDatastore().select(sqlQuery, 10, values -> {
    ErrorEntity entity = new ErrorEntity();
    entity.setUuid(UUID.fromString(values.get(OdfEntity.UUID_COLUMN)));
    return entity;
});
Retrieve and apply variation ID
If you need to populate transaction or other Data Store that has the variation_id column, get the required value from importedAssetBundle.getVariationId();:
    final ImportedAssetBundle importedAssetBundle = controlTower.importAssetBundle(
                AssetBundle.fromResource(getClass(), "/bp/spoke-core-40693-package-1.1.zip"));

    final Long variationId = importedAssetBundle.getVariationId();
You can use this ID to set up test data before running Business Processes from the imported bundle. For example, you can create transactions belonging to this variation:
controlTower.getRemoteDatastore().executeQuery(String.format("INSERT INTO ds_uc_spoke40693_transaction_v1_1 (status, variation_id) VALUES ('NEW', '%s')", variationId));
New AI Agent API
Since version 1.0.140, Spoke introduced the next iteration of importing API that supports working with variations.
DigitalWorkerVariation variation = controlTower.importDigitalWorker(assetBundle);
ControlTower.importDigitalWorker() works in the same way as ControlTower.importAssetBundle(). DigitalWorkerVariation abstraction returned by it has the same methods as ImportedAssetBundle and introduces several new ones.
DigitalWorkerVariation.getVariationId()returns ID of a given variation that can be used, for example, in database operations.DigitalWorkerVariation.copy()creates a copy of a given variation with the same configuration payload in Control Tower.DigitalWorkerVariation.copy(String newName)creates a copy of a given variation with a provided name and the same configuration payload in Control Tower. Mind that the name's length must not exceed 50 characters.DigitalWorkerVariation.copyWithConfiguration(Class<?> ownerClass, String payloadResourceName)creates a copy of a given variation with a different configuration payload.DigitalWorkerVariation.copyWithConfigurationAndName(Class<?> ownerClass, String payloadResourceName, String variationName)creates a copy of a given variation with a different configuration payload and a provided name. Mind that the name's length must not exceed 50 characters.DigitalWorkerVariation.rename(String newName)renames the current configuration. Mind that the name's length must not exceed 50 characters.DigitalWorkerVariation.updateConfiguration(String payloadContent)changes a configuration payload of a given variation.DigitalWorkerVariation.updateConfiguration(Class<?> ownerClass, String payloadResourceName)changes a configuration payload of a given variation.DigitalWorkerVariation.delete()deletes a given variation.
These new methods will work only if the uploaded bundle contains 'MULTI_CONFIGURATION':'true' in its meta-info.json.
Start using Spoke with existing project
Find the latest Spoke JARs in the ODF public Nexus: https://repository.workfusion.com/service/local/repositories/releases/content/com/workfusion/spoke/.
Spoke is a part of the Open Development Framework. We recommend generating a project from the latest ODF 10.1 archetype and looking at the <project-name>-e2e-tests module. It provides you with a ready-to-use example of integrating Spoke into your builds.
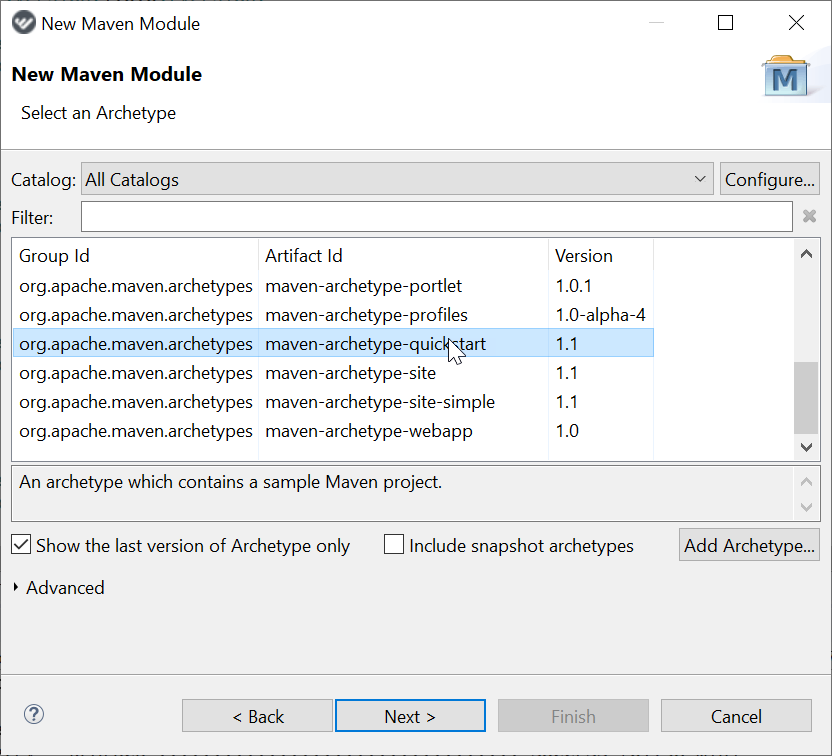
If you already have a Maven project for your Bundle, the best way to add Spoke tests is to create a separate Maven module.
Right-click the project in the navigator > New > Other > Maven > Maven Module > give it a name > click the Next button > select All Catalogs in Catalog > use the maven-archetype-quickstart archetype > Next > specify Group Id, Version and Package > click Finish.
If the root pom uses com.workfusion.odf:odf of the latest version as a parent, versions of all the required dependencies are already managed. If not, your test module can import ODF BOM into your pom.xml.
Import ODF BOM as follows:
<dependencyManagement>
    <dependencies>
        <dependency>
            <groupId>com.workfusion.odf</groupId>
            <artifactId>odf</artifactId>
            <version>10.1.whatever</version>
            <scope>import</scope>
            <type>pom</type>
        </dependency>
    </dependencies>
</dependencyManagement>
Declare your dependencies.
<dependencies>
    <dependency>
        <groupId>com.workfusion.spoke</groupId>
        <artifactId>spoke-api</artifactId>
        <version>...</version>
        <scope>test</scope>
    </dependency>
    <dependency>
        <!-- if you are using AssertJ -->
        <groupId>com.workfusion.spoke</groupId>
        <artifactId>spoke-assertj</artifactId>
        <version>...</version>
        <scope>test</scope>
    </dependency>
    <dependency>
        <!-- if you are using AssertJ -->
        <groupId>org.assertj</groupId>
        <artifactId>assertj-core</artifactId>
        <scope>test</scope>
    </dependency>
    <dependency>
        <!-- if you are using Junit 5 -->
        <groupId>org.junit.jupiter</groupId>
        <artifactId>junit-jupiter-api</artifactId>
        <scope>test</scope>
    </dependency>
    <dependency>
        <!-- if you are using Junit 5 -->
        <groupId>org.junit.jupiter</groupId>
        <artifactId>junit-jupiter-engine</artifactId>
        <scope>test</scope>
    </dependency>
    <dependency>
        <!-- if you are using Junit 5 -->
        <groupId>org.junit.jupiter</groupId>
        <artifactId>junit-jupiter-params</artifactId>
        <scope>test</scope>
    </dependency>
</dependencies>
To ensure that the test module is built after the Bundle, it should depend on the module that is responsible for assembly. Add this into the test module pom:
<dependency>
    <groupId>your.group.id</groupId>
    <artifactId>your-package</artifactId>
    <version>your.version</version>
    <type>pom</type> <!-- if assembly module declares it's packaging as 'pom' -->
</dependency>
Place test classes into the
src/test/javadirectory as usual. In your tests, specify your Bundle by the path relative to the root of the test module, for example:controlTower(new File("../your-package/target/your-package-0.1-SNAPSHOT.zip"))
Configured like this, your tests will always run during the Maven build.
Full test examples
Test with mocks of Manual and Bot Tasks
Expand to view the example
package com.workfusion.spoke.sandbox.quickstart;

import java.io.File;
import java.io.IOException;
import java.net.URL;
import java.time.Duration;

import org.apache.commons.lang3.StringUtils;
import org.junit.jupiter.api.DisplayName;
import org.junit.jupiter.api.Test;

import com.workfusion.spoke.Await;
import com.workfusion.spoke.ControlTower;
import com.workfusion.spoke.assertj.SpokeAssertions;
import com.workfusion.spoke.bp.BusinessProcessResult;
import com.workfusion.spoke.bp.BusinessProcessRun;
import com.workfusion.spoke.bp.Conditions;
import com.workfusion.spoke.bp.StepOutcome;
import com.workfusion.spoke.csv.CsvData;
import com.workfusion.spoke.mock.MockEtlStep;
import com.workfusion.spoke.mock.MockStep;

import static org.assertj.core.api.Assertions.assertThat;

import static com.workfusion.spoke.configuration.Configuration.fromFile;

public class UsageExamplesTest {

    /**
     * Change this variable to point to configuration file on your machine
     * <p>
     * Content of this file should be like following:
     * <p>
     * apiRoot=https://[your-wf-server]/workfusion/api
     * authenticationEndpoint=https://[your-wf-server]/workfusion/api/dologin
     * username=[your username]
     * password=[your password]
     */
    private static final String CONFIGURATION_FILE = "your/path/to/spoke.properties";

    @Test
    @DisplayName("should run business process with mock manual step")
    void shouldRunBpWithMockManualStep() throws IOException {
        // given
        final ControlTower controlTower = ControlTower.createConfigured(fromFile(CONFIGURATION_FILE));

        final BusinessProcessRun run = controlTower
                .businessProcess(getResource("/simple-package-with-mt-0.0.113-3.zip"))
                .with(MockStep.named("double-input-string")
                        .botTaskBuilder()
                        .script("output = \"${input}${input}\"")
                        .exportSingleColumn("double_input_string", "${output}"))
                .publish()
                .run();

        try {

            // when
            final BusinessProcessResult result = run
                    .waitFor(Await.atMost(Duration.ofMinutes(5)).checkingEvery(Duration.ofSeconds(10)))
                    .untilFinished();

            // then
            assertThat(result.isSuccessful()).isTrue();

            final CsvData output = result.getOutputDataAsCSV();

            SpokeAssertions.assertThat(output)
                    .isNotEmpty()
                    .containsColumns("input", "double_input_string")
                    .allRowsSatisfy(row -> assertThat(row.get("double_input_string")).isEqualTo(row.get("input") + row.get("input")));

        } finally {
            run.stop();
        }
    }

    @Test
    @DisplayName("should run business process with mock manual and machine steps")
    void shouldRunBpWithMockManualAndMachineSteps() throws IOException {
        // given
        final ControlTower controlTower = ControlTower.createConfigured(fromFile(CONFIGURATION_FILE));

        final BusinessProcessRun run = controlTower
                .businessProcess(getResource("/simple-package-with-mt-0.0.113-3.zip"))
                .with(MockStep.named("first bot task")
                        .botTaskBuilder()
                        .script("inputList = [[input:'x'], [input:'y'], [input:'z']]")
                        .excludeOriginalData()
                        .export("<multi-column list=\"${inputList}\" split-results=\"true\">\n" +
                                "<put-to-column-getter name=\"input\" property=\"input\"></put-to-column-getter>\n" +
                                "</multi-column>"))
                .with(MockStep.named("double-input-string")
                        .botTaskBuilder()
                        .script("output = \"${input}${input}\"")
                        .exportSingleColumn("double_input_string", "${output}"))
                .publish()
                .run();

        try {

            // when
            final BusinessProcessResult result = run
                    .waitFor(Await.atMost(Duration.ofMinutes(5)).checkingEvery(Duration.ofSeconds(10)))
                    .untilFinished();

            // then
            assertThat(result.isSuccessful()).isTrue();

            final CsvData resultData = result.getOutputDataAsCSV();

            SpokeAssertions.assertThat(resultData)
                    .isNotEmpty()
                    .containsColumns("input", "double_input_string")
                    .hasSize(3)
                    .containsRowValue("input", "x")
                    .containsRowValue("input", "y")
                    .containsRowValue("input", "z")
                    .allRowsSatisfy(row -> assertThat(row.get("double_input_string")).isEqualTo(row.get("input") + row.get("input")));

        } finally {
            run.stop();
        }
    }

    @Test
    @DisplayName("should wait until manual task receives expected number of records")
    void shouldWaitForManualTask() {
        // given
        final ControlTower controlTower = ControlTower.createConfigured(fromFile(CONFIGURATION_FILE));

        final BusinessProcessRun run = controlTower
                .businessProcess(getResource("/simple-package-with-mt-0.0.113-3.zip"))
                .publish()
                .run();

        try {

            // when
            final StepOutcome result = run
                    .waitFor(Await.atMost(Duration.ofMinutes(5)).checkingEvery(Duration.ofSeconds(10)))
                    .untilStep("double-input-string").hasPendingSubmissions(Conditions.atLeast(3));

            // then
            SpokeAssertions.assertThat(result)
                    .isSuccessful()
                    .inputDataCsv()
                    .isNotEmpty()
                    .containsColumnsExactly("input")
                    .hasSize(3)
                    .containsRowValue("input", "a")
                    .containsRowValue("input", "b")
                    .containsRowValue("input", "c");

        } finally {
            run.stop();
        }
    }

    @Test
    @DisplayName("should run business process with mock ETL step")
    void shouldRunBpWithMockEtlStep() throws IOException {
        // given
        final ControlTower controlTower = ControlTower.createConfigured(fromFile(CONFIGURATION_FILE));

        final BusinessProcessRun run = controlTower
                .businessProcess(getResource("/test-bp-with-etl.zip"))
                .with(MockEtlStep.named("Provider settings")
                        .withAnswer("selected_service", "GOOGLE NEWS")
                        .withAnswer("selected_parser", "DIFFBOT"))
                .publish()
                .run();

        try {

            // when
            final BusinessProcessResult result = run
                    .waitFor(Await.atMost(Duration.ofMinutes(5)))
                    .untilFinished();

            //then
            assertThat(result.isSuccessful()).isTrue();

            final CsvData resultData = result.getOutputDataAsCSV();

            SpokeAssertions.assertThat(resultData)
                    .isNotEmpty()
                    .containsColumns("service", "parser")
                    .hasSize(1)
                    .containsRowValue("service", "GOOGLE NEWS was selected")
                    .containsRowValue("parser", "DIFFBOT was selected");

        } finally {
            run.stop();
        }
    }

    private File getResource(String path) {
        final URL resource = getClass().getResource(path);
        assertThat(resource).isNotNull();
        return new File(resource.getFile());
    }

}
Negative News AI Agent test scenario
Expand to view the example
package com.workfusion.spoke.sandbox.nn;

import java.io.File;
import java.time.Duration;

import org.assertj.core.api.Assertions;
import org.junit.jupiter.api.Disabled;
import org.junit.jupiter.api.DisplayName;
import org.junit.jupiter.api.Test;

import com.workfusion.spoke.Await;
import com.workfusion.spoke.ControlTower;
import com.workfusion.spoke.InputData;
import com.workfusion.spoke.bp.BusinessProcessResult;
import com.workfusion.spoke.bp.BusinessProcessRun;
import com.workfusion.spoke.bp.Conditions;
import com.workfusion.spoke.bp.StepOutcome;
import com.workfusion.spoke.mock.MockEtlStep;
import com.workfusion.spoke.mock.MockStep;

import static com.workfusion.spoke.assertj.SpokeAssertions.assertThat;
import static com.workfusion.spoke.configuration.Configuration.fromFile;

public class NegativeNewsTest {

    /**
     * Change this variable to point to configuration file on your machine
     * <p>
     * Content of this file should be like following:
     * <p>
     * apiRoot=https://[your-wf-server]/workfusion/api
     * authenticationEndpoint=https://[your-wf-server]/workfusion/api/dologin
     * username=[your username]
     * password=[your password]
     */
    private static final String CONFIGURATION_FILE = "your/path/to/spoke.properties";

    /**
     * Change this variable to point to models bundle on your machine
     */
    private static final String MODELS_BUNDLE = "your/path/to/negativenews-package-10.1.8-models.zip";

    /**
     * Change this variable to point to AI Digital Worker bundle on your machine
     */
    private static final String USE_CASE_BUNDLE = "your/path/to/negativenews-package-10.1.zip";

    @Test
    @DisplayName("should upload models")
    @Disabled("Run this test if you need to deploy models to your instance. It should not be done every time.")
    void shouldUploadMlPackage() {
        ControlTower.createConfigured(fromFile(CONFIGURATION_FILE))
                .businessProcess(new File(MODELS_BUNDLE))
                .publish();

        // This test will fail at the end, because Spoke would not be able to receive business process UUID. Don't worry about that.
    }

    @Test
    @DisplayName("should search for news and receive found items on manual task")
    void shouldSearchForNewsAndReceiveFoundItemsOnManualTask() {
        // given
        final int articlesToSearch = 1;

        final BusinessProcessRun runningProcess = ControlTower.createConfigured(fromFile(CONFIGURATION_FILE))
                .businessProcess(new File(USE_CASE_BUNDLE))
                .with(MockEtlStep.named("Select Negative News Provider")
                        .withAnswer("selected_service", "GOOGLE NEWS")
                        .withAnswer("selected_parser", "MERCURY"))
                .with(MockEtlStep.named("Google Search Settings")
                        .withAnswer("google_date_from", "")
                        .withAnswer("google_date_to", "")
                        .withAnswer("google_articles", String.valueOf(articlesToSearch))
                        .withAnswer("google_domain", ".com")
                        .withAnswer("google_keywords", "FRAUD, MONEY LAUNDERING, LAUNDERING"))
                .publish()
                .run(InputData.of("search_request", "Banco Santander INDUSTRIAL AND PROVIDENT SOCIETY"));

        try {
            // when
            final StepOutcome outcome = runningProcess
                    .waitFor(Await.atMost(Duration.ofMinutes(15)))
                    .untilStep("Negative News Review").hasPendingSubmissions(Conditions.exactly(articlesToSearch));

            //then
            assertThat(outcome).isSuccessful();

        } finally {
            runningProcess.stop();
        }
    }

    @Test
    @DisplayName("should generate report for found news")
    void shouldGenerateReportForFoundNews() {
        // given
        final String articleToFind = "https://www.cnbc.com/2019/10/14/cum-ex-german-tax-case-could-ripple-through-the-finance-industry.html";


        final BusinessProcessRun runningProcess = ControlTower.createConfigured(fromFile(CONFIGURATION_FILE))
                .businessProcess(new File(USE_CASE_BUNDLE))
                .with(MockEtlStep.named("Select Negative News Provider")
                        .withAnswer("selected_service", "GOOGLE NEWS")
                        .withAnswer("selected_parser", "MERCURY"))
                .with(MockStep.named("Negative news input v10.1 (Search news articles in Google News)")
                        .botTaskBuilder()
                        .script("import com.workfusion.gorilla.negativenews.app.InputAmlApp;\n" +
                                "import com.workfusion.gorilla.negativenews.google.GoogleNewsSearchIntakeProcessor;\n" +
                                "InputAmlApp aml = new InputAmlApp(binding, ['googleLink': '" + articleToFind + " ']);\n" +
                                "def transaction = aml.processTransaction(GoogleNewsSearchIntakeProcessor.class, _sys_transaction_id.toString())")
                        .exportSingleColumn("google_articles", "1"))
                .with(MockStep.named("Negative News Review").botTaskBuilder())
                .publish()
                .run(InputData.of("search_request", "Banco Santander INDUSTRIAL AND PROVIDENT SOCIETY"));

        try {
            // when
            final BusinessProcessResult result = runningProcess
                    .waitFor(Await.atMost(Duration.ofMinutes(15)))
                    .untilFinished();

            //then
            Assertions.assertThat(result.isSuccessful()).isTrue();

        } finally {
            runningProcess.stop();
        }
    }

}
Test with mocks of JNW step
Expand to view the example
package com.workfusion.spoke.sandbox.quickstart;

import java.time.Duration;

import org.junit.jupiter.api.DisplayName;

import com.workfusion.spoke.Await;
import com.workfusion.spoke.ControlTower;
import com.workfusion.spoke.assertj.SpokeAssertions;
import com.workfusion.spoke.bp.BusinessProcessSuccessfulResult;
import com.workfusion.spoke.bundle.AssetBundle;
import com.workfusion.spoke.configuration.Configuration;
import com.workfusion.spoke.dw.DigitalWorkerVariation;
import com.workfusion.spoke.junit.delay.Delay;
import com.workfusion.spoke.junit.mdc.TestNameToMDC;
import com.workfusion.spoke.junit.retry.RetryTest;
import com.workfusion.spoke.junit.stagger.StaggerClass;
import com.workfusion.spoke.mock.MockStep;

public class MockJnwStepIT {

    private static final Await DEFAULT_DURATION = Await.atMost(Duration.ofMinutes(5)).checkingEvery(Duration.ofSeconds(15));

    private static final ControlTower controlTower = Configuration.fromFileInUserHome("spoke-it.properties");

    @DisplayName("should mock and run three bp with mock JNW step")
    void shouldMockAndRunThreeBpWithMockJnwStep() {
        // given
        final AssetBundle assetBundle = AssetBundle.fromResource(getClass(), "/bp/jnw-step-mock-package-1.0.0.zip")
                .withBusinessProcess("first+bp.zip",
                        MockStep.named("jnw-step-mock-worker v1.0.0 (config-printer)")
                                .jnwTaskBuilder()
                                .configuration("mock content"))
                .withBusinessProcess("second+bp.zip",
                        MockStep.named("jnw-step-mock-worker v1.0.0 (config-printer-with-default-config)")
                                .jnwTaskBuilder()
                                .configuration("mock content instead of default")
                                .template("test-template.ftl"))
                .withBusinessProcess("third+bp.zip",
                        MockStep.named("Manual for mock")
                                .jnwTaskBuilder()
                                .worker("com.workfusion.spoke:jnw-step-mock-worker:1.0.0")
                                .processor("data-generator")
                                .configuration("content from configuration"));

        // when
        final DigitalWorkerVariation importedAssetBundle = controlTower
                .importDigitalWorker(assetBundle);

        final BusinessProcessSuccessfulResult firstResult = importedAssetBundle
                .getBusinessProcessByZipName("first+bp.zip")
                .run()
                .waitFor(DEFAULT_DURATION)
                .untilFinished()
                .expectSuccessful();

        final BusinessProcessSuccessfulResult secondResult = importedAssetBundle
                .getBusinessProcessByZipName("second+bp.zip")
                .run()
                .waitFor(DEFAULT_DURATION)
                .untilFinished()
                .expectSuccessful();

        final BusinessProcessSuccessfulResult thirdResult = importedAssetBundle
                .getBusinessProcessByZipName("third+bp.zip")
                .run()
                .waitFor(DEFAULT_DURATION)
                .untilFinished()
                .expectSuccessful();

        //then
        SpokeAssertions.assertThat(firstResult.getOutputDataAsCSV())
                .containsColumns("config")
                .hasSize(1)
                .containsRowValue("config", "mock content");

        SpokeAssertions.assertThat(secondResult.getOutputDataAsCSV())
                .containsColumns("config")
                .hasSize(1)
                .containsRowValue("config", "mock content instead of default");

        SpokeAssertions.assertThat(thirdResult.getOutputDataAsCSV())
                .containsColumns("config")
                .hasSize(1)
                .containsRowValue("config", "content from configuration");
    }
}