Manage Data Model with Liquibase
With ODF 2, we encourage you to use Data Stores as a universal and effective way to have different steps of Business Processes within your AI Agent exchange data. The section provides a reference on how to organize your Data Model through AI Agent automation.
Pre-ODF 2 approaches
The approaches that worked before ODF 2 are applicable as well, with all their pros and cons.
Package CSV files in package modules
The approach assumes that the package module of your ODF project contains CSV files, each representing a Data Store in the src/main/resources/datastore folder. For more information, refer to Package assets into an Asset Bundle for deployment.
CSV files are modified as your Data Store's field schema changes, and the corresponding changes apply to the environment. The technique is inherited from ODF, but in ODF 2, it is used in specific cases only. We don't recommend using it except for the simplest projects. If you still choose to use the CSV approach, mind the following limitations:
- You cannot specify a data type for a Data Store column.
- You cannot maintain constraints and indexes on the Data Store columns.
- You cannot create a Data Store without records.
- If you have multiple Data Stores and want to alter a column in one of them, all your Data Stores will contain the data specified in the corresponding CSV file only after deploying the project's Asset Bundle.
Before ODF 2, you always had your Data Store data reset after any Asset Bundle import. Due to the Asset Bundle import strategy, you have an option to leave the data in Data Stores if they exist in the environment.
Create Business Process to add Data Stores in target environment
The Data Stores API enables you to create and alter Data Stores in the context of a Bot Task that allows creating a specific Business Process only for that purpose. You can put this Business Process to your package module as described in Package assets into an Asset Bundle for deployment and run once you deploy the AI Agent to a new environment. This approach is more advanced than the previous one but also has its limitations. We don't recommend using it unless you are migrating an old project to ODF 2. Keep in mind the following potential issues:
- As Data Store names are now stored in a custom Bot Task code, you cannot use the out-of-the-box versioning functionality and have to maintain this Business Process yourself.
- After running a BP in the development environment, to alter the Data Store, manually delete all the Data Stores created by the BP, update a Bot Task in it, and re-run it, or write additional logic that doesn't try to create a Data Store if it already exists.
- Provide the instruction describing preparatory steps needed to run your AI Agent.
- You can create constraints and indexes using the raw
/executemethod that requires you to write a complete SQL statement and wrap it into URL encoding.
ODF 2 approach: use Liquibase migrations
For Data Model management in ODF 2 projects, we provide an integrated migrations mechanism based on Liquibase.
Migrations are defined in the -package module. Each time the AI Agent bundle is deployed to the platform environment, Import API launches Liquibase migrations mechanism so new to this environment changes are applied.
Perform initial migration from archetype
If you start a new project, it already has the datastore/migrations folder containing a set of migrations that create tables. For more information, refer to Standard Extendable Data Model. Depending on the archetype, it contains either all tables or a subset of them.
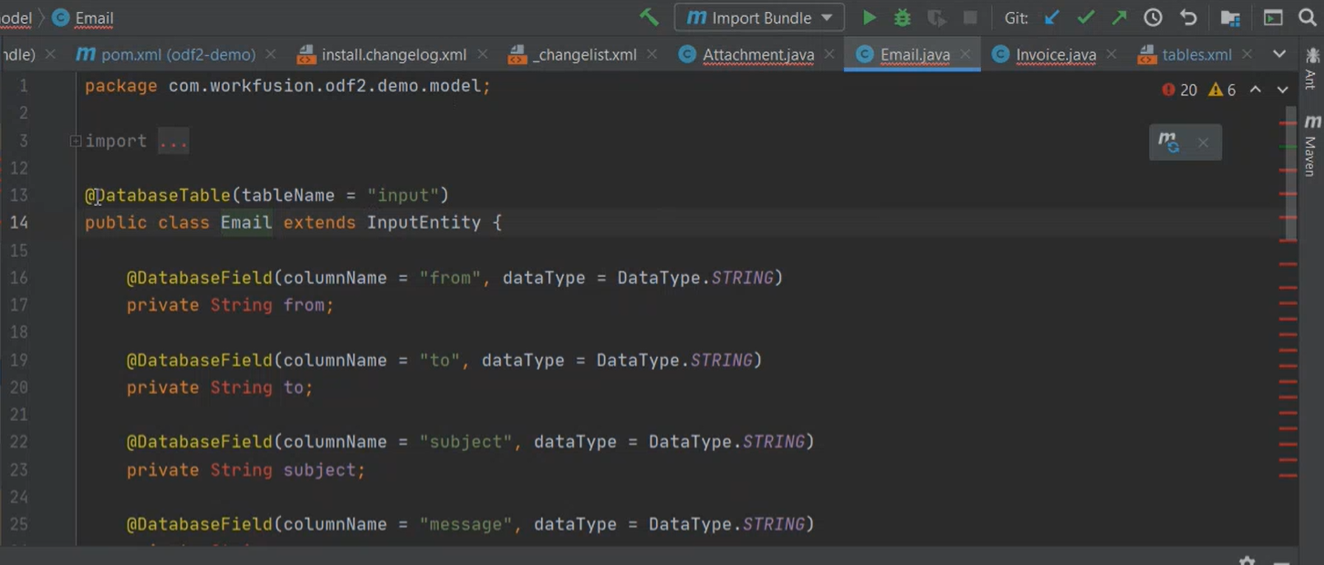
You can use standard tables. This approach assumes that you define some entity in your project Java code, for example, Email.
Mind the naming conventions for your table, for example:
- XML
- YAML
<createTable tableName="uc_odf2_demo_input_v1_0">
- createTable:
    tableName: uc_odf2_demo_input_v1_0
where:
ucis a prefix meaning that this is an AI Agent table.odf2_demois the AI Agent code.inputis the entity name.v1_0is the Data Model version. When you start a project, the version is 1, you can modify it independently from the AI Agent version in your project.
By default, you can access this table from your Java code using the @DatabaseTable (tableName = "input") ORMlite annotation for ODF 2 to figure out the mapping to the exact table.
You can specify migrations in XML and YAML files as they are supported in Liquibase. The current version of bundle-versions-maven-plugin has a problem with processing of changeset preconditions, so it is recommended to specify changesets with preconditions in XML migrations files.
Extend Data Model
Initially provided migrations will likely not cover your AI Agent specifics so you can extend your Data Model.
Creating new Data Model version
Refer to the Data Model versioning article.
Making changes to existing Data Model version
Technically, you can make changes to any column, index, or table provided by you or included in migrations initially. Practically we recommend not affecting the fields provided initially, as in that case, you may lose a possibility of an automated analytics capture.
For example, if your Input means an email, you may want to add some email-specific fields. In the Java code, use the @DatabaseField ORMlite annotation for that.
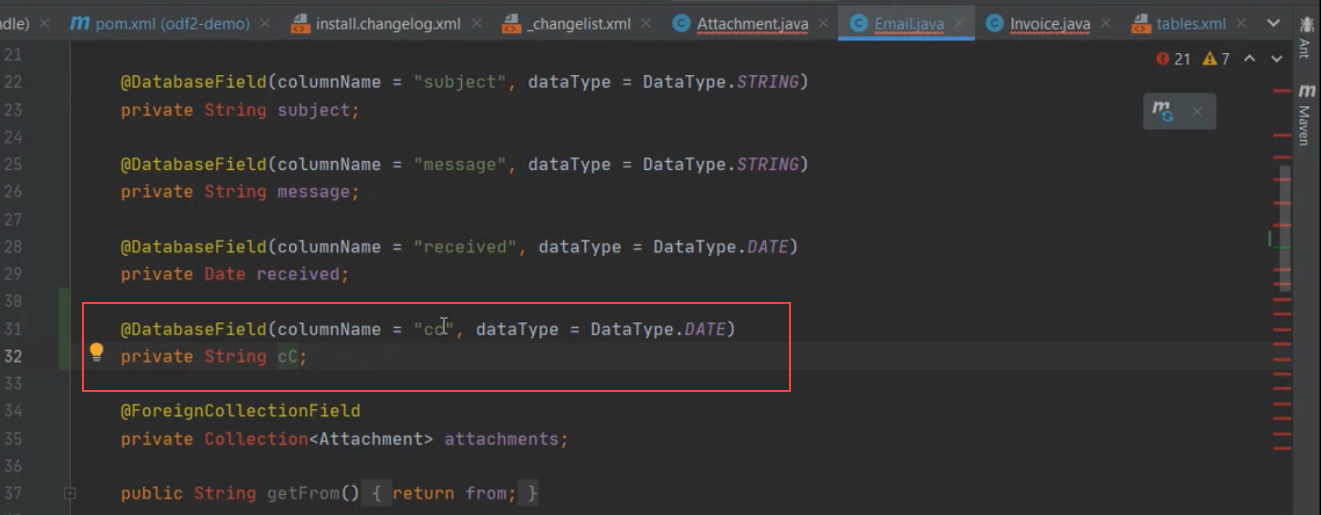
To create a corresponding column in the uc_odf2_demo_input_v1_0 Data Store, there are two practical options:
- create a new changeset that represents the delta between the current and required states of things
- modify the existing changeset so that it creates a Data Store in the required state on a fresh database
Both approaches have their pros and cons. We recommend creating a new changeset on each change you commit to the version control system. This enables other developers working on the same project to successfully install your migrations on top of their database since it contains the revision previous to your changes. However, following this best practice assumes that you invest in testing scenarios that migrations fail to apply and, potentially, writing the <rollback> sections to your changesets.
Mind that the default Liquibase behavior assumes that only the failed changeset is automatically rolled back. Still, all previous ones will be committed to the database, potentially leaving it in an inconsistent state. To exploit the fact that Liquibase can roll back the failed changeset, sometimes a shortcut is possible: instead of creating a new changeset, modify the existing one. This changeset fails to apply on top of the existing Data Model. Thus, ensure that the Data Model is erased in all target environments where you deployed the AI Agent with the previous changeset state. The one who modifies the changeset should control this.
When you create and map an entity using the ORMLite framework, mind that columns of the Data Stores created in Control Tower can have one of the four data types. To learn more about this limitation, refer to Data Stores with ORMLite.
See how to add the Cc field to be used in the Input entity as an example.
Go to the
datastore/migrationsfolder, right-click theversionedsub-folder (if versioned data structures are required), and select New > File.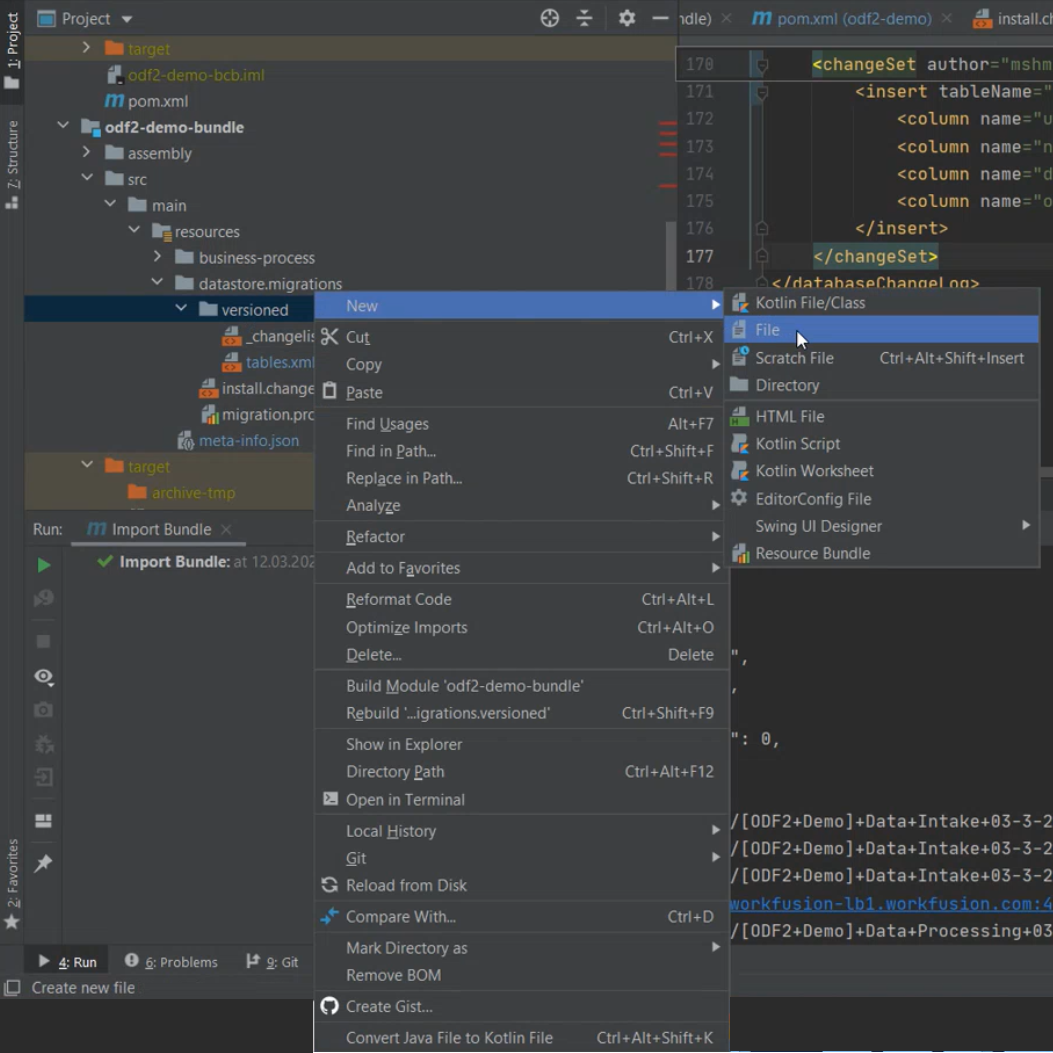
Specify a name for your new changelog file, for example,
my-new-changelog, and associate it with the XML or YAML type.Add a new changeset.
- Create a unique identifier in the
idattribute. - Specify the table name you're making changes to.
- Add the
addColumnchange type with the needed attributes to your changeset.
- XML
- YAML
<?xml version="1.1" encoding="UTF-8"?>
    <databaseChangelog xmlns="http://wwww.liquibase.org/xml/ns/dbchangelog"
                        xmlns:xsi="http://www.w3.org/2001/XMLSchema-instance"
                        xsi:schemaLocation="http://www.liquibase.org/xml/ns/dbchangelog http://www.liquibase.org/xml/ns/dbchangelog/dbchangelog-3.6.xsd">

        <changeSet author="user1@company.com" id="odf2_demo_0009_v1_0">
            <addColumn tableName="uc_odf2demo_document_v1_0" >
                <column name="address" type="NVARCHAR(256)">
                   <constraints nullable="false" unique="true"/>
                </column>
            </addColumn>
        </changeSet>

</databaseChangeLog>databaseChangeLog:
- changeSet:
id: odf2_demo_0009_v1_0
author: user1@company.com
objectQuotingStrategy: LEGACY
changes:
- addColumn:
tableName: uc_odf2demo_document_v1_0
columns:
- column:
name: cc
type: NVARCHAR(36)
constraints:
unique: true
nullable: false- Create a unique identifier in the
When you create a new file, specify it in the relevant changelist. Go to
_changelist.xmlorinstall.changelog.xmland add the data about your new file.- XML
- YAML
<?xml version="1.1" encoding="UTF-8"?>
<databaseChangelog xmlns="http://wwww.liquibase.org/xml/ns/dbchangelog"
                    xmlns:xsi="http://www.w3.org/2001/XMLSchema-instance"
                    xsi:schemaLocation="http://www.liquibase.org/xml/ns/dbchangelog http://www.liquibase.org/xml/ns/dbchangelog/dbchangelog-3.6.xsd">

    <include relativeToChangelogFile="true" file="versioned/Standard-Tables.xml"/>
    <include relativeToChangelogFile="true" file="versioned/my-new-changelog.xml"/>

</databaseChangelog>
<?xml version="1.1" encoding="UTF-8"?>
<databaseChangelog xmlns="http://wwww.liquibase.org/xml/ns/dbchangelog"
xmlns:xsi="http://www.w3.org/2001/XMLSchema-instance"
xsi:schemaLocation="http://www.liquibase.org/xml/ns/dbchangelog http://www.liquibase.org/xml/ns/dbchangelog/dbchangelog-3.6.xsd">
<include relativeToChangelogFile="true" file="versioned/initial-tables.yaml"/>
<include relativeToChangelogFile="true" file="versioned/my-new-changelog.yaml"/>
</databaseChangelog>
Updating identifiers of changesets
When you write a new changeset, you require the id attribute. Mind the following requirements:
- Identifiers shouldn't overlap with changeset identifiers in other AI Agents and other AI Agent versions.
- Identifiers must be unique for the current project, for example:
- XML
- YAML
<changeSet author="wfuser@workfusion.com" id="odf2demo_0002_v1_0">
- changeSet:
    id: wfuser@workfusion.com
    author: odf2demo_0002_v1_0
where:
odf2demois the AI Agent code.0002is the name unique within the project.v1_0is the Data Model version.
We recommend sticking to the convention above to automatically update changeset identifiers when increasing a new AI Agent version.
Using allowed statements
Liquibase is a universal and powerful tool to manage the Data Model management lifecycle. Its Community version allows making lots of various changes to the database. However, in Work.AI, it is intentionally reduced to apply to Data Stores only.
- All the tables you are working with are tables that power Data Stores. You don't have access to any system tables.
- You cannot operate with any objects but tables, columns, constraints, and indexes and use the
loadDatachangeset to simplify the data insert. Mind that you cannot maintain primary keys as the platform maintains them - You cannot write a raw SQL using the
sqlorsqlFilechange. - You cannot operate with system columns of Data Stores that are not shown in the data grid in Control Tower.
Add new business entity
To create a business entity, the general workflow is as follows.
- Create a project from the archetype.
- Create a new file.
- Create a changeset.
- To define a table, add a
createTablestatement in the changeset and write it according to the Liquibase rules. - Using OrmLite, define the classes associated with this table in your code.
- Embed the classes into the code of Bot Tasks and then the Bot Tasks—into Business Processes.
- Check your results in some environment.
Migrate to Liquibase migrations from other techniques
A migration to Liquibase migrations depends on the techniques you've used before.
Migrating from CSV files
If you have CSV files, you need to fully understand all the Data Stores that you need—whether they are limited to CSV files that you have in your package module or not. By default, they are limited to CSV files in your package module, but not necessarily, when, for example, you have a typical transaction table as in ODF or any global variables.
Don't transfer any global Data Stores shared across several AI Agents to migrations.
When you have decided on a set of tables you transfer to migrations, perform the following steps.
Create a specific structure within the
datastore/migrationsfolder. For more details, refer to Package assets into an Asset Bundle for deployment.├── datastore.migrations
│ ├── versioned
│ │ └── _changelist.xml
│ │ └── Standard_Tables.xml
│ │ └── Other_Table1.xml
│ │ └── Other_Table2.yaml
│ ├── install.changelog.xml
│ └── migrations.propertiesAdd the AI Agent code and Data Model version to the
idattribute.In the file that contains your tables (in this case,
Other_Table1.xmlorOther_Table2.yaml), write thecreateTablestatements for each table.- Take the table names from the filename with the relevant version.
- Specify all the columns and the default data type. Take the column names from the Data Store columns.
- XML
- YAML
<changeSet author="user1@company.com" id="odf2_demo_0001_v1_0">
    <createTable tableName="uc_odf2demo_transaction_v1_0">
        <column name="uuid" type="NVARCHAR(256)">
            <constraints nullable="false" unique="true" />
        </column>
        <column name="parent_transaction_uuid" type="NVARCHAR(36)" />
        <column name="start_time" type="datetime2" />
        <column name="end_time" type="datetime2" />
        <column name="status" type="NVARCHAR(36)" />
        <column name="bp_uuid" type="NVARCHAR(36)" />
        <column name="is_stp" type="int" />
    </createTable>
</changeSet>databaseChangeLog:
- changeSet:
id: odf2_demo_0009_v1_0
author: user1@company.com
changes:
- createTable:
tableName: uc_odf2demo_transaction_v1_0
columns:
- column:
name: uuid
type: VARCHAR(36)
defaultValueComputed: NEWID()
constraints:
unique: true
nullable: false
- column:
name: parent_transaction_uuid
type: VARCHAR(36)
- column:
name: start_time
type: DATETIME2
- column:
name: end_time
type: DATETIME2
- column:
name: status
type: VARCHAR(36)
- column:
name: bp_uuid
type: VARCHAR(36)
- column:
name: is_stp
type: VARCHAR(36)If there is data in your CSV file, write the
insertstatements used to insert data to the table, where the column names are also taken from the columns of the Data Store columns:- XML
- YAML
<changeSet author="user1@company.com" id="odf2demo_0011_v1_0">
    <insert tableName="uc_odf2demo_stage_v1_0">
        <column name="uuid" value="0001" />
        <column name="name" value="markAsRead" />
        <column name="description" value="marking email as read" />
        <column name="order" value="1" />
    </insert>
</changeSet>databaseChangeLog:
- changeSet:
id: odf2_demo_0009_v1_0
author: user1@company.com
- insert:
columns:
- column:
name: uuid
value: 0001
- column:
name: name
value: markAsReadCheck that everything works fine. Then, you can use the benefits of having migrations enabling you to change data types, add indexes, add constraints.
Migrating from Business Processes that create Data Stores
The main advantage of this migration approach is more accessible versioning.
If you have a Business Process that creates Data Stores, there are some bot steps for this Business Process in the project. Go to the Bot Task with the code that calls the datastore plugin or Data Store API. The code below contains the datastore plugin:
<create-datastore name="${fullDsName}">
    <datastore-column name="name" type="TEXT" />
    <datastore-column name="value" type="TEXT" />
</create-datastore>
<case><if condition="${sys.isVariableDefined('wf_studio')}">
    <insert-datastore datastore-name="${fullDsName}" json-value-map="${values}" />
</if></case>
To perform a migration:
- Take your statements and convert them into the Liquidbase-like format considering that the Data Store name must include the AI Agent code and Data Model version. You can leave the columns as they are, but change the type to
NVARCHAR(256). - If you have any data types, create new statements by manually converting your SQL into Liquibase statements.
- To add indexes, either add a new file or a new changeset that creates them.
- When you finish, check that the format conversion from your Business Process to migrations has occurred, and you can deploy the Bundle.
Delete AI Agent Data Model during development
Suppose the development environment is under your complete control, and there is no problem deleting all the AI Agent data. In that case, you can erase the entire AI Agent Data Model, update the changeset, and redeploy the Asset Bundle.
To do that, from your IDE or the Maven console, call mvn bundle:drop-data-stores in the context of your project and run it. In the case of a successful run, there is no Data Model in the environment. Thus, you won't need to create a new changeset with another identifier. Update your existing changeset instead.
The dropping of the whole Data Model is dangerous and is recommended only in development environments. By default, the drop-data-stores operation is disabled in Control Tower via permissions. To enable it, go to System Settings > Role Management > Administrator and check the Erase AI Agent Datastores checkbox.
Alternatively, if you want to delete some other Data Model, not the one specified in meta-info.json of your project, set parameters explicitly via the command-line arguments, for example:
mvn bundle:drop-data-stores -DuseCaseCode=CODE -DdataModelVersion=1.0.0
The command erases the Data Model for the AI Agent with the CODE code and Data Model version 1.0.0.
If the Data Model is not explicitly set for your AI Agent, it equals to the AI Agent version. Therefore, you can use this version as well:
mvn bundle:drop-data-stores -DuseCaseCode=CODE -DuseCaseVersion=1.0.0
Mind that it considers this version as dataModelVersion anyway.
Deletion can fail if there is a relationship between some Control Tower entity, for example, a Manual Task and the Data Store you need to delete.
- After you run the Maven goal, see the details about the connected entity in the console.
- Find the object that prevents deleting and delete it manually in the environment.
- Repeat the deletion.
If any restrictions prevent you from deleting, for example, you share the environment with the distributed team; you can write a new changeset in the same file that will delete the table and recreate or alter it.