Package AI Agent Asset Bundle
The article describes an AI Agent Asset Bundle. For details on the structure of an AI Agent Variation Asset Bundle, refer to Package assets into AI Agent Variation Asset Bundle.
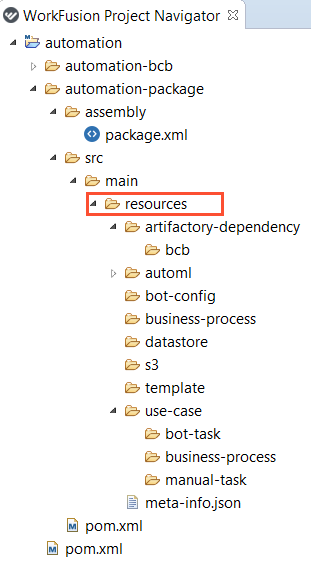
Each project you create from an ODF 2 Archetype includes an [ARTIFACT]-package module. Inside the module, the resources directory contains a pre-configured structure where you can put AI Agent assets for further deployment to Control Tower (CT).
Prepare AI Agent Asset Bundle for deployment
To prepare an AI Agent Asset Bundle for deployment, pack the directories into the upper-level resources directory as described below:
├── artifactory-dependency
├── analytics
│   ├── dm_schema_migration
│   ├── superset_assets
│   └── elasticsearch_assets
├── automl
│   ├── model
│   └── artifact
├── bot-config
├── business-process
├── report-template
├── datastore
│   └── datastore.migrations
├── s3
├── template
│   └── macro
├── training-set
├── use-case
│   ├── bot-task
│   ├── business-process
│   └── manual-task
├── web_resource
│   └── assets
├── db-data-purge
├── s3-data-purge
├── db-data-archival
│   ├── archive_schema_migration
│   ├── dp_schema_migration
│   └── db-archival.json
├── db-data-restoration
│   └── db-data-restoration.json
└── meta-info.json
/artifactory-dependency
The directory is required if a Bot Config Bundle (BCB), Java Native Worker (JNW), or Trigger is used. Otherwise, it is optional. The content of the directory maps to zero, one, or multiple BCBs.
For instructions on adding JNW and Trigger artifacts, refer to:
In most cases, there is no need to add assets to the /artifactory-dependency directory. After you run mvn clean install, BCB files from the [ARTIFACT]-bcb module of the same project are deployed automatically to [ARTIFACT]-package/target/artifactory-dependency.
The deployed BCBs are structured as follows:
artifactory-dependency > bcb >directory1 > directory2 > directory3> bcb-name > bcb-version > bcb-name.jar
The directory structure in bold stands for the BCB's groupId, so it must include at least three directories. Example: a BCB with Group:Artifact:Version being com.workfusion.examples:demo-bcb:0.5 must be represented as follows:
artifactory-dependency > bcb > com > workfusion > examples > demo-bcb > 0.5 > demo-bcb.jar
/analytics
The directory contains the following folders with analytics data:
/dm_schema_migration
The directory contains migrations for the dm schema. Those are XML files containing migrations in the Liquibase format. The dm schema is a schema in the WorkFusion database used by the Analytics application.
Control Tower always tries to import data from this directory. Usually, it contains the following files:
install.changelog.xmlon the root level of the directory.- Current changesets in
tables.xml. The name can be different.
There are no limitations on the structure inside this directory. The main requirement is that install.changelog.xml is always present in this directory.
/superset_assets
The directory contains dashboards as JSON files to be uploaded as separate assets into the Superset-based Analytics component. Other files are skipped.
The WorkFusion team also provides dashboards for WorkFusion's home-built AI Agents. The export of a custom dashboard generates a JSON file that cannot be imported within an Asset Bundle.
/elasticsearch_assets
The directory contains the following folders and files required to create Elasticsearch assets for managing the analytics data storage:
The
indicesfolder containsindex.jsonfiles, each specifying Elasticsearch index configurations, such as mappings and settings.The
index_templatefolder containsindex_template.jsonfiles, each defining reusable settings and mappings for multiple Elasticsearch indices.The
index_lifecycle_policyfolder containsindex_policy.jsonfiles required to manage the lifecycle of Elasticsearch indices, including creation, rollover, and deletion.The
repository_lifecycle_policyfolder containsrepository_lifecycle_policy.jsonfiles required to manage the retention and expiration of Elasticsearch repository snapshots.The
logstash.conffile defines the pipeline configuration for processing and transforming data into Elasticsearch.
Below is a sample folder structure:
├──elasticsearch_assets
   ├──logstash.conf
   ├──indices
      ├──index1.json
      ├──index2.json
      ├──index3.json
   ├──index_template
      ├──index_template1.json
      ├──index_template2.json
   ├──index_lifecycle_policy
      ├──index_policy1.json
      ├──index_policy2.json
   ├──repository_lifecycle_policy
      ├──repository_lifecycle_policy1.json
      ├──repository_lifecycle_policy2.json
/automl
The directory maps to zero, one, or multiple AutoML models (trained or not). Each trained model is a sub-directory of the model directory. Each model artifact (not trained yet) is a sub-directory of the artifact directory.
In most cases, there is no need to add assets to the /automl directory. After you run mvn clean install, model artifacts and trained models are deployed from the [ARTIFACT]-ml-sdk module (if any) of the same project to [ARTIFACT]-package/target/automl.
/bot-config
The directory contains bot steps (XML) that appear in Control Tower and are essential for designing BPs. It is intended to store the bot steps the BCB module does not include.
Packing this directory is optional unless you have legacy Bot Configs that are not in BCBs (for example, those created before the transition to ODF 2).
You do not need to copy XML data from your BCB to the /bot-config directory. Once BCB import is over, all the necessary bot steps reappear in Control Tower automatically.
/business-process
Pack the directory with Business Process packages created as zip files in a local or server Control Tower (CT) in the development environment.
The recommended practice is to leave the directory empty at the first AI Agent Asset Bundle deployment and to proceed as follows:
- Create a Business Process (BP) in a server or local CT in your development environment.
- Export the Business Process from CT.
- Put the exported Business Process into
resources/business-process.
Apply a similar workflow when you need to update a Business Process to incorporate BCB code changes.
The system automatically creates a BP draft for every imported BP package in Control Tower.
/report-template
The directory contains the report templates used by Business Processes in the bundle.
Each report template has its own sub-directory containing the Word template file and a JSON description file:
└── report-template
    └── report-template1
        ├── report-template.docx
        └── report-template-desc.json
/datastore
The /datastore directory is dedicated to the Data Store definition. Data Stores are the most convenient means of sharing temporary data across bot steps and persisting data for Analytics.
The root of the directory can contain CSV files to be used for creating Data Stores. One CSV file corresponds to one Data Store. The names of CSV files map to the names of Data Stores.
The format of the data in the files must be the same as if you uploaded data to a Data Store via Control Tower. Each file must contain headers and, at least, one record.
Mind that Data Stores created based on the files contain a single data type—NVarchar(max).
Data in the CSV files overrides the existing content in Control Tower Data Stores by default. For more information, refer to AI Agent Asset Bundle migration API | Import strategies.
The /datastore directory includes the /migrations sub-directory storing structured Liquibase XML migrations required to define the Data Stores of your AI Agent. In addition to the standard concepts of Liquibase XML changelogs structuring, there are some extra requirements to ensure proper Data Store management:
- For a non-empty
/migrationsdirectory, themigrations.propertiesfile is expected. Its default content is the one line:apply.migrations.in.raw.form=false. Via the property, the platform automatically reflects your migrations to the platform service metadata, which is required for proper functioning of your Data Store as a platform entity. It is not recommended to change the property. - The
install.changelog.xmlfile is at the root level of the directory. - The actual changesets are to reside in the
/versionedsub-directory. There are no limitations on the structure inside it. A typical structure created in your ODF 2 project looks like this:
    ├──datastore.migrations
    │ ├──versioned
    │ │  └── _changelist.xml
    │ │  └──Standard_Tables.xml
    │ │  └──Other_Table1.xml
    │ │  └──Other_Table2.xml
    │ ├── install.changelog.xml
    │ └── migrations.properties
Where:
_changelist.xmlis an index of all changelists in this directory._changelist.xml sample
<?xml version="1.1" encoding="UTF-8"?>
<databaseChangeLog xmlns="http://wwww.liquibase.org/xml/ns/dbchangelog"
    xmlns:xsi="http://www.w3.org/2001/XMLSchema-instance"
    xsi:schemaLocation="http://wwww.liquibase.org/xml/ns/dbchangelog ../dbchangelog-3.6.xsd">

    <include relativeToChangeLogFile = "true" file = "Standard_Tables.xml" />
    <include relativeToChangeLogFile = "true" file = "Other_Table1.xml" />
    <include relativeToChangeLogFile = "true" file = "Other_Table2.xml" />
</databaseChangeLog>Standard_Tables.xml,Other_Table1.xml, andOther_Table2.xmlcontain actual migrations of Data Stores.install.changelog.xmlis located at the root level and contains all XML files with relative paths from which you read the migrations.install.changelog.xmlsample<?xml version="1.1" encoding="UTF-8"?>
<databaseChangeLog xmlns="http://wwww.liquibase.org/xml/ns/dbchangelog"
xmlns:xsi="http://www.w3.org/2001/XMLSchema-instance"
xsi:schemaLocation="http://wwww.liquibase.org/xml/ns/dbchangelog ../dbchangelog-3.6.xsd
http://www.liquibase.org/xml/ns/dbchangelog-ext dbchangelog-ext.xsd">
<include relativeToChangeLogFile = "true" file = "versioned / _changelist.xml" />
</databaseChangeLog>migrations.propertiesis an integral part of the structure located on the root level since the project creation.
If you create a project from the ODF 2 Archetype, /datastore.migrations already has an initial structure compatible with the platform requirements. Otherwise, the structure has to be created by a developer.
In addition to the migration structure requirements, some Liquibase changeset types and database Data Types are prohibited.
For more details, refer to Manage Data Model with Liquibase| Using allowed statements and Data Stores with ORMLite | View ORMLite limitation.
/s3
Add static resources to the directory if you need those for your AI Agent. Each top-level sub-directory in the /s3 directory corresponds to an S3 bucket. Therefore, the names of these top-level sub-directories in the /s3 directory must map to the names of S3 buckets.
Assume the /s3 directory in an AI Agent Asset Bundle has the following structure: s3 > bucket1 > directory1 > directory2 > file.txt. In the target environment, the file.txt file resides in the directory1/directory2 structure inside the bucket1 S3 bucket. If there is no such bucket on a target environment, it is created.
/schema
Pack the directory if you have a schema-based BP. The directory contains Bot Configs, JNW, contracts, and schemas.
For the schema-based implementation, the Asset Bundle has the following structure:
├── artifactory-dependency
│   └── workers
│     └── com
│       └── mycompany
│         └── myworker
│           └── 1.0.0
│             └── myworker-1.0.0.jar
├── schema
|     └── com
│       └── mycompany
│         └── connector
│           └── email
|             └── schema.yaml
└── meta-info.json
If you use JNW or BCB, add input and output contract files and a Bot Config XML file to the result bundle:
...
|
├── BOOT-INF
│   └── classes
│     └── configs
│       └── main
│         └── my-bot-config.xml
│         ├── my-bot-config.in-contract.yaml
│         └── my-bot-config.out-contract.yaml
...
Name contract files according to the following pattern:
For an input contract: Bot Config name +
.in-contract.yamlFor an output contract: Bot Config name +
.out-contract.yaml
Example: for my-bot-config.xml, you need to create the my-bot-config.in-contract.yaml and my-bot-config.out-contract.yaml files.
/template
The directory contains zero, one, or multiple XML files, each representing a template. The XML file name maps to the template name.
The /template directory should contain a macro sub-directory with a structure representing Macro Templates used for advanced Manual Task customizations.
When simple Task Designer manipulations or Answer configurations are not enough to achieve the desired behavior or interface in a Manual Task, Macro Templates are created in CT with custom HTML, CSS, or JavaScript code. Subsequently, the Macro Templates can be re-used in a base Manual Task template via the <include> tag.
Example of a macro sub-directory structure:
Assume that the /template/macro directory has the following structure:
    ├──macro
    │ ├──ie
    │ │  └──js
    │ │  │  └── code.js
    │ │  └──styles.css
    │ └── front.ftl
Then, three Macro Templates named ie/js/code.js, ie/styles.css, front.ftl appear in Control Tower. In case there is a conflict between a template in the /macro sub-directory and the root of the /template directory, the /macro template prevails. UTF-8 encoding is supported only.
To put a macro template into the /template directory, follow the instructions below:
In the
/templatedirectory, create amacrosub-directory.Inside the
macrosub-directory, put the macro template files in required formats. For a clearer structure, create lower-level sub-directories, as shown in the sample above.To verify whether the templates were deployed successfully, go to CT and open Advanced > Templates. On the Templates page, set the search filter to Macro and check the resulting list for your templates.
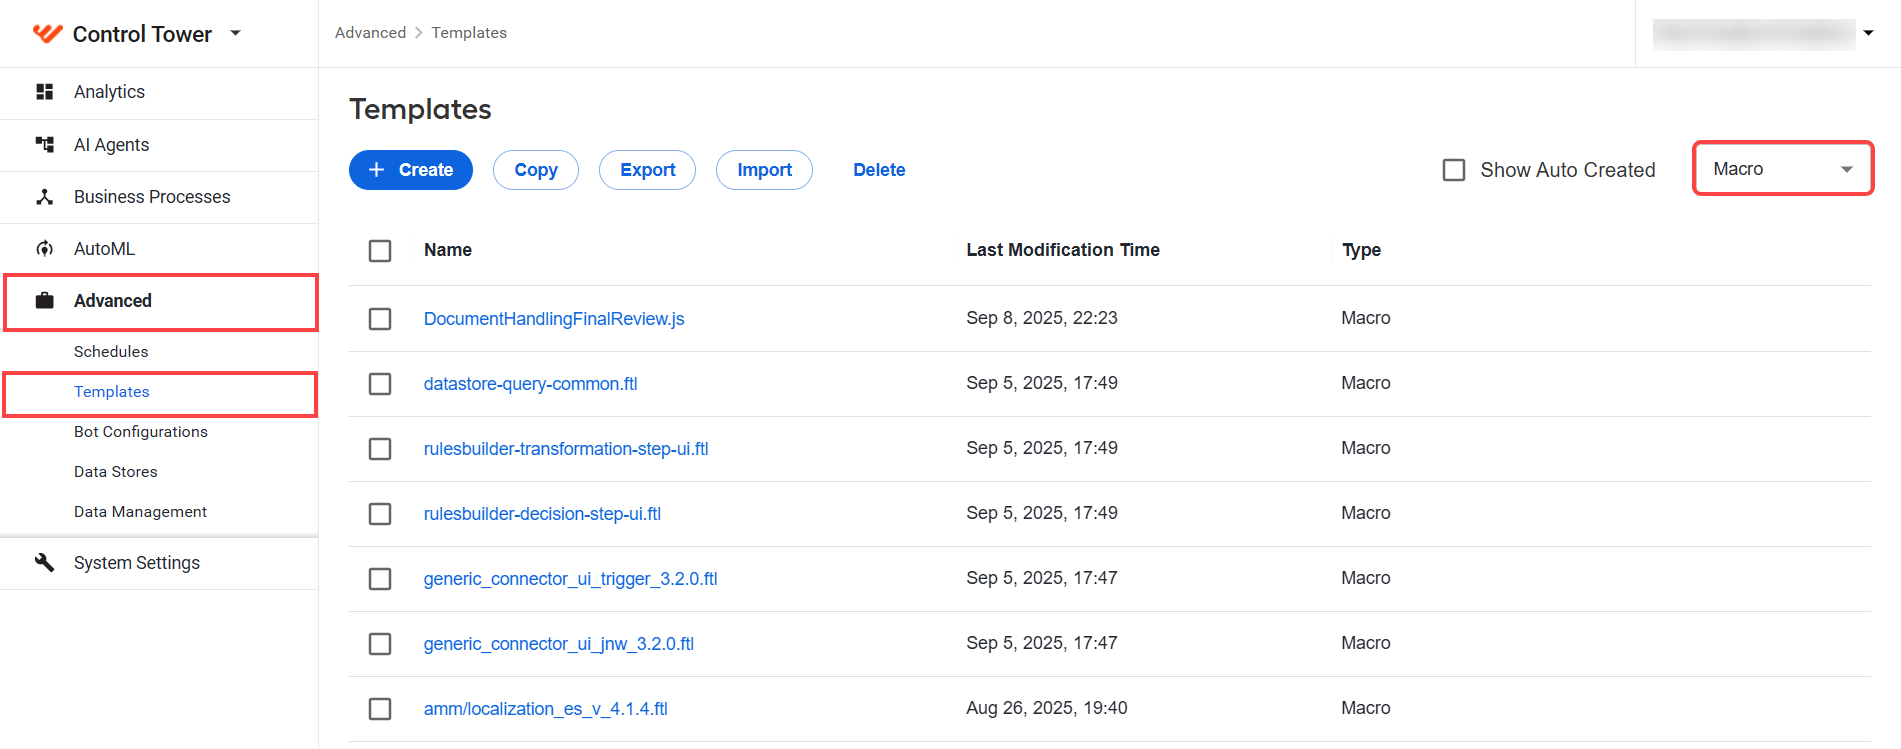
Subsequently, you can re-use the content of the existing templates to create new files in the template/macro directory. To do so, go to the Templates page, click any item in the macro-filtered list, and copy its content into a file in your Integrated Development Environment (IDE). After the templates are deployed to Control Tower, you can edit their content right from your IDE.
/training-set
Packing the directory is optional. It can contain zero, one, or multiple CSV files, each representing an automation training set. A CSV file name maps to an automation training set name. The file format corresponds to the resulting format of a single automation training set export.
/use-case
If you have a Business Process fully developed, packing the /use-case directory is optional.
/web_resource
Pack the directory with such static assets as JavaScript, CSS, images, and fonts used in Manual Tasks and step configuration panels. During import, Control Tower copies the assets into the shared web server storage, from which they are served as static files. Because the browser can cache them, referencing an asset from this directory is faster than embedding the same code in a Macro Template.
Packing the directory is optional. Each asset exists in two places, and you derive the second path from the first:
| Location | Path |
|---|---|
| In the AI Agent Asset Bundle | web_resource/assets/my-agent/js/app.js |
| In a Manual Task or step configuration template | /static/my-agent/js/app.js |
The structure you create inside assets is preserved as is. To reference a file, replace the web_resource/assets prefix with /static.
In the examples throughout this section, my-agent stands for a directory of your own naming, such as your AI Agent's code. Substitute your own value.
All imported bundles share one directory on the web server, and an asset is addressed only by its path relative to assets. If two bundles contain the same relative path, the one imported later overwrites the earlier file and can break the Manual Tasks that rely on it. Nothing warns you when this happens.
Therefore, place your files in a directory named after your AI Agent instead of at the root of assets. Use assets/my-agent/js/app.js rather than assets/js/app.js.
Sample web_resource directory structure:
├── web_resource
│   └── assets
│       └── my-agent
│           ├── css
│           │   └── styles.css
│           ├── fonts
│           │   └── icon-font.woff2
│           ├── images
│           │   └── logo.png
│           └── js
│               ├── app.js
│               └── app.js.map
Only the files inside the assets sub-directory are imported. Files placed directly in web_resource are skipped with a warning, and the import still completes successfully. If an asset does not appear on the target environment, check that it resides under assets.
Explore allowed file extensions
An asset must have an allowed extension to be imported, and the web server must be configured to serve that same extension. On an environment deployed with the WorkFusion installer, both lists come from a single setting, so by default, they contain the following extensions: js, mjs, css, map, jpeg, jpg, png, tiff, tif, gif, img, ttf, woff, woff2.
Extension matching is case-insensitive. Files with any other extension and files without an extension are rejected. A rejected file produces an error in the import status but does not prevent the rest of the bundle from being imported. In particular, html is not allowed, so you need to use markup in a Macro Template instead.
If a file already exists at the target path, the imported file overwrites it. This is what lets you ship an updated asset in a new version of your AI Agent.
SVG images are deliberately excluded and cannot be delivered as static assets. An SVG is a document rather than a plain image, so it can carry an executable script. Because static assets are served from the platform's own origin and without authentication, opening such a file directly would run that script in the context of your Work.AI session. Use png for raster images, an icon font for glyphs, or embed the vector markup in a Macro Template.
Reference imported assets
To load an imported asset, pass it to the <@hit> macro of a Manual Task template or to the <@stepConfigurationPanel> macro of a step configuration panel. Both macros accept the following optional parameters, each taking a sequence of entries rendered into the HTML <head> section:
| Parameter | Renders | An entry given as a map | An entry given as a string |
|---|---|---|---|
headLinks | <link> tags, for example, stylesheets and rel="preload" hints | Attributes of the tag | Raw HTML, emitted unchanged |
headScripts | <script> tags with either a src attribute or inline content, including module scripts | Attributes of the tag, either at the top level or nested in attrs, plus optional content | The src URL |
headInlineScripts | <script> tags with inline content and custom attributes | content plus optional attributes nested in attrs | The script body |
headImportMaps | <script type="importmap"> tags | json with the import map body, plus optional attributes nested in attrs | Not supported |
A string entry does not mean the same thing for every parameter, so mind the last column above. In particular, a string in headScripts becomes the value of a src attribute, not markup: passing a complete <script> tag there produces a script element whose src is that tag, and the asset never loads. Pass a map when you need to control attributes.
An entry of headImportMaps must be a map with a json key. A plain string is not used as the import map body, and the resulting element gets an empty map instead.
It is a good practice to pin every script and stylesheet you load from /static/ to a Subresource Integrity (SRI) hash, either as an integrity attribute or through the integrity object of an import map. Imported assets are overwritten in place by any later bundle import, so a pinned hash means the browser refuses to run a file that is not the one you shipped.
Recalculate the hash whenever you change the file and ship the new hash together with the new asset.
Change the asset URL whenever you change the file content. The web server serves scripts and stylesheets with Cache-Control: public, max-age=18000, so a browser can hold a copy of /static/my-agent/js/app.js for five hours. If you replace the file and publish a new hash at the same URL, the browser validates the bytes it already cached against the new hash, and the mismatch makes the asset fail to load. It does not fetch the file again by itself.
Put the version in the file name, as in app_v_1.2.0.js, or append it as a query parameter, as in /static/my-agent/js/app.js?v=1.2.0. Control Tower discards the query string and the fragment before it resolves the file for a variation export, so a versioned URL still exports the underlying asset.
Example for loading a stylesheet and a script:
<#assign headLinks = [
  {"rel":"stylesheet","href":"/static/my-agent/css/styles.css",
   "integrity":"sha384-REPLACE_WITH_STYLES_CSS_HASH","crossorigin":"anonymous"}
]/>
<#assign headScripts = [
  {"src":"/static/my-agent/js/app.js",
   "integrity":"sha384-REPLACE_WITH_APP_JS_HASH","crossorigin":"anonymous"}
]/>

<@hit
  headLinks=headLinks
  headScripts=headScripts
>
  <!-- Manual Task content -->
</@hit>
Example for loading a module script in a step configuration panel
<#assign headScripts = [
  {"type":"module","src":"/static/my-agent/js/panel.js",
   "integrity":"sha384-REPLACE_WITH_PANEL_JS_HASH","crossorigin":"anonymous"}
]/>

<@stepConfigurationPanel
  headScripts=headScripts
>
  <!-- Configuration panel content -->
</@stepConfigurationPanel>
Example for declaring an import map so that a module can be imported by name
In an import map, supply the hash through the integrity object keyed by the same path you mapped:
<#assign headImportMaps = [
  {"json":"{\n  \"imports\": { \"/static/my-agent/js/utils.js\": \"/static/my-agent/js/utils.js\" },\n  \"integrity\": { \"/static/my-agent/js/utils.js\": \"sha384-REPLACE_WITH_UTILS_JS_HASH\" }\n}"}
]/>
<#assign headScripts = [
  {"type":"module","content":"import '/static/my-agent/js/utils.js'; console.log('Module loaded');"}
]/>

<@hit
  headImportMaps=headImportMaps
  headScripts=headScripts
>
  <!-- Manual Task content -->
</@hit>
The web server serves everything under /static/ without authentication, so treat imported assets as publicly readable. Do not place credentials, customer data, or any other sensitive content in the /web_resource directory.
When you export a variation of your AI Agent, Control Tower collects the assets referenced from these parameters and packs them back into the resulting bundle. For the conditions an asset must meet to be collected, refer to Package AI Agent Variation Asset Bundle | web_resource.
Calculate an integrity hash
Whichever method you use, the value you place in the template is the algorithm name, a hyphen, and the base64 digest of the file—for example, sha384-REPLACE_WITH_BASE64_DIGEST. A SHA-384 digest is 48 bytes, so its base64 form is always 64 characters long.
Per file, with OpenSSL. Convenient when you maintain a small set of assets by hand:
openssl dgst -sha384 -binary path/to/file | openssl base64 -A
For an entire build output, with a Node script. Convenient when a bundler produces the assets and their content changes with every build. Instead of hashing each file by hand, walk the build output, hash every script and stylesheet, and pair each hash with the /static/ URL that the template requests at run time.
Below is the core of such a script. Treat it as a sketch to adapt to your project rather than a ready-to-run tool:
const fs = require('fs');
const crypto = require('crypto');

const ALGORITHM = 'sha384';   // sha256, sha384, and sha512 are all valid
const BUILD_DIR = 'dist';     // the output directory of your bundler

function integrityFor(filePath) {
    const digest = crypto.createHash(ALGORITHM)
        .update(fs.readFileSync(filePath))
        .digest('base64');
    return `${ALGORITHM}-${digest}`;
}

// Read the directory synchronously. With the callback form of readdir, the
// map below is still empty by the time the surrounding code reads it.
const assets = fs.readdirSync(BUILD_DIR, { recursive: true })
    .filter(name => /\.(js|mjs|css)$/i.test(name));

const hashes = {};
for (const name of assets) {
    // dist/my-agent/js/app.js in the build output is /static/my-agent/js/app.js at run time
    hashes[`/static/${name}`] = integrityFor(`${BUILD_DIR}/${name}`);
}
Each entry of hashes then feeds one of the head parameters. Generate a map of attributes rather than a finished HTML tag, because a plain string means something different in each parameter, as described in Reference imported assets:
| Asset | Generate this entry | Pass it to |
|---|---|---|
| Stylesheet | { "rel": "stylesheet", "href": "URL", "integrity": "HASH", "crossorigin": "anonymous" } | headLinks |
| Script | { "src": "URL", "integrity": "HASH", "crossorigin": "anonymous" } | headScripts |
A module resolved through an import map is different: the whole import map, both the imports and the integrity objects, is serialized into the single json attribute of one entry.
{
  "json": "{\"imports\":{\"MODULE_NAME\":\"URL\"},\"integrity\":{\"URL\":\"HASH\"}}"
}
Regenerate the hashes on every build and update the template together with the assets. A hash that no longer matches its file makes the browser refuse the asset.
Write the generated output to a location outside web_resource/assets. Text and JSON files are not on the list of allowed extensions, so each one left among the assets produces an error during import.
/db-data-purge
Pack the db-data-purge directory with database data management configurations in the JSON format and SQL files with custom SQL for purging database data. The folder structure is as follows:
├── db-data-purge
│   ├── config1.json
│   └── config1.sql
To learn more details, read Import data management configurations via Asset Bundle.
/s3-data-purge
The folder contains S3 data management configurations in the JSON format:
├── s3-data-purge
│   └── config1.json
To learn more details, read Import data management configurations via Asset Bundle.
/db-data-archival
The directory contains the archive_schema_migration and dp_schema_migration folders and a database data archival management configuration in the JSON format.
├── db-data-archival
│   ├── archive_schema_migration
│   ├── dp_schema_migration
│   └── db-archival.json
The
archive_schema_migrationfolder comprises migrations for the archive schema. Those are XML files containing migrations in the Liquibase format. The archive schema is a schema in the WorkFusion database used by the data management capability for storing archived data. In addition, the schema contains a procedure to purge the data from the archive tables.dp_schema_migrationis a folder with migrations for the dp schema. Those are XML files containing migrations in the Liquibase format. The dp schema is a schema in the WorkFusion database used by the data management capability to purge process data and push it into the archive tables.
Typically, both folders contain the following files:
install.changelog.xmlon the root level- Current changesets in
tables.xml(or another XML file with a different name)
There are no limitations on the structure inside the folders. The main requirement is that install.changelog.xml is always present in them.
To learn more, read Import data management configurations via Asset Bundle.
/db-data-restoration
The directory comprises the db-restoration.json file with the parameters of the database data restoration management configuration.
├──db-data-restoration
   └── db-restoration.json
To learn more, refer to Import data management configurations via Asset Bundle.
meta-info.json
The file is required and must be a valid JSON file. The NAME and WF_VERSION parameter pairs are required.
The recommended structure is as follows:
    {
        "USE_CASE_CODE": "B-AML-NNRDC",
        "USE_CASE_VERSION": "1.0.0",
        "DATA_MODEL_VERSION": "1",
        "AUTHOR": "user user",
        "DESCRIPTION": "Some specific bundle description",
        "INSTANCE": "example.workfusion.com",
        "MULTI_CONFIGURATION":true,
        "NAME": "pack name",
        "PACKAGE_DATE": "2019-06-28 06:24:43",
        "TARGET_VERSION": "10.2.0.4",
        "WF_BRANCH": "bcb-intake-9.2.0.3",
        "WF_REVISION": "bf19d7ff",
        "WF_VERSION": "10.2.0.4"
    }
The USE_CASE_CODE and USE_CASE_VERSION parameters are required for all projects that contain Liquibase XML migrations. It is recommended to also use them for all projects to enable better compatibility with some features of 10.2+ versions. The following restrictions apply to the parameters:
USE_CASE_CODEcan contain letters in upper case, dashes ("-"), underlines ("_"), and digits.USE_CASE_VERSIONmust contain a semantic version of an AI Agent (refer to Semantic Versioning), for example,1.0.2,2.3.5-SNAPSHOT, and so on.
The MULTI_CONFIGURATION parameter defines whether you can create multiple configurations or Variations using the AI Agent Bundle. In this case, it is set to true.
If an AI Agent Asset Bundle is structured correctly, it contains all components needed for Business Processes to run on a target (production) environment. However, any component from the structure above is optional, except for meta-info.json.
You can also create an AI Agent Asset Bundle containing one or more resources (for example, AutoML models or templates) and import it to a target environment to add those components only.
See sample AI Agent Asset Bundle
The figure below depicts a sample AI Agent Asset Bundle with an extended structure.
├── artifactory-dependency
│    ├── bcb
│    │    └── com
│    │        └── workfusion
│    │            ├── intake
│    │            │    └── intake-core
│    │            │         └── 1.0
│    │            │              └── intake-core-1.0.jar
│    │            └── negative-news
│    │                 └── 3.0
│    │                      └── negative-news-3.0.jar
│    └── repository-name1
├── analytics
│    ├── dm_schema_migration
│    │    ├── install.changelog.xml
│    │    └── tables.xml
│    ├── superset_assets
│    ├── dashboard1.json
│    │    ├── dashboard2.json
│    │    └── dashboard3.json
│    └── elasticsearch_assets
│         ├── logstash.conf
│         ├── indices
│         │    ├── index1.json
│         │    ├── index2.json
│         │    └── index3.json
│         ├── index_template
│         │    ├── index_template1.json
│         │    └── index_template2.json
│         ├── index_lifecycle_policy
│         │    ├── index_policy1.json
│         │    └── index_policy2.json
│         └── repository_lifecycle_policy
│              ├── repository_lifecycle_policy1.json
│              └── repository_lifecycle_policy1.json
│
├── automl
│    ├── artifact
│    │    ├── generic-ru-model
│    │    │    ├── 1.0
│    │    │    │    ├── config
│    │    │    │    ├── lib
│    │    │    │    └── model.description.jar
│    │    │    └── 1.1
│    │    │         ├── config
│    │    │         ├── lib
│    │    │         └── model.description.jar
│    │    └── invoice-extraction-model
│    │         └── 2.0
│    │              ├── config
│    │              ├── lib
│    │              └── model.description.jar
│    └── model
│         ├── claim_classification_1_3
│         │    └── output
│         │         ├── hpo-config
│         │         ├── model
│         │         └── model-info.txt
│         └── invoice_xml_4aa8ef30-290c-4a25-8deb-264e27b03068
│              └── output
│                   ├── model
│                   └── model-info.txt
├── bot-config
│    └── ocr.xml
├── business-process
│    ├── BP+with+BCB+Example+29-3-2019.zip
│    └── Negative+News+AML.zip
├── report-template
│    └── report-template1
│         ├── report-template.docx
│         └── report-template-desc.json
├── datastore
│    ├── datastore1.csv
│    └── datastore2.csv
├── s3
│    ├── bucket-name-example
│    └── doc-upload
│         ├── pdf-chrome-printer.jar
│         └── report
│              └── report-template.html
├── template
│    ├── template1.xml
│    ├── template2.xml
│    └── templates-combined.xml
├── use-case
│    ├── bot-task
│    │    ├── bot-use-case1.xml
│    │    ├── bot-use-case2.xml
│    │    └── bot-use-cases-combined.xml
│    ├── business-process
│    │    ├── bp-use-case1.xml
│    │    ├── bp-use-case2.xml
│    │    └── bp-use-cases-combined.xml
│    └── manual-task
│         ├── manual-use-case1.xml
│         ├── manual-use-case2.xml
│         └── manual-use-cases-combined.xml
├── web_resource
│    └── assets
│         └── my-agent
│              ├── css
│              │    └── styles.css
│              ├── fonts
│              │    └── icon-font.woff2
│              ├── images
│              │    └── logo.png
│              └── js
│                   ├── app.js
│                   └── app.js.map
├── db-data-purge
│    ├── config1.json
│    └── config1.sql
├── s3-data-purge
│    └── config.json
├── db-data-archival
│    ├── archive_schema_migration
│    │    ├── install.changelog.xml
│    │    └── tables.xml
│    ├── dp_schema_migration
│    │    ├── install.changelog.xml
│    │    └── tables.xml
│    └── db-archival.json
├── db-data-restoration
│    └── db-restoration.json
└── meta-info.json
For a typical AI Agent Asset Bundle example, download bundle-example.zip.
After you package the AI Agent assets into a bundle as described above, your next steps are to build the bundle and deploy it:
For detailed instructions on importing an Asset Bundle with Maven, read Deploy Asset Bundle.
For instructions on importing an Asset Bundle via REST API, read AI Agent Asset Bundle migration API.