Run screening
Once the Name Sanctions Screening (NSS) skill is installed and the configuration is complete, you can initiate screening in one of the following ways:
- Start a Business Process (BP) from Control Tower
- Call the NSS REST API
- Start a BP from REST API with a CSV file
Start Business Process from Control Tower
Core NSS Business Process
The figure below is a sample NSS BP core workflow:
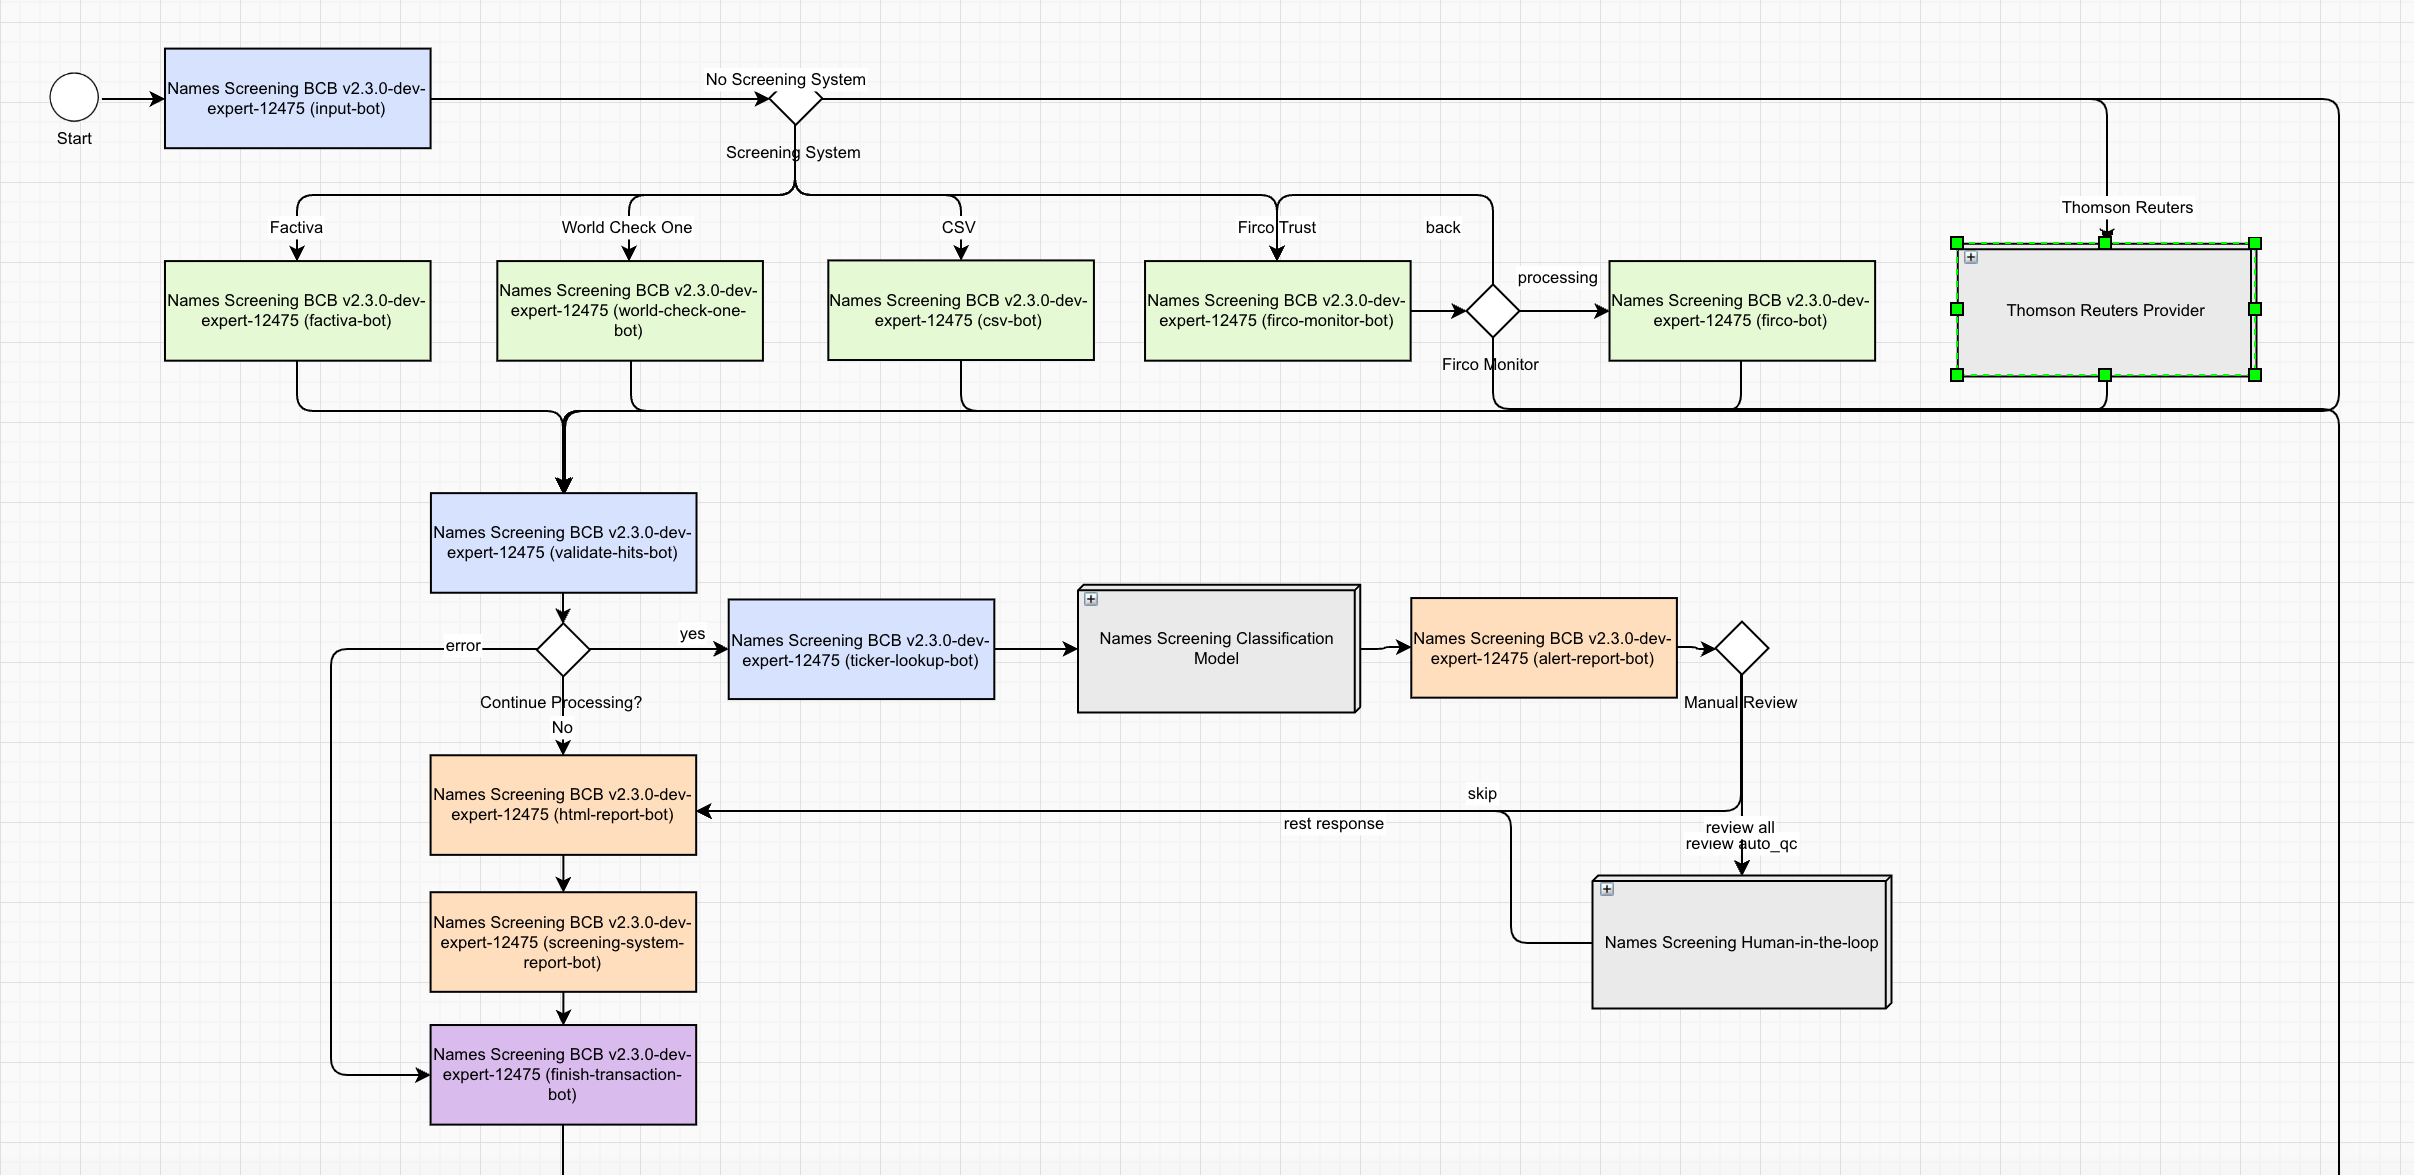
To start the core BP, do the following:
In the Control Tower menu, in the Digital Workers section, click View All and go to the Name Sanctions Screening group.
Open the variation you wish to use and select the core Names Screening vX.X.X BP definition.
On the Data tab, you don't need to upload a data file. The input data is either sourced from a CSV file in the S3 location or a screening system, depending on the NSS configuration.
Go to the Run tab and start the BP.
Once all entities within the input file are processed, the BP automatically ends and uploads a report to S3 MinIO.
Name Screening Ticker Lookup Business Process
The NSS skill contains the Name Screening Ticker Lookup BP designed to maintain accurate and current ticker information within the NSS internal storage by fetching data from https://www.sec.gov/, which is a reliable source for financial information. The BP ensures that the internal storage of ticker information for various financial instruments is kept up-to-date and guarantees compliance with regulatory requirements.
To view the BP, do as follows:
In the Name Sanctions Screening group, find the variation you wish to use and click Version X.X.X.. In the list of available BP definitions, select the Name Screening Ticker Lookup BP.
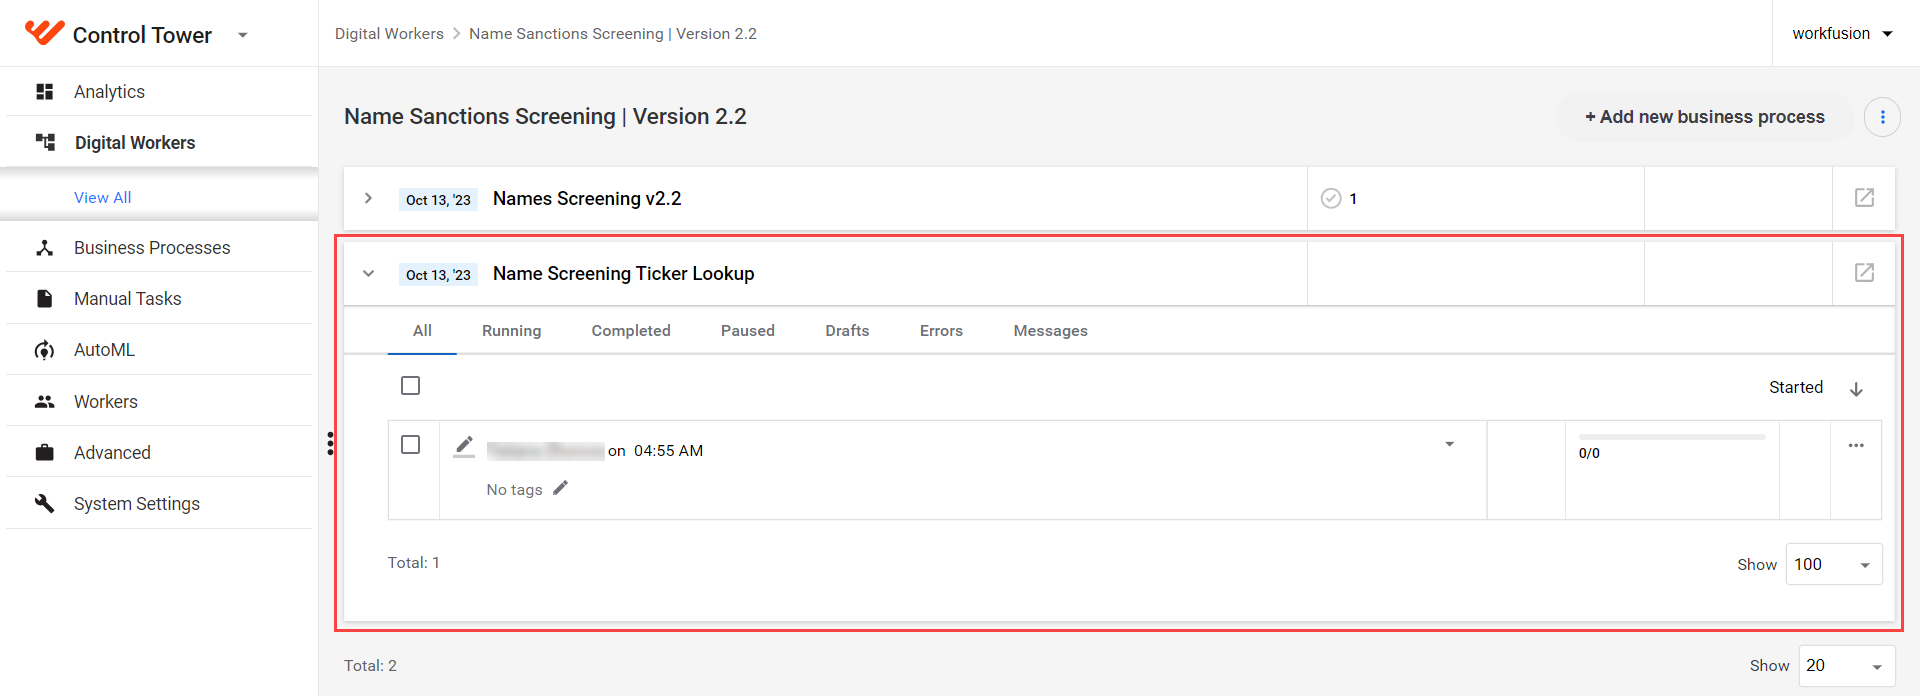
In the Business Process window, go to the Workflow tab.
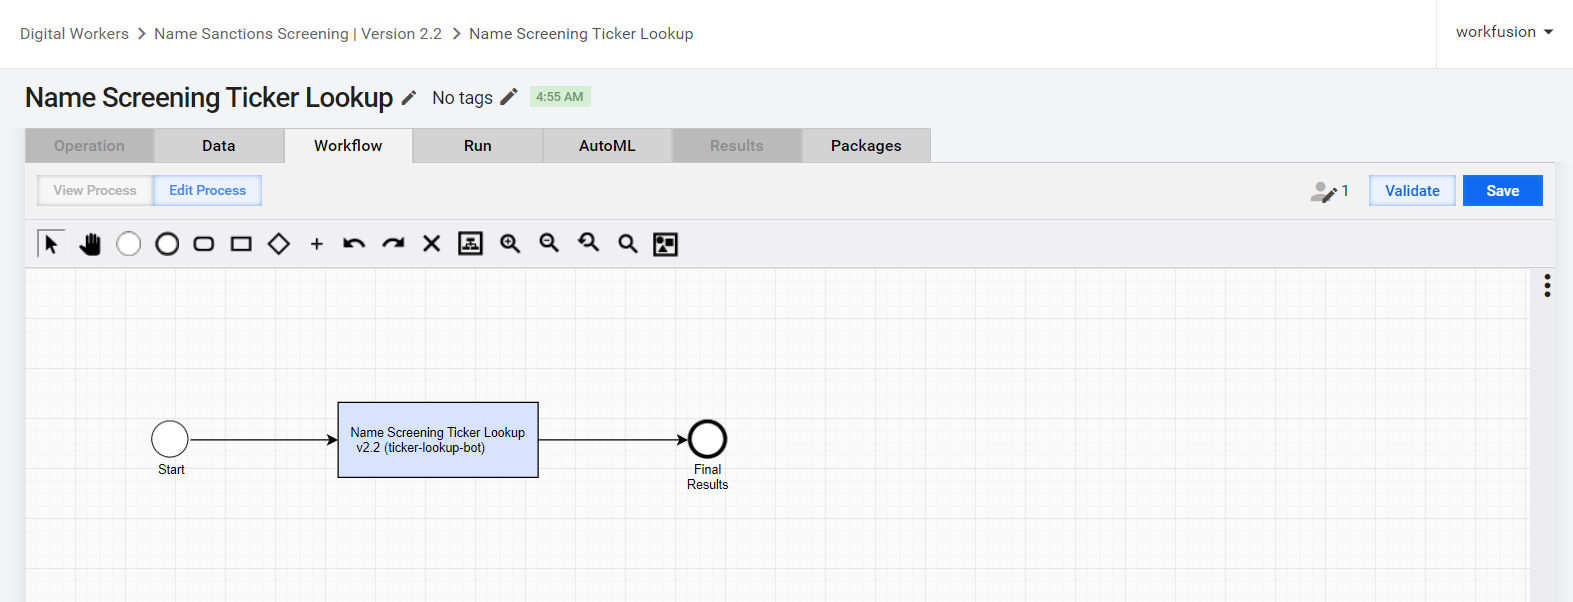
You can configure to update ticker information with the desired frequency, depending on your specific needs: daily, weekly, or monthly. To set up the schedule, refer to the Schedule Business Process instruction.
To minimize disruption to the production environment, it is recommended to schedule the Name Screening Ticker Lookup BP outside of regular production working hours so it does not interfere with the execution of critical BPs.
Call NSS REST API
You can invoke NSS by calling the WorkFusion REST API. To do it, set up a skill variation to source data from WorkFusion API.
To configure REST endpoints, perform the following steps:
Open the core BP definition. On the Data tab, select Streaming Records from External Sources and specify your custom signal ID.
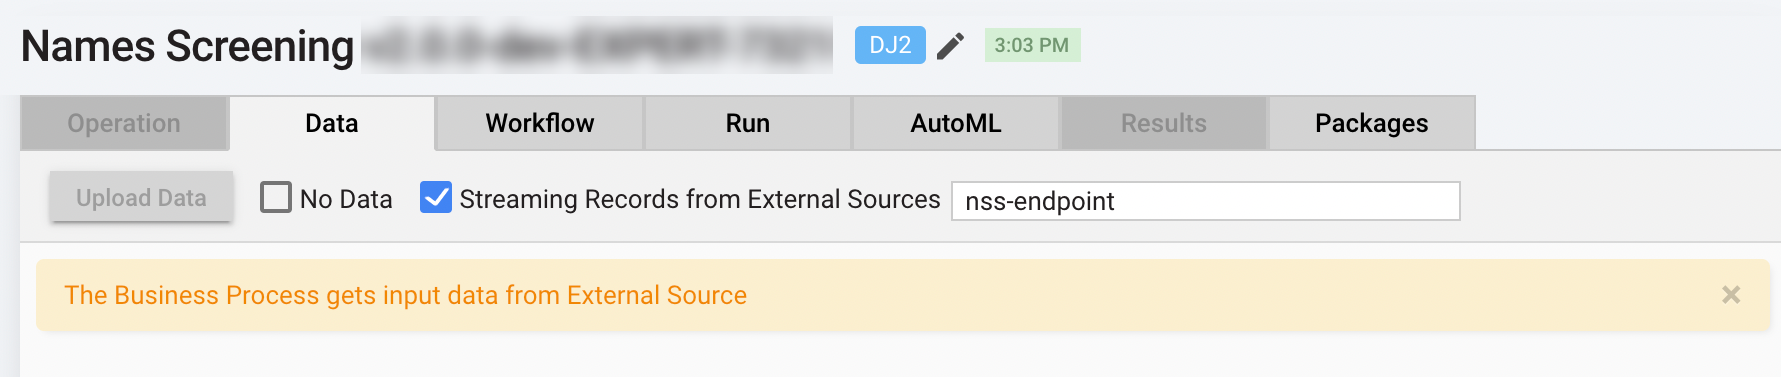
On the Run tab, click the Run This Process button. Once the BP starts, go to the Run tab and click Show API... to find available generated endpoints.
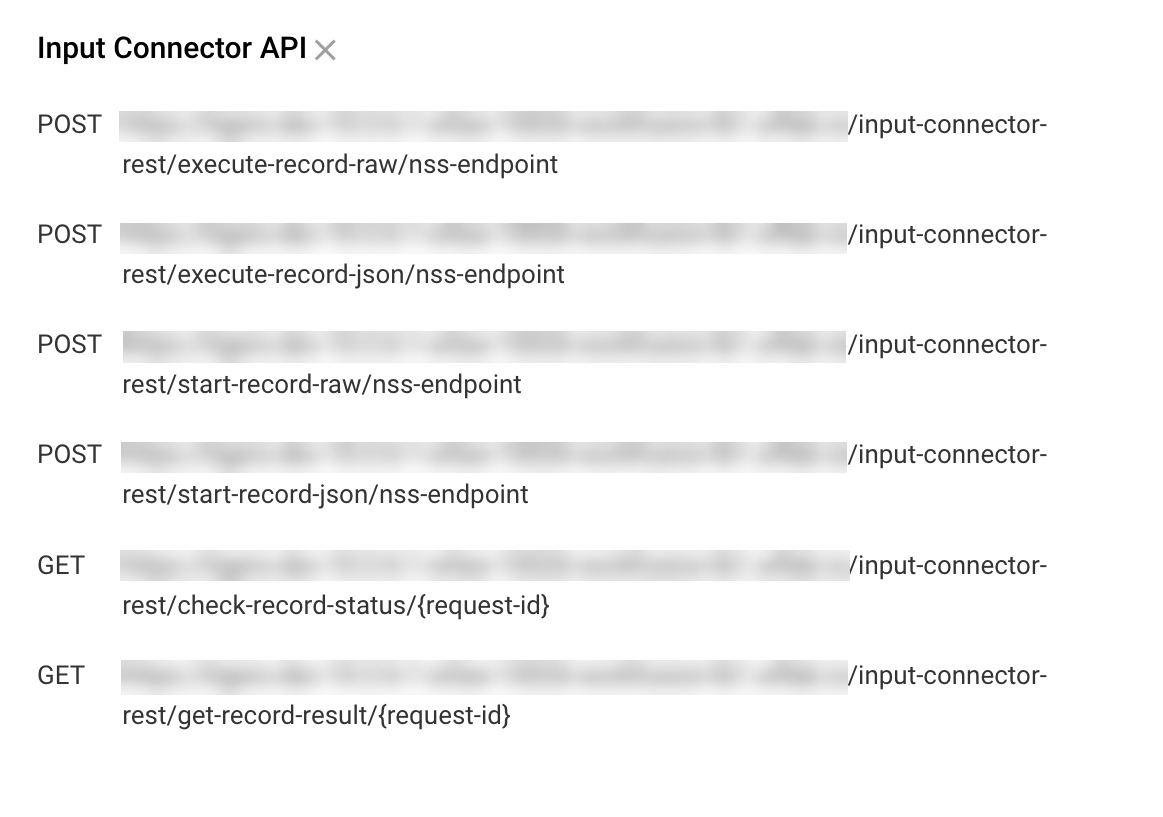
For NSS, only asynchronous invocation is supported. In this case, use only the following endpoints:
/start-record-rawto start a BP./check-record-statusto check the status of the running transaction./get-record-resultto get the result data of the completed transaction.
- Running AI Agents via REST API to learn about invoking transactions and getting access to their token.
- Evelyn API to see the detailed description of endpoints.
- Process transactions with REST connector
REST API request
The NSS skill supports the following JSON structure for triggering screening. The structure depends on the selected screening system.
A request can have the hits element.
Full alert screening JSON template
{
    "input_id": String (required),
    "input_full_name": String (required),
    "input_aliases": [
      alias1, alias2 ...
    ],
    "input_first_name": String,
    "input_middle_name": String,
    "input_last_name": String,
    "input_record_type": String,
    "input_gender": String,
    "input_address": [
        {
            "type": String,
            "country": String,
            "state": String,
            "city": String,
            "address": String
        },
        ...
    ],
    "input_date": [
        {
            "type": String,
            "year": String,
            "month": String,
            "day": String
        },
    "additional_data": {
      "<key>(String)": "<value>(String)",
      ...
    }
    "category": String,
    "configuration": {
      "<key>(String)": "<value>(String)",
      ...
    }
        ...
    ],
    "hits": [
        {
            "hit_id": String (required),
            "hit_matched_name": String (required),
            "hit_first_name": String,
            "hit_middle_name": String,
            "hit_last_name": String,
            "hit_aliases": [
              alias1, alias2 ...
            ],
            "hit_record_type": String,
            "hit_gender": String,
            "hit_address": [
                {
                    "type": String,
                    "country": String,
                    "state": String,
                    "city": String,
                    "address": String
                },
                ...
            ],
            "hit_date": [
                {
                    "type": String,
                    "year": String,
                    "month": String,
                    "day": String
                },
            "additional_data": {
              "<key>(String)": "<value>(String)",
              ...
            }
            "category": String,
                ...
            ]
        }
    ]
}
Dow Jones Risk & Compliance, World-Check One, Thomson Reuters JSON template
The request JSON structure should contain only input elements. If the hits element is present, it is ignored.
{
  "input_id": String (required),
    "input_full_name": String (required),
    "input_aliases": [
      alias1, alias2 ...
    ],
    "input_first_name": String,
    "input_middle_name": String,
    "input_last_name": String,
    "input_record_type": String,
    "input_gender": String,
    "input_address": [
        {
            "type": String,
            "country": String,
            "state": String,
            "city": String,
            "address": String
        },
        ...
    ],
    "input_date": [
        {
            "type": String,
            "year": String,
            "month": String,
            "day": String
        },
    "additional_data": {
      "<key>(String)": "<value>(String)",
      ...
    }
    "category": String,
    "configuration": {
      "<key>(String)": "<value>(String)",
      ...
    }
        ...
    ]
}
Firco Trust Case Manager API JSON template
Once the screening with Firco Trust System is initiated, all existing messages are processed via a BP.
Firco Trust Bunit and Units coming from a REST request have higher priority than the AI Digital Worker configuration.
{
  firco_trust_b_unit: String,
  firco_trust_unit: ["unit_1", "unit_2"]
}
REST API response
After a successful run, the BP sends a response. The response JSON structure can be different, depending on the selected screening system.
If you enable QC or HTML reports when configuring the AI Digital Worker, hyperlinks to the reports are available in a REST response.
Full alert screening JSON template
{
    "input_id": String,
    "alert_resolution": String,
    "alert_explanation": String,
    "html_report_link": String,
    "qc_report_link": String,
    "hits": [
        {
            "hit_id": String,
            "hit_resolution": String,
            "hit_explanation": String
        }
    ]
}
Dow Jones Risk & Compliance, World-Check One JSON template
{
    "input_id": String,
    "alert_resolution": String,
    "alert_explanation": String,
    "html_report_link": String,
    "qc_report_link": String,
    "hits": [
        {
            "hit_id": String,
            "hit_resolution": String,
            "hit_explanation": String
        }
    ]
}
Firco Trust Case Manager API JSON template
{
    "report_link": []
}
REST API configuration map
You can send a JSON configuration as part of REST requests to override the skill's configuration associated with processing Manual Tasks (MT).
Default parameters
The following parameters, if sent, are processed by the NSS skill to configure manual review assignments:
mt_assigneesets an assignee for an assignment in Workspace. For details, see Define task assignees.mt_prioritysets the assignment priority. For details, see Set assignment priority.mt_titlesets the assignment title. For details, see Adjust assignment title.mt_forceforces a request to go to the manual review step.- If set to
true, the request goes to the manual review step regardless of the skill's configuration. - If set to
false, the manual review step is skipped regardless of the skill's configuration.
- If set to
Additional parameters
In addition to the default ones, you can send any other parameters as part of the configuration map, including to create filter attributes.
Sample request
In the example, mt_filter_sla can be used to create filter attributes.
{
    "input_id": "183800066.6686744",
    "input_full_name": "PINKAL PATEL",
    "input_record_type": "INDIVIDUAL",
    "input_gender": "",
    "input_address":
    [
        {
            "type": "",
            "country": "USA",
            "state": "CT",
            "city": "BERLIN"
        }
    ],
    "input_date":
    [
        {
            "type": "DOB",
            "year": "1976",
            "month": "07",
            "day": "05"
        }
    ],
    "hits":
    [
        {
            "hit_id": "149868084",
            "hit_matched_name": "PINKAL P PATEL",
            "hit_record_type": "INDIVIDUAL",
            "hit_gender": "",
            "hit_address":[],
            "hit_date":[]
        }
    ],
    "configuration":
    {
        "mt_assignee": "aharhots1",
        "mt_title": "PINKAL PATEL - WKSFN2342",
        "mt_force": "true",
        "mt_filter_sla": "01/01/2024"
    }
}
Start Business Process from REST API with CSV file
To start the core NSS BP from REST API with a CSV file, make sure you selected WorkFusion API as the input source when configuring the skill.
Before running the BP, open the required process definition and navigate to the Data tab. Then, click Upload and upload a CSV file.
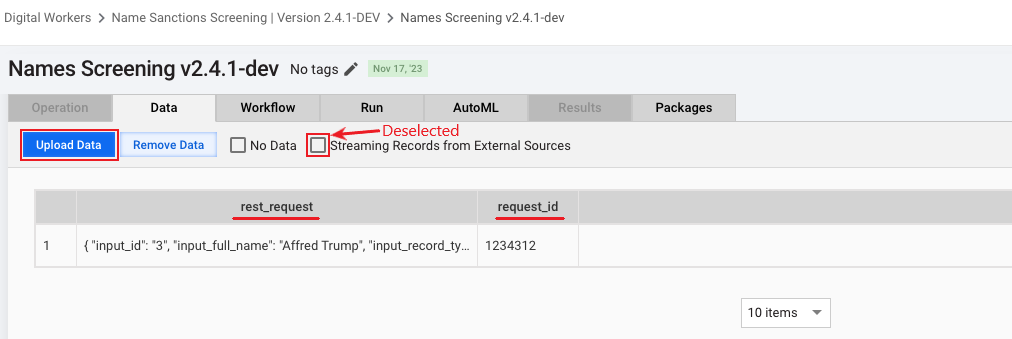
The CSV file must include the two required column headers:
request_id representing the unique ID used for internal NSS processing.
rest_request containing the request to be parsed in NSS. It needs to be provided as JSON and must contain all required screening details.
Sample JSON
"{
  ""input_id"": ""3"",
  ""input_full_name"": ""Affred Trump"",
  ""input_record_type"": ""person"",
  ""input_gender"": ""male"",
  ""input_address"": [
    {
      ""type"": ""citizenship"",
      ""country"": ""USA"",
      ""state"": ""NY"",
      ""city"": ""New York""
    }
  ],
  ""input_date"": [
    {
      ""type"": ""DOB"",
      ""year"": ""1949"",
      ""month"": ""06"",
      ""day"": ""14""
    }
  ],
  ""hits"": [
    {
      ""hit_id"": ""3_1"",
      ""hit_matched_name"": ""DoNald Trump"",
      ""hit_record_type"": ""INDIVIDUAL"",
      ""hit_gender"": ""male"",
      ""hit_address"": [
        {
          ""type"": ""citizenship"",
          ""country"": ""USA"",
          ""state"": ""NY"",
          ""city"": ""New York""
        }
      ],
      ""hit_date"": [
        {
          ""type"": ""DOB"",
          ""year"": ""1949"",
          ""month"": ""06"",
          ""day"": ""14""
        }
      ]
    }
  ]
}"
When you use REST API with a CSV file as a request source, the NSS skill generates a Quality Check and HTML reports (as configured). One report is generated per REST request with all associated hits.
Track NSS API request status
To support REST request tracking, the NSS skill is enhanced with the capability to update a dedicated Data Store on when an MT is created, saved, or completed.
Learn about working principle
The new tracking feature works only if you meet the following requirements:
Selected Workfusion REST API as the input source during the NSS skill configuration.
Installed and configured all components as described in the Enable status tracking section.
The table below details the structure of the uc_dw_request_status_v1_0 request:
| Column | Type | Description |
|---|---|---|
UUID | NVARCHAR(36) | |
TRANSACTION_ID | NVARCHAR(36) | NSS-created transaction ID |
REQUEST_ID | NVARCHAR(255) | External request ID |
STATUS | NVARCHAR(255) | Request status:
|
MESSAGE | NVARCHAR(max) |
The NSS skill updates uc_dw_request_status_v1_0 with the current request progress:
When an MT is ready for review.
The current request ID in the Data Store is updated with the
READY_FOR_MTstatus. The message contains a link to the MT corresponding to the current alert.After the MT is resolved.
The current request ID in the Data Store is updated with the
MT_COMPLETEDstatus. The message is empty until record processing is in progress.After NSS processing is finished.
The current request ID in the Data Store is updated with the
FINISHEDstatus. The message is updated with the NSS REST output contract.
Enable status tracking
To leverage the REST request tracking feature for the NSS skill, follow the steps below:
Download and install the request status service bundle. After successful installation, the new
uc_dw_request_status_v1_0Data Store becomes available.Create a Secrets Vault entry using the following parameters:
- Alias: workspace_url
- Key: URL to Workspace
- Value: leave empty
For detailed instructions, see Secrets Vault.
If no Secrets Vault entry is found during NSS processing, the request status contains an error requesting to create a Secrets Vault entry.
Add the request status service dependency to the project:
<dependency>
    <groupId>com.workfusion.dw</groupId>
    <artifactId>request-status-service-core</artifactId>
    <version>${request-status-service.version}</version>
</dependency>request-status-service.version= the latest released dependency version available in Nexus.Add to your Bot Config Bundle (BCB).
@RequiredArgsConstructor(onConstructor = @__({@Inject}))
public class PrepareForMTask implements GenericTask {

    private final RequestStatusService requestStatusService;

    @Override
    public TaskRunnerOutput run() {
        ...
        String message = requestStatusService.getMessageBy("external_id"));
        ...
    }
}
Review screening results
You can review MTs in Workspace if you performed the required setup when configuring the AI Digital Worker.
You can also view the results of the BP execution in the Quality Check or HTML reports.