Run screening
Start NSS Business Processes
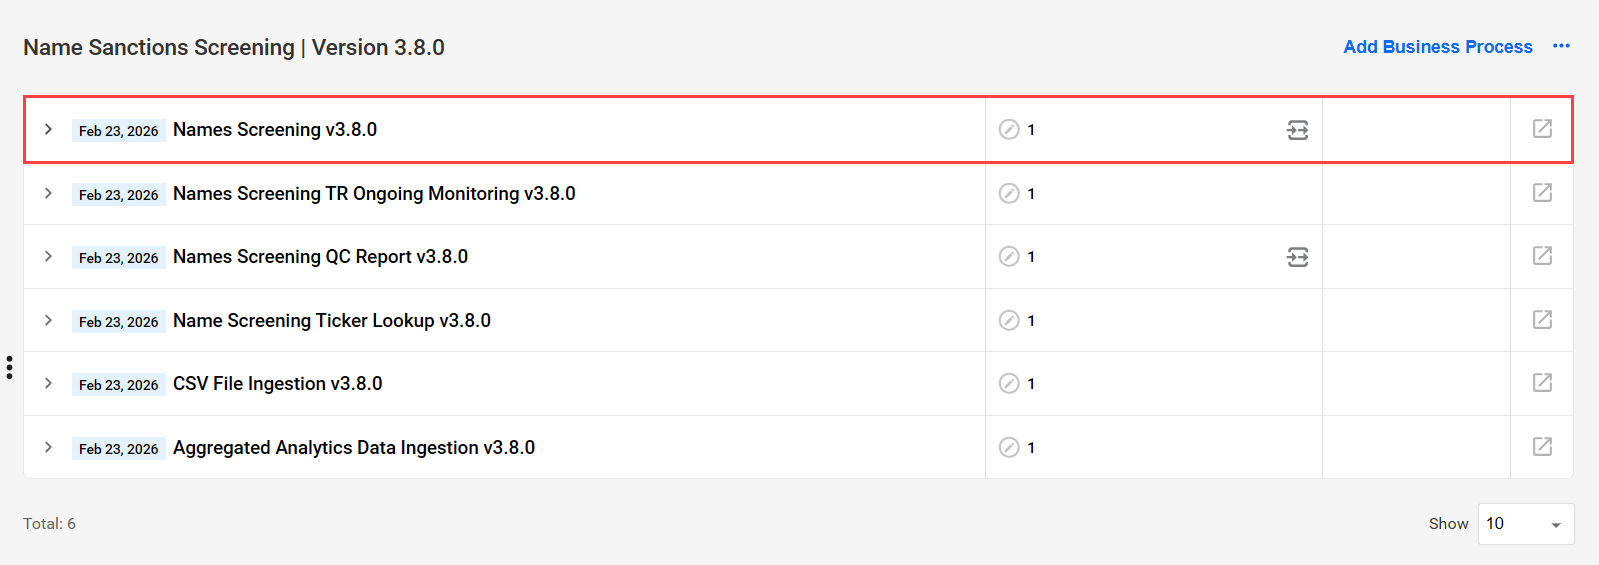
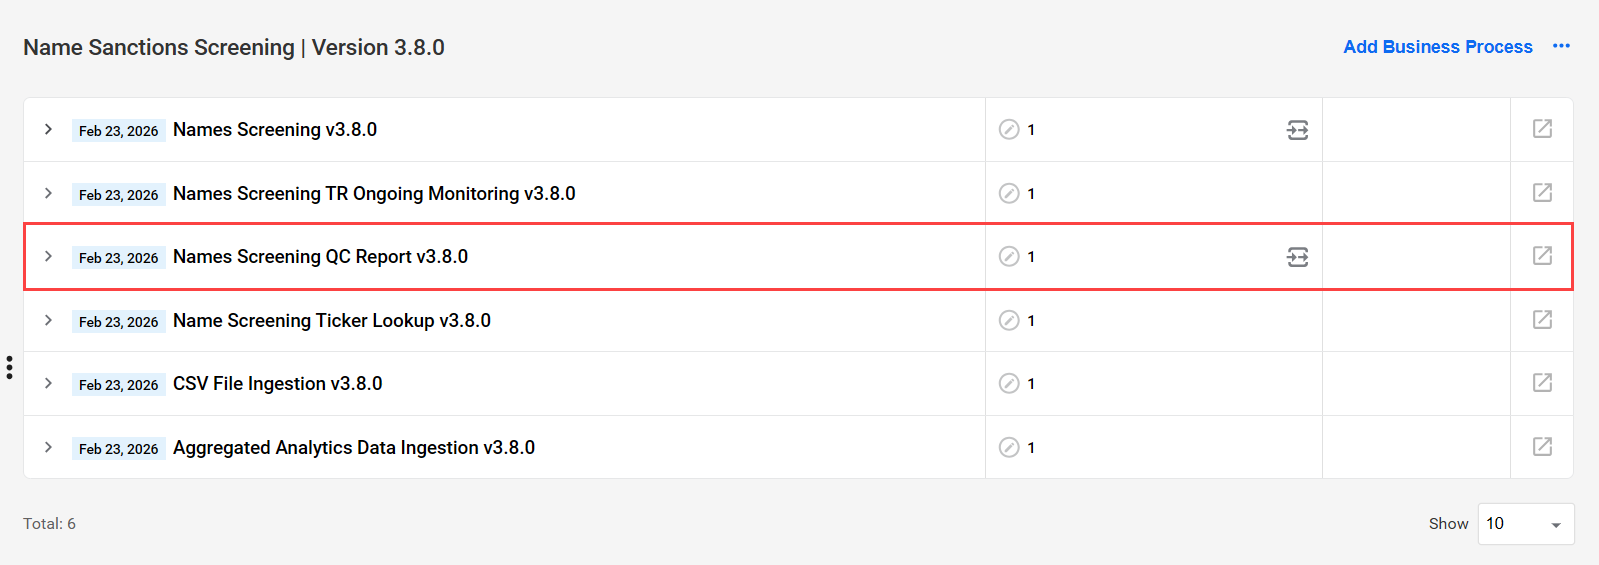
The Evelyn contains several Business Processes (BP):
Names Screening: runs the core screening workflow and generates screening results.
Name Screening Ticker Lookup: updates NSS internal ticker data by fetching the latest information from the SEC website.
Names Screening TR Ongoing Monitoring: triggers screening based on monitored events when you enable proactive, event-based monitoring.
Names Screening QC Report: generates quality control (QC) reports.
CSV File Ingestion: ingests CSV files to prepare data for processing.
Aggregated Analytics Data Ingestion: rebuilds the ds_aggregated_analytics master table so analytics dashboards load quickly by reading from pre-aggregated data.
Names Screening Business Process
The figure below is a sample core Names Screening BP workflow:
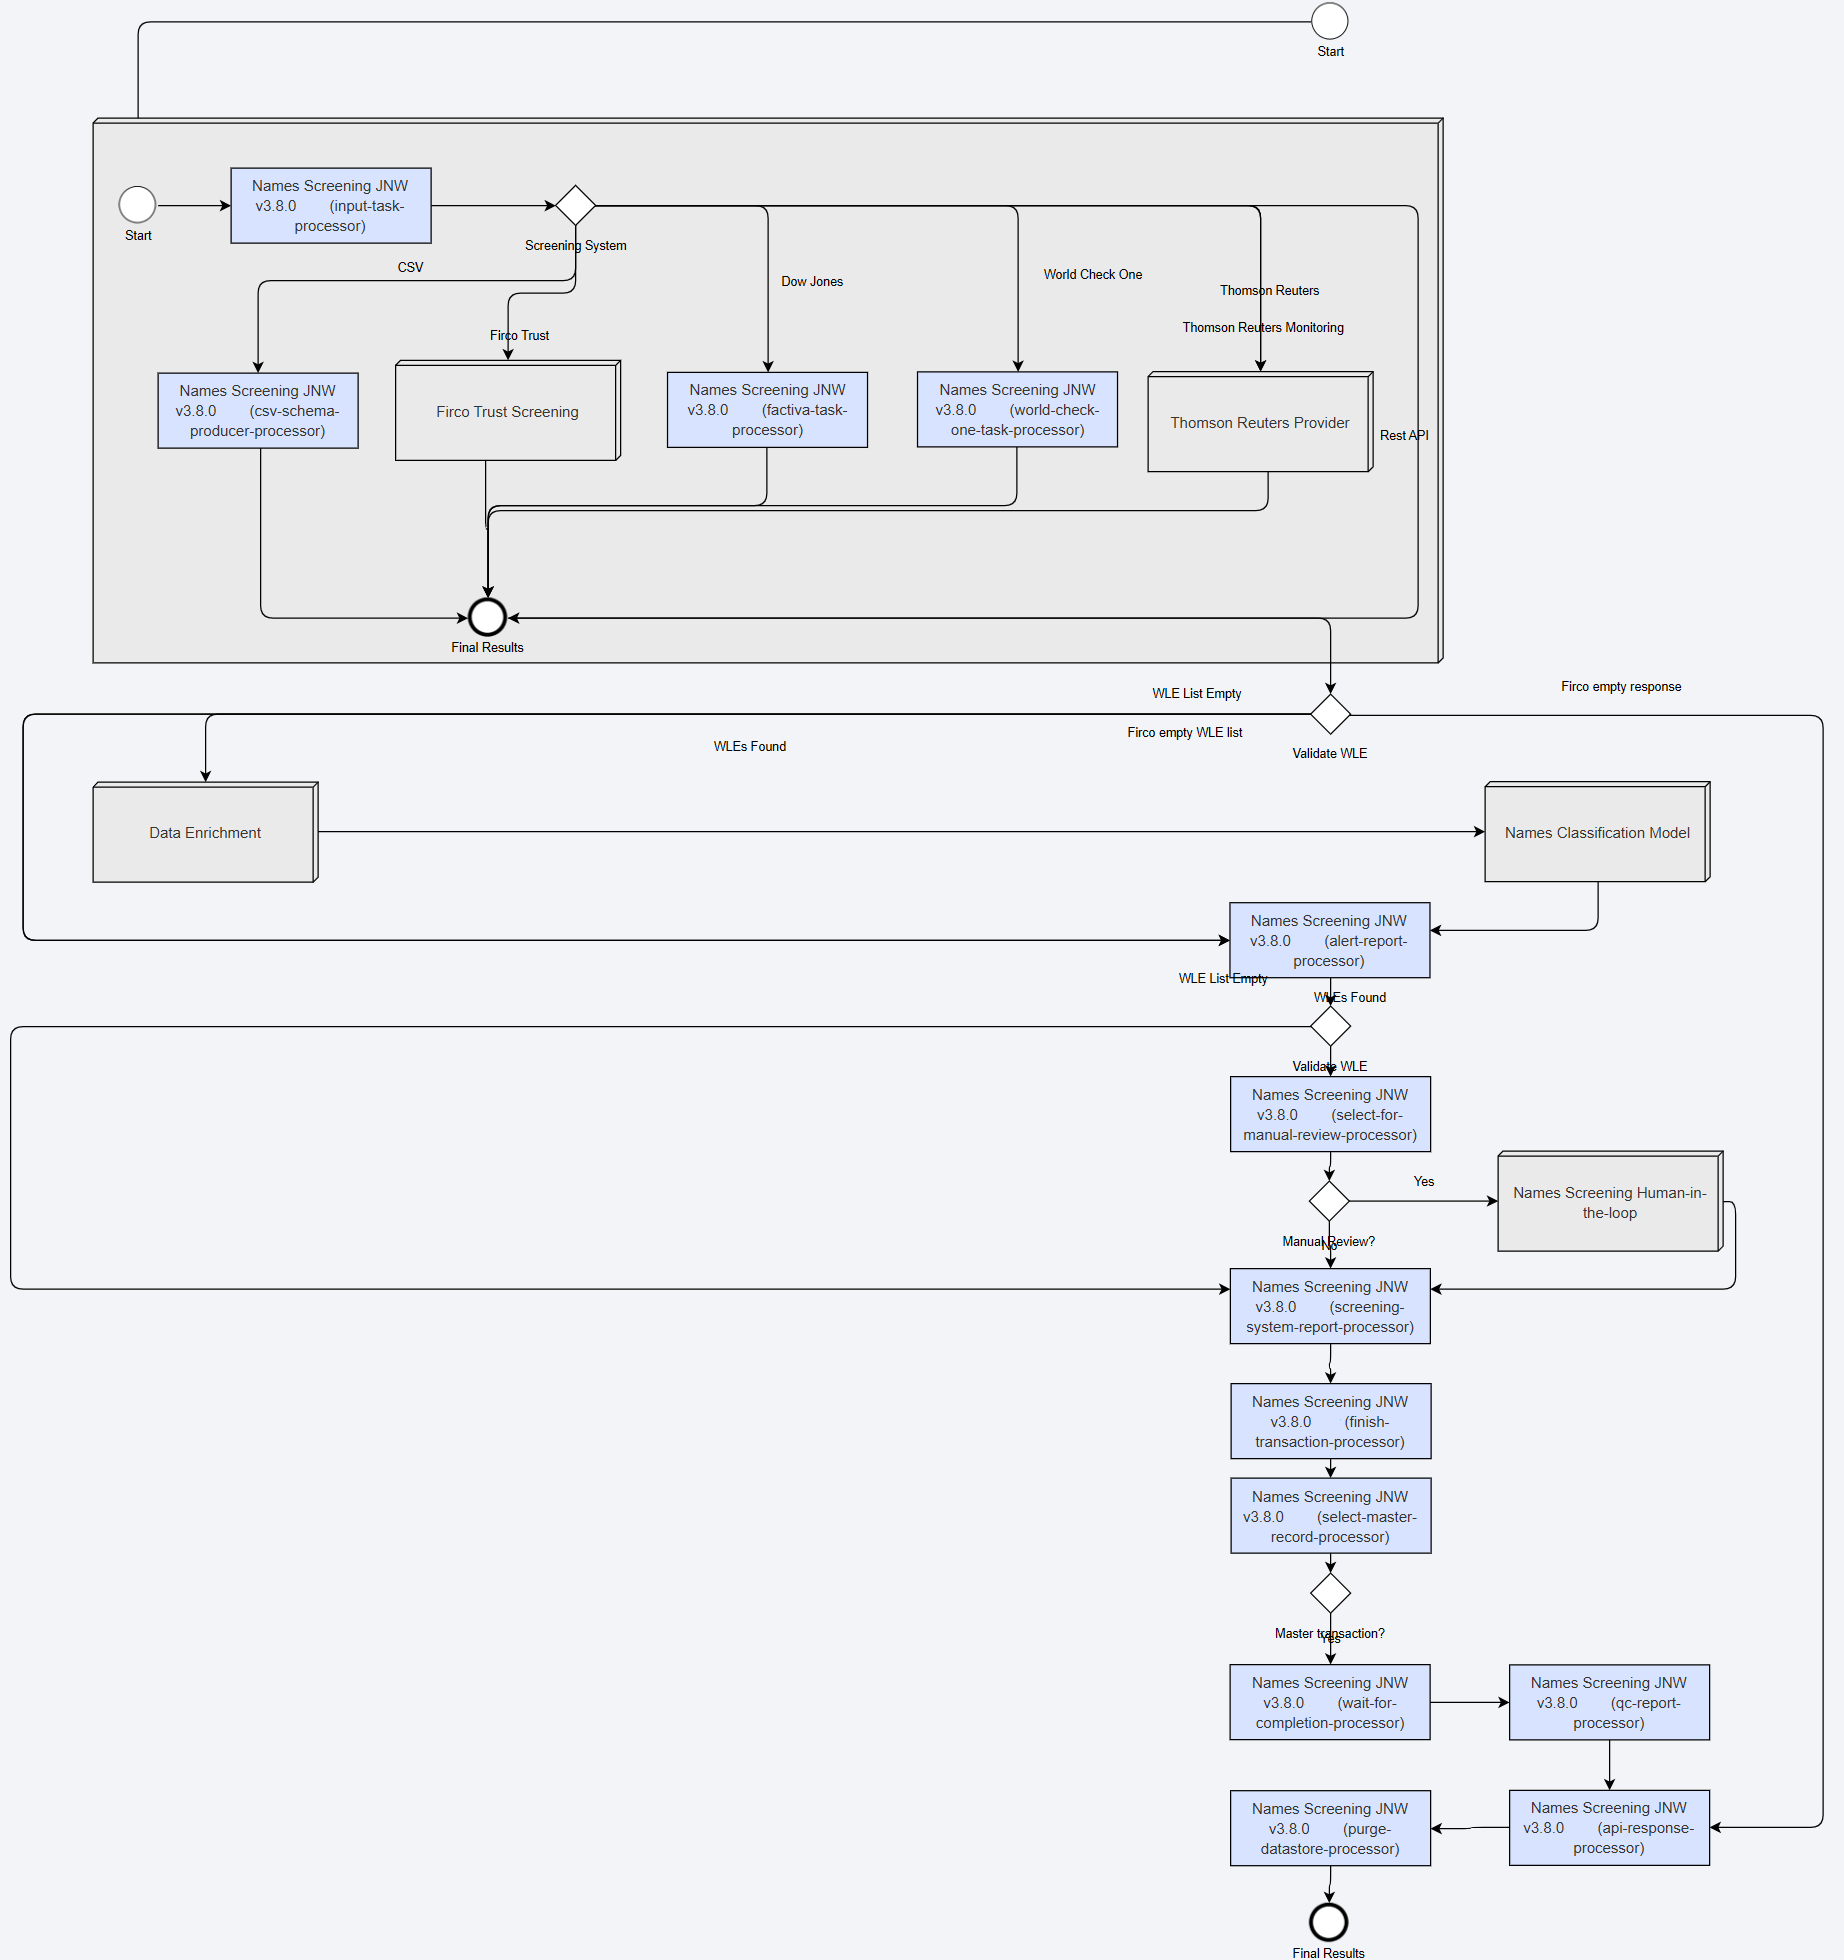
Once Evelyn is installed and configured, you can initiate screening in any of the following ways:
- Start the core BP using a signal ID.
- Start the BP through a REST API call with a CSV file.
- Call the NSS REST API.
Use signal ID
To start the core BP via a signal ID, do the following:
In the Control Tower main menu, go to Digital Workers, click View All, and find the Name Sanctions Screening group.
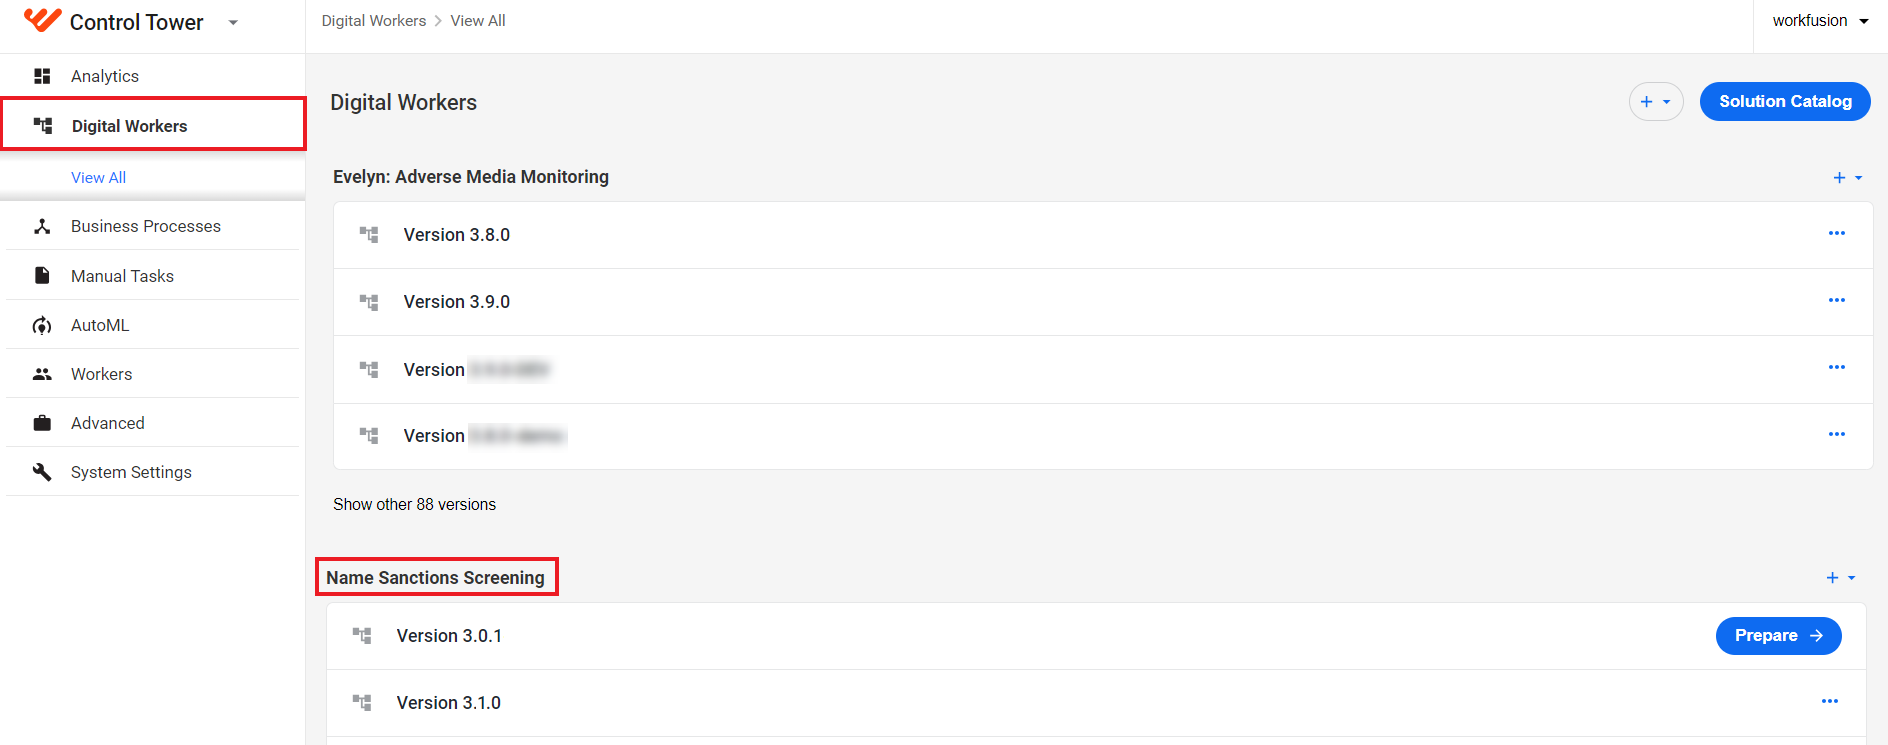
In the group, click the variation you wish to use. On the variation details page, open the core Names Screening vX.X.X BP definition.
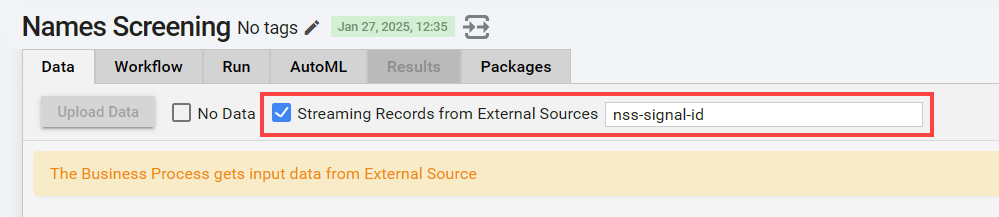
On the Data tab, select Streaming Records from External Sources and specify a signal ID.
Go to the Run tab and click Run This Process.
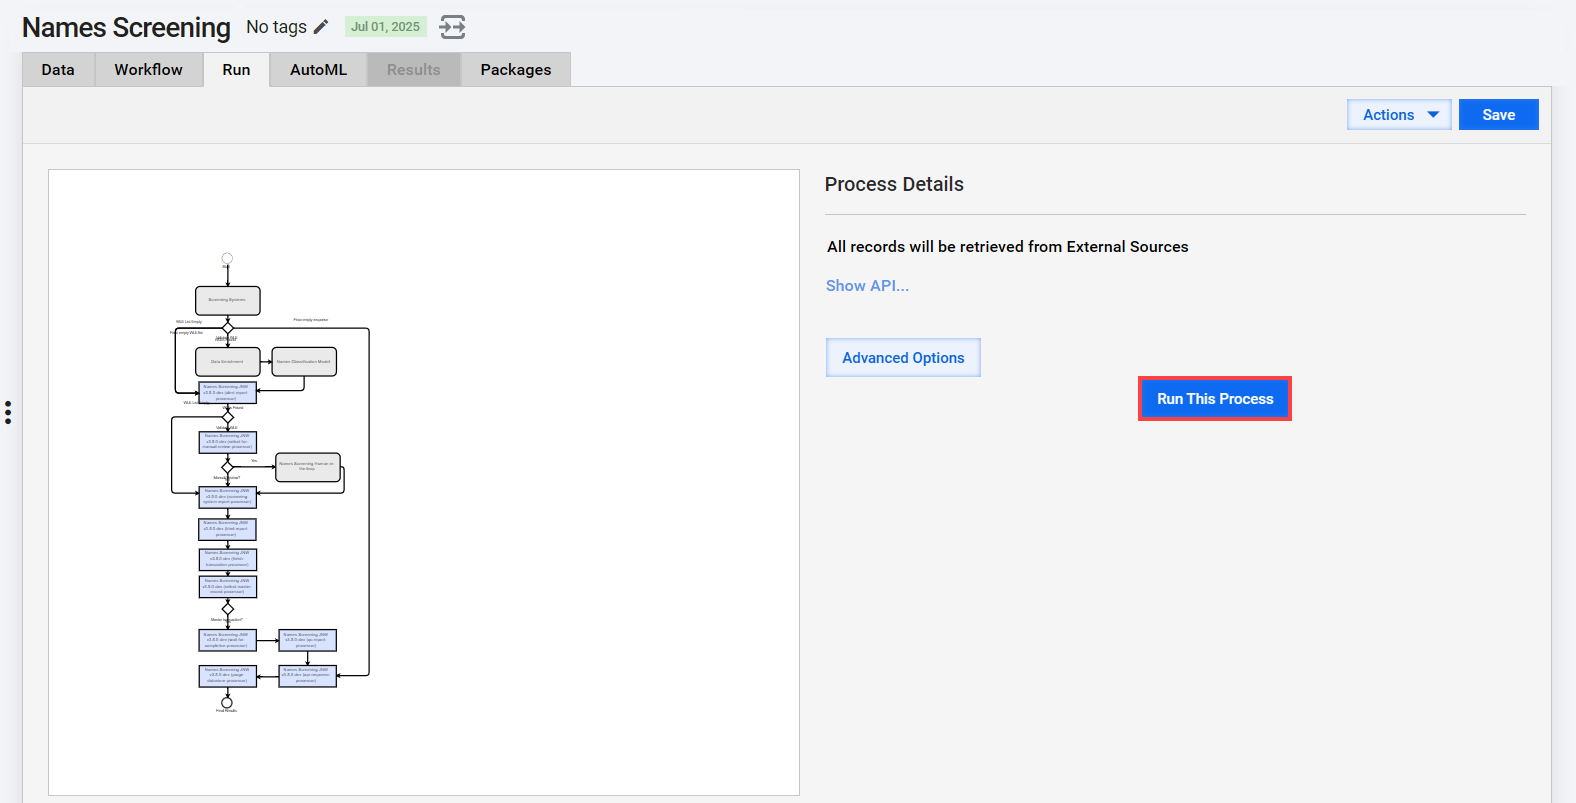
Once all entities from the input file are processed, the BP automatically ends and uploads a report to S3 MinIO.
You can set the core Names Screening BP to run on schedule. For more details, refer to Schedule Business Process.
From REST API with CSV file
To start the core Names Screening BP from REST API with a CSV file, make sure you selected WorkFusion API as the input source when configuring Evelyn.
Before running the BP, open the required process definition and navigate to the Data tab. Then, click Upload Data and upload a CSV file.
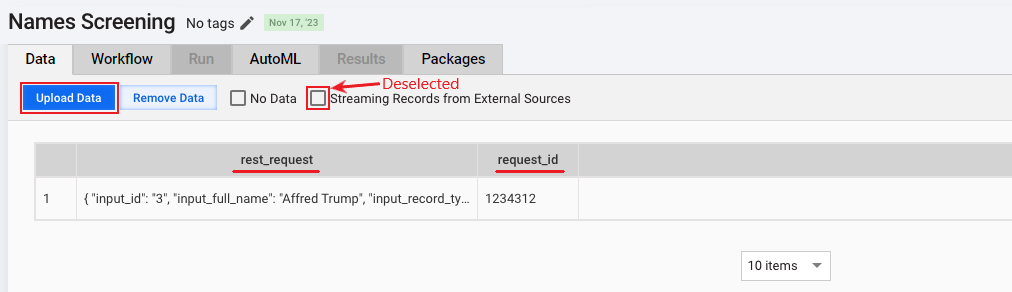
The CSV file must include the two required column headers:
request_idrepresenting the unique ID used for internal NSS processing.rest_requestcontaining the request to be parsed in NSS. It needs to be provided as JSON and must contain all required screening details.Sample JSON
"{
  ""input_id"": ""3"",
  ""input_full_name"": ""Affred Trump"",
  ""input_record_type"": ""person"",
  ""client_id"": ""123"",
  ""input_gender"": ""male"",
  ""input_address"": [
    {
      ""type"": ""citizenship"",
      ""country"": ""USA"",
      ""state"": ""NY"",
      ""city"": ""New York""
    }
  ],
  ""input_date"": [
    {
      ""type"": ""DOB"",
      ""year"": ""1949"",
      ""month"": ""06"",
      ""day"": ""14""
    }
  ],
  ""hits"": [
    {
      ""hit_id"": ""3_1"",
      ""hit_matched_name"": ""DoNald Trump"",
      ""hit_record_type"": ""INDIVIDUAL"",
      ""hit_gender"": ""male"",
      ""hit_address"": [
        {
          ""type"": ""citizenship"",
          ""country"": ""USA"",
          ""state"": ""NY"",
          ""city"": ""New York""
        }
      ],
      ""hit_date"": [
        {
          ""type"": ""DOB"",
          ""year"": ""1949"",
          ""month"": ""06"",
          ""day"": ""14""
        }
      ]
    }
  ]
}"
When you use REST API with a CSV file as a request source, Evelyn generates Quality Check and HTML reports as configured. One report is generated per REST request with all associated hits.
Go the Results tab to view the Business Process execution results.
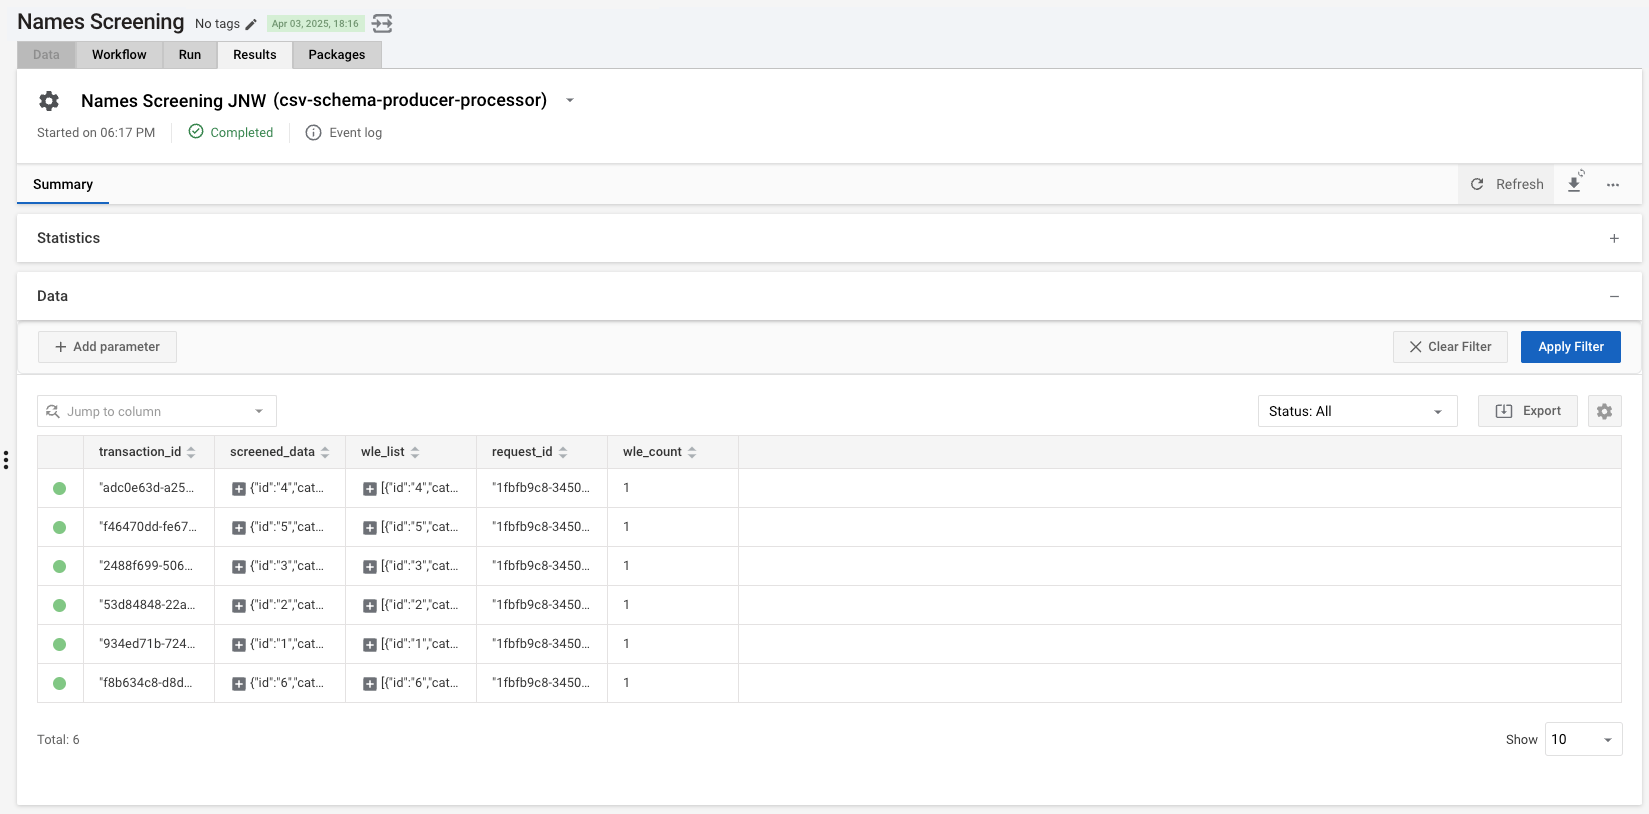
The Final Results section contains the following data:
transaction_id: transaction UUIDscreened_data: input data received for screeningwle_list: watchlist entity information received from a screening systemrequest_id: external request identifierwle_count: number of watchlist entities found per transaction
For more details, refer to Learn about input and output data.
Name Screening Ticker Lookup Business Process
Evelyn contains the Name Screening Ticker Lookup BP designed to maintain accurate and current ticker data within the NSS internal storage by fetching it from https://www.sec.gov/, which is a reliable source for financial information. The BP ensures that the internal storage of ticker data for various financial instruments is kept up to date and guarantees compliance with regulatory requirements.
To run the BP, complete the following steps:
On the Digital Workers page, in the Name Sanctions Screening group, click the required BP variation.
In the list of available BP definitions, open the Name Screening Ticker Lookup BP definition.
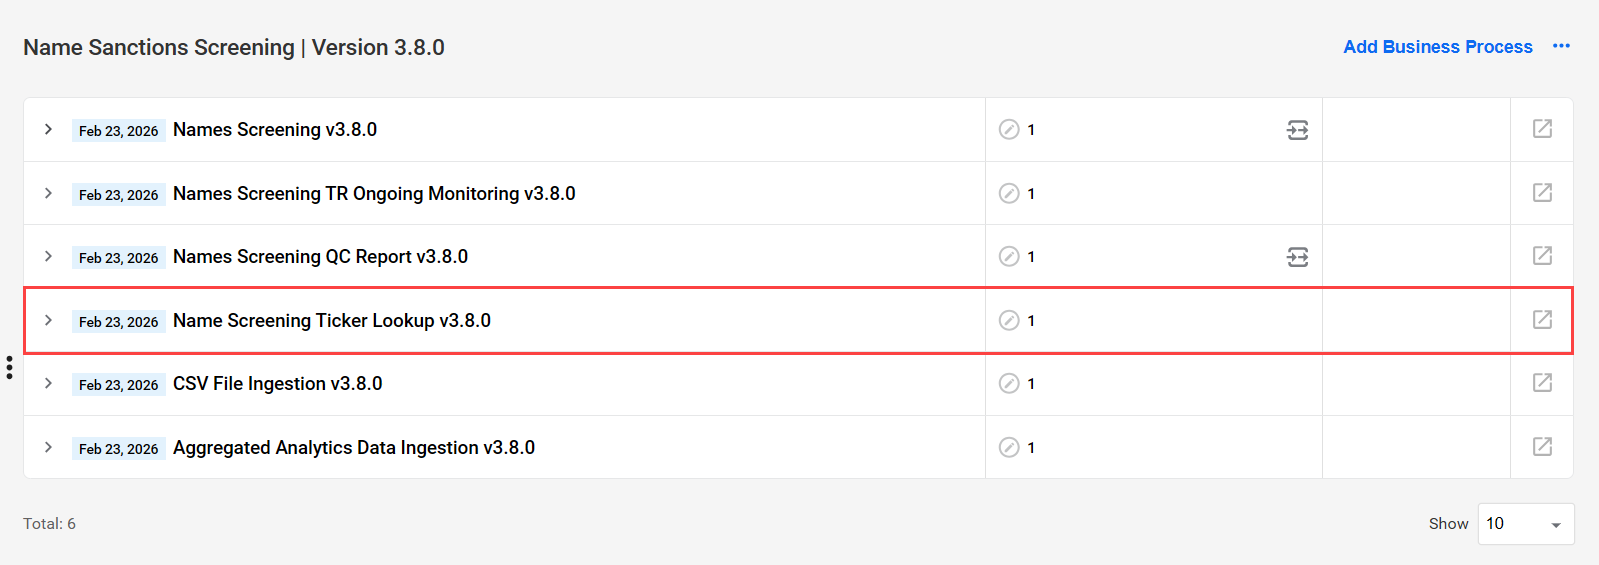
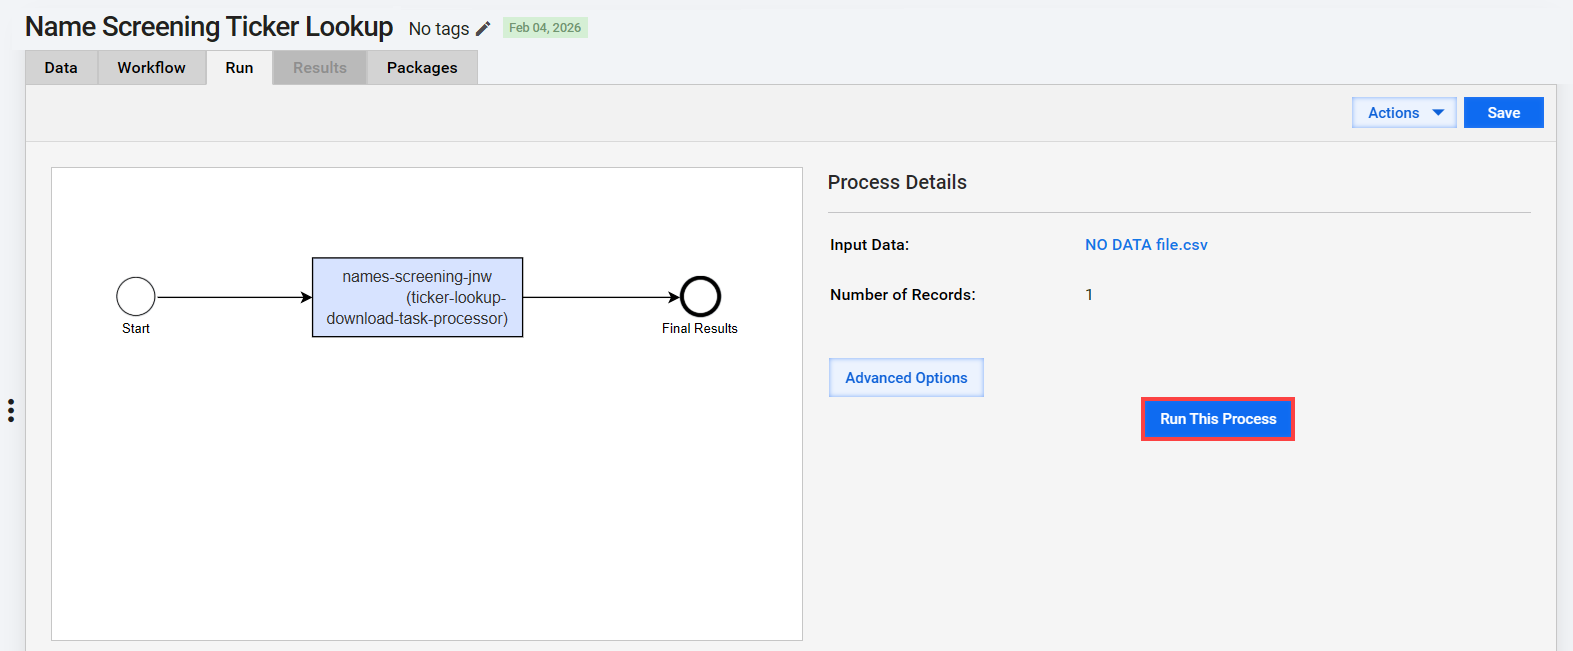
In the Business Process window, navigate to the Run tab and click Run This Process.
 tip
tipTo set the BP to update ticker information with your preferred frequency, schedule the BP execution.
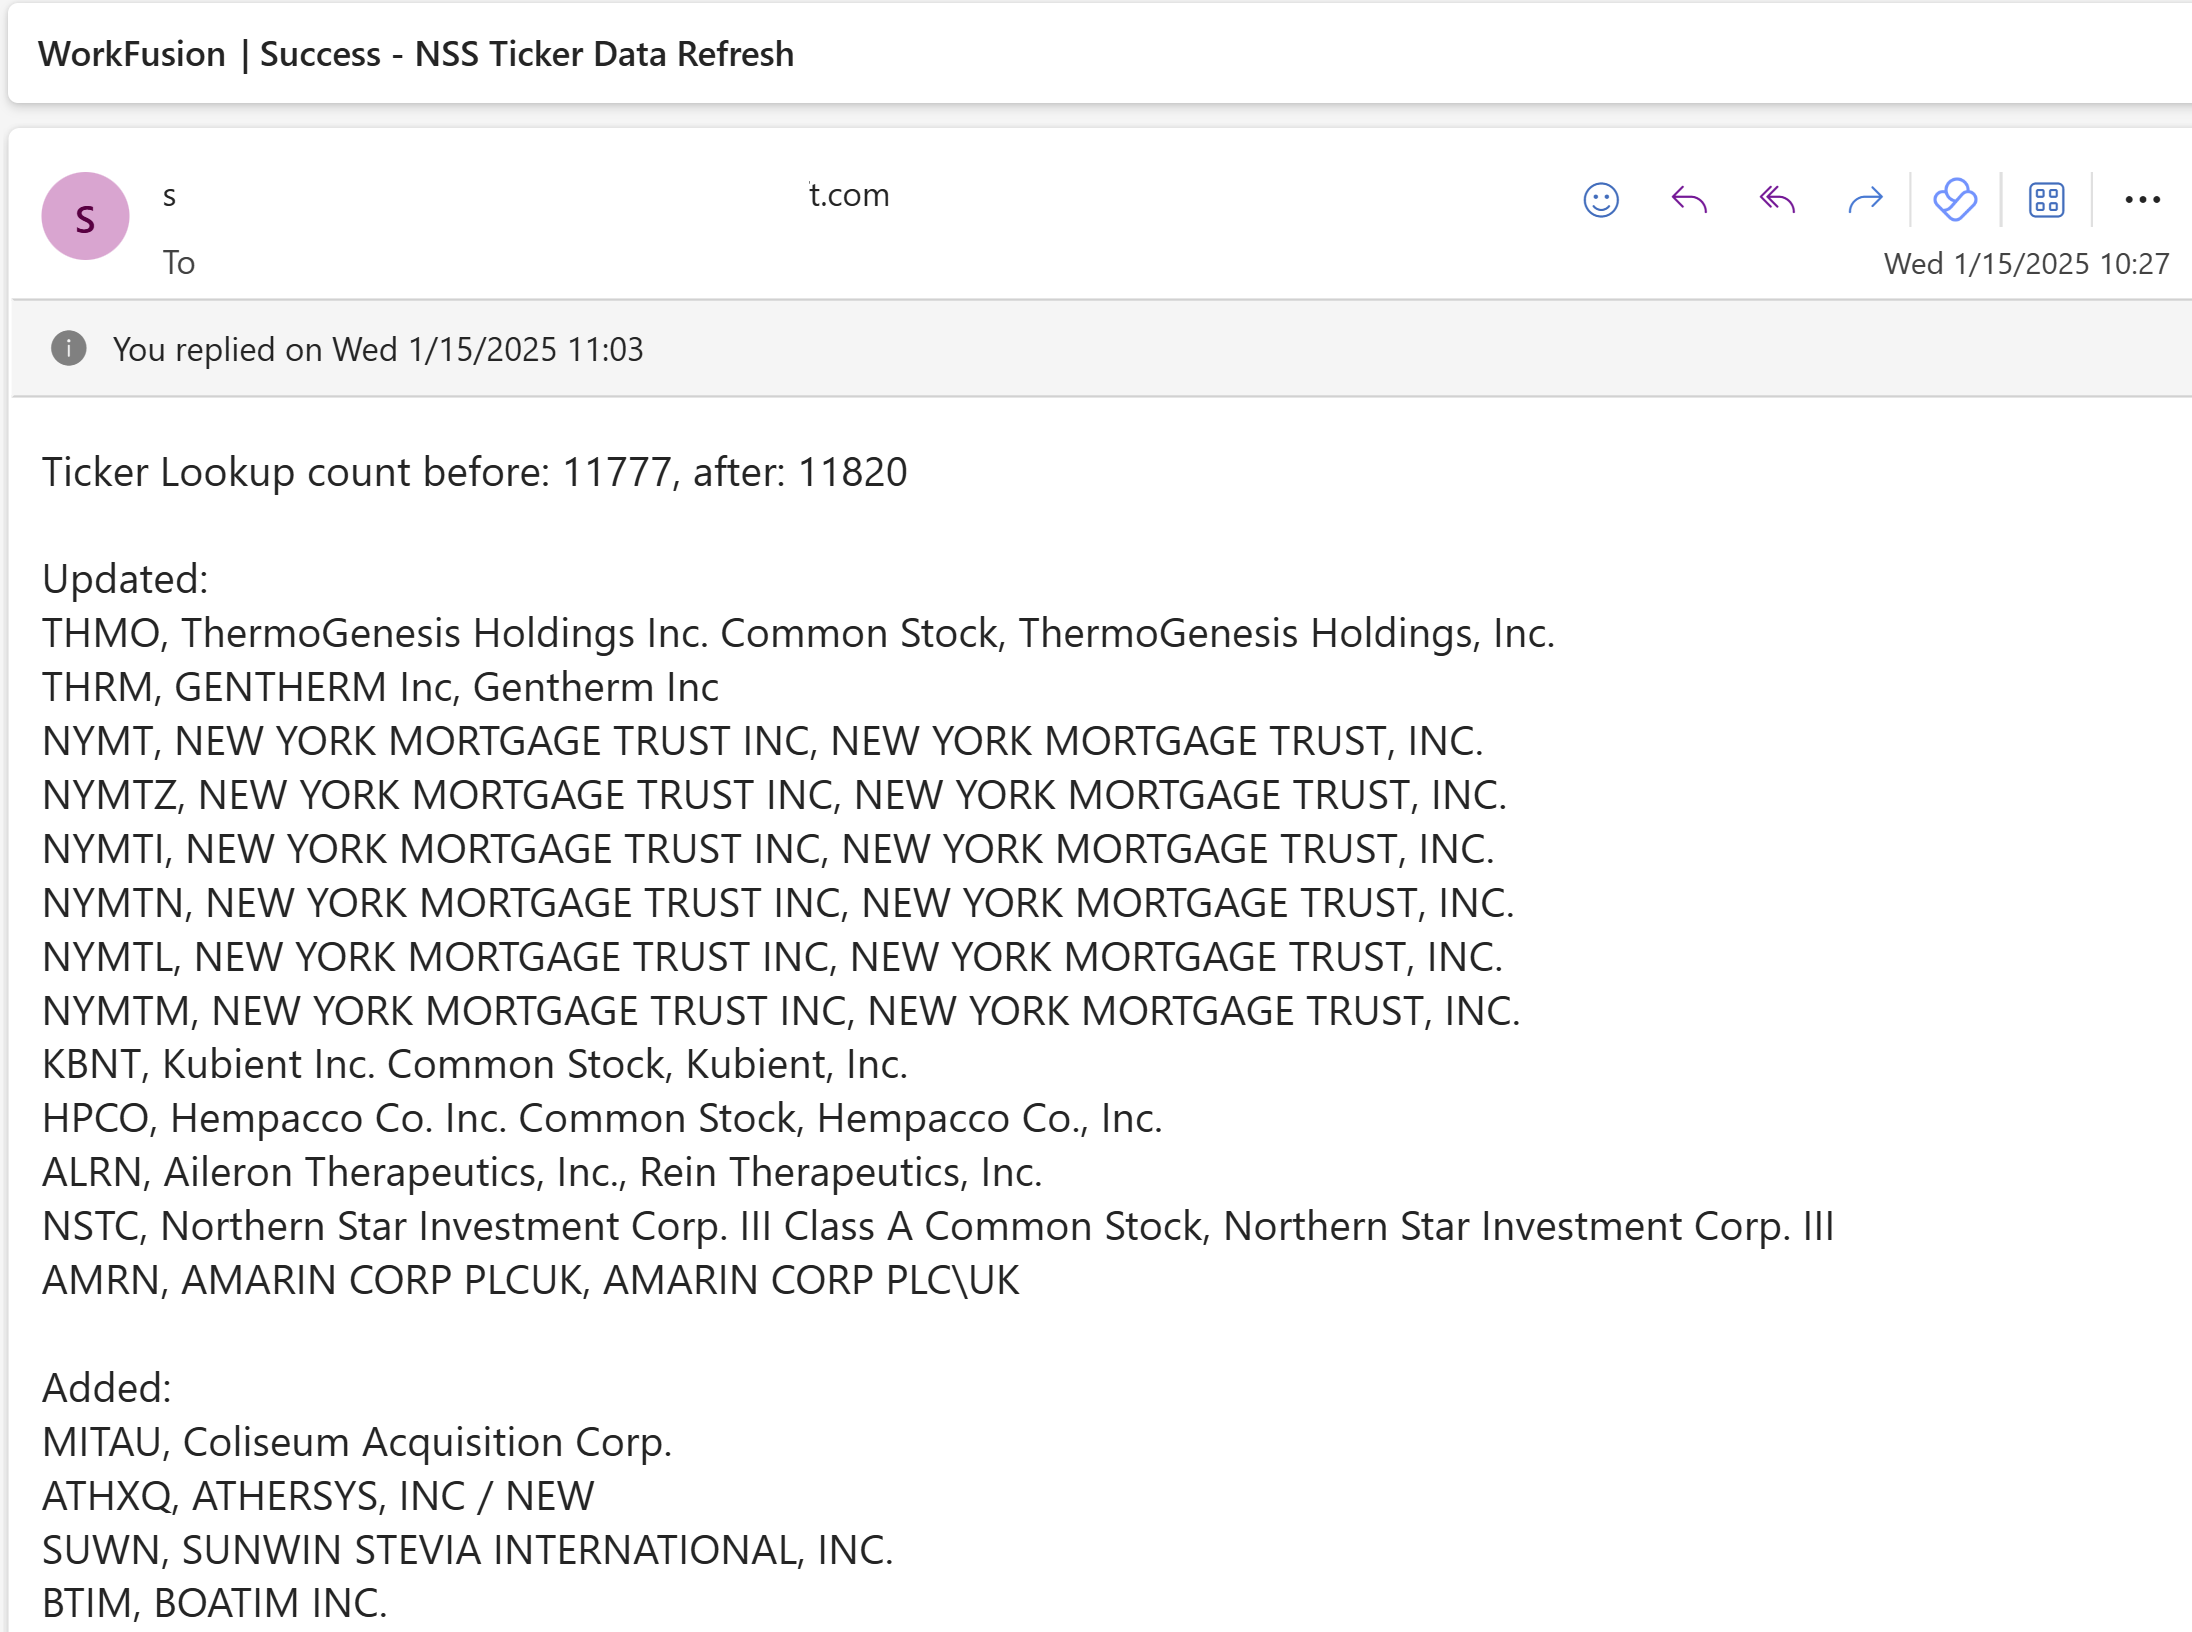
You can also set up email notifications for BP executions. If you enabled email notifications, after running the BP, execution results are sent to the specified email addresses.
To minimize disruption to the production environment, it is recommended to schedule the Name Screening Ticker Lookup BP outside of regular production working hours so it does not interfere with the execution of critical BPs.
The Name Screening Ticker Lookup BP propagates its execution results to logs. If a ticker is updated or added to the Data Store, the BP produces the following log entry:
Ticker Lookup count before 12345, after 12347

Updated:
ABC, Old ABC Name, New ABC Name

Added:
DEF - DEF Name
If no updates are made, the BP produces the following log entry:
Ticker Lookup no differences
Names Screening TR Ongoing Monitoring Business Process
The BP allows the screening to be automatically executed based on monitored events. It is used if you select the Proactively using event-based monitoring option when configuring the NSS input settings.
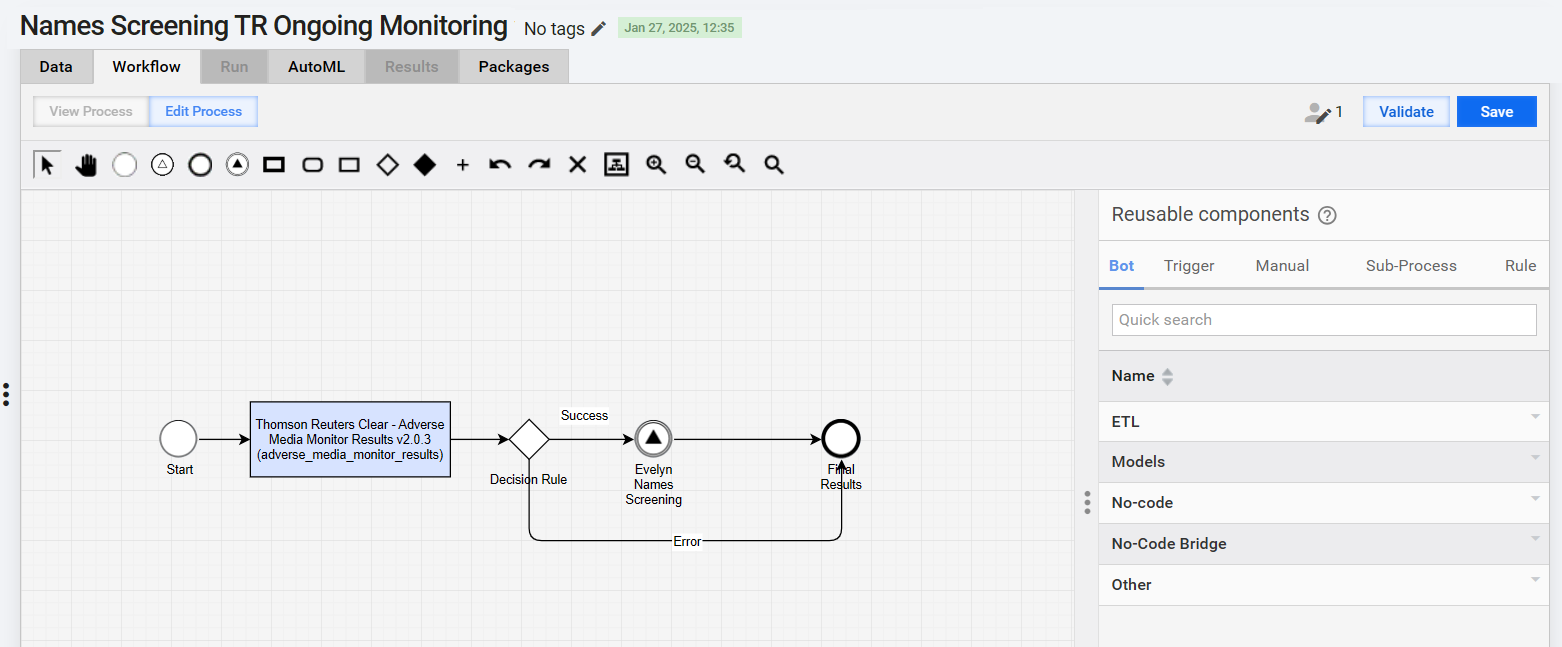
The Business Process uses the Monitor Results Polling Connector to proactively get results from the data provider (currently, only Thomson Reuters CLEAR) and then asynchronously call the core Names Screening BP to process the results.
To view the BP, do as follows:
On the Digital Workers page, in the Name Sanctions Screening group, click the required BP variation.
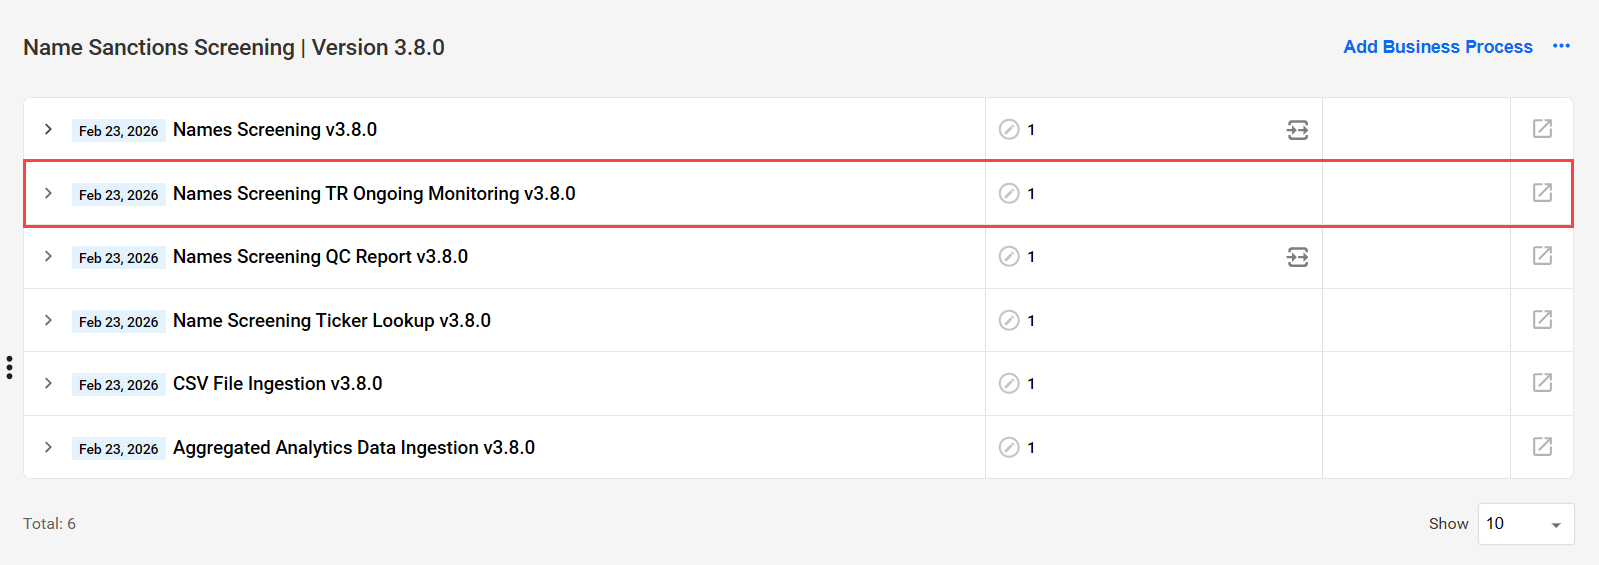
In the list of available BP definitions, open the Names Screening TR Ongoing Monitoring BP definition.
In the Business Process window, go to the Workflow tab.
Names Screening QC Report Business Process
The Names Screening QC Report BP enables other systems to interact with the report generation mechanism and request QC reports independently.
There are several ways to run the Names Screening QC Report BP:
Run Business Process automatically
When the BP is configured to run automatically, it runs as part of the core Names Screening BP. A QC report is generated for all transactions created by the core BP.
To run the BP automatically, in the configuration form, on the Output step, set Do you want QC report generated automatically? to Yes.
Run Business Process manually
You can run the BP manually in two ways:
- By sending a REST request (synchronous or asynchronous)
- With no input data. When no input data is provided, the AI Agent configuration is used to run the Business Process.
To run the BP through the REST API, complete the following steps:
In the configuration form, on the Input step, select WorkFusion API.
On the Output step > QC report, set Do you want QC report generated automatically? to No.
Go to Digital Workers > Name Sanctions Screening, click the required BP variation, and open Names Screening QC Report BP.
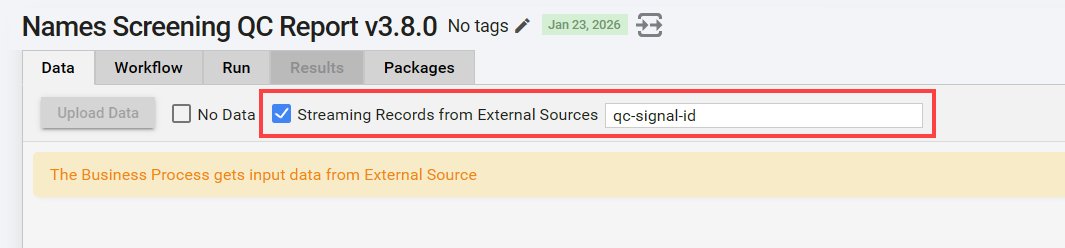
On the Data tab, select Streaming Records from External Sources and specify a signal ID.
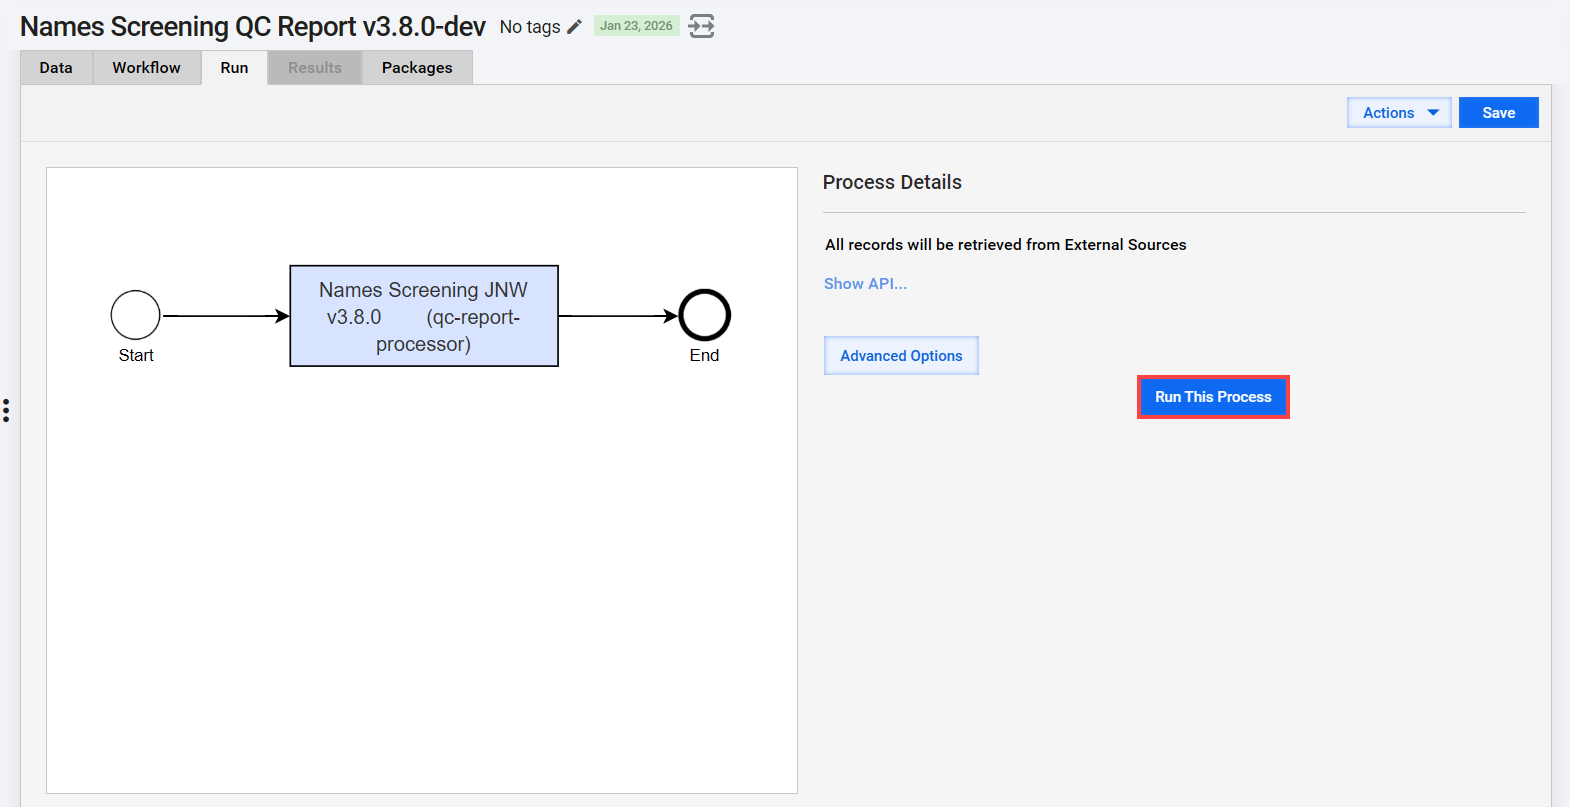
Go to the Run tab and click Run This Process.
For details about the REST request format and parameters, refer to View QC report Business Process contract.
To run the BP using only the configuration settings (no input data), complete the following steps:
In the configuration form, on the Input step, select WorkFusion API.
On the Output step > QC report, set Do you want QC report generated automatically? to No. Select how much data to collect and specify the required BP UUIDs or variations. For details, see Install and configure | Configure output.
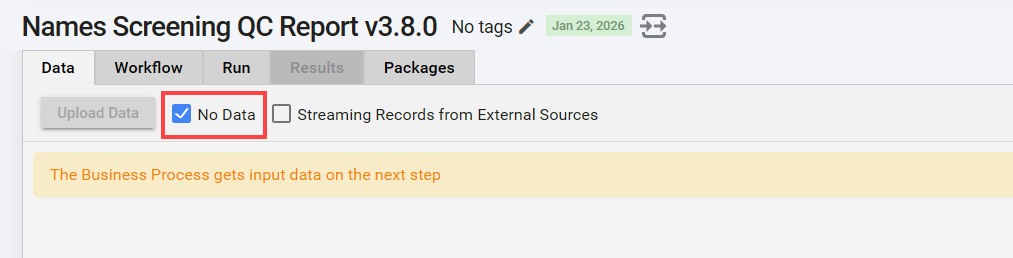
On the Data tab, select No data.
Go to the Run tab and click Run This Process.
Run Business Process with CSV file
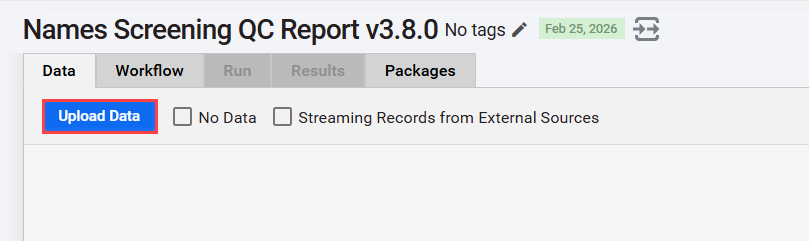
You can use a CSV file to provide input parameters for generating a QC report. This approach is particularly useful when scheduling the Names Screening QC Report Business Process. The configuration is the same as for the API-based approach. On the Data tab, click Upload Data, then upload a CSV file.
The CSV file uses the same parameters as the API. In the example below, the header row defines the parameter names, and the first row directly after the header contains the corresponding values.
business_process_ids,last_x_months
"89cbae81-a3ac-4345-b50e-df80a8360a0d, 09aa5e27-48a0-4db0-aa37-de8a8bc63682",28
This sample file generates a QC report covering the last 28 months for the following Business Process IDs: 89cbae81-a3ac-4345-b50e-df80a8360a0d and 09aa5e27-48a0-4db0-aa37-de8a8bc63682.
See also QC Report Business Process API contract.
Aggregated Analytics Data Ingestion
The Aggregated Analytics Data Ingestion BP rebuilds the ds_aggregated_analytics master table with fresh data so analytics dashboards can load from prebuilt results. To start the BP, do as follows:
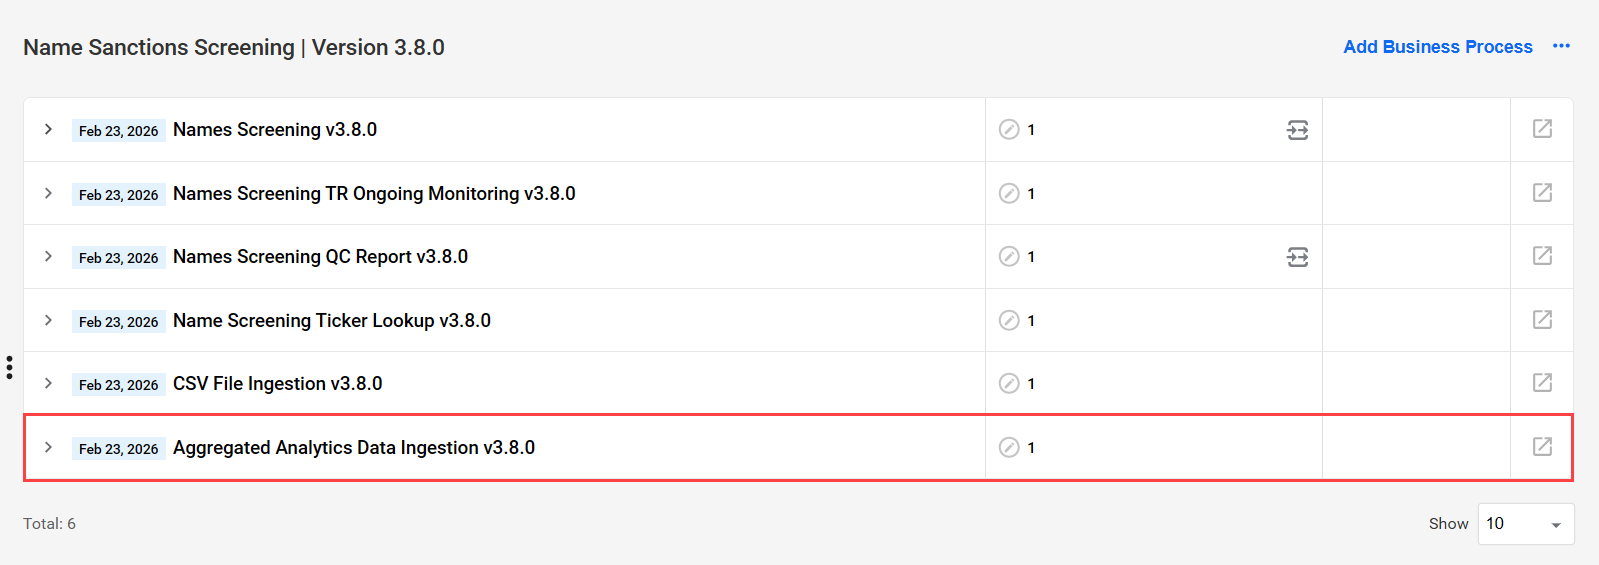
On the Digital Workers page, in the Name Sanctions Screening group, open the required BP variation.
In the list of available BP definitions, select the Aggregated Analytics Data Ingestion BP.
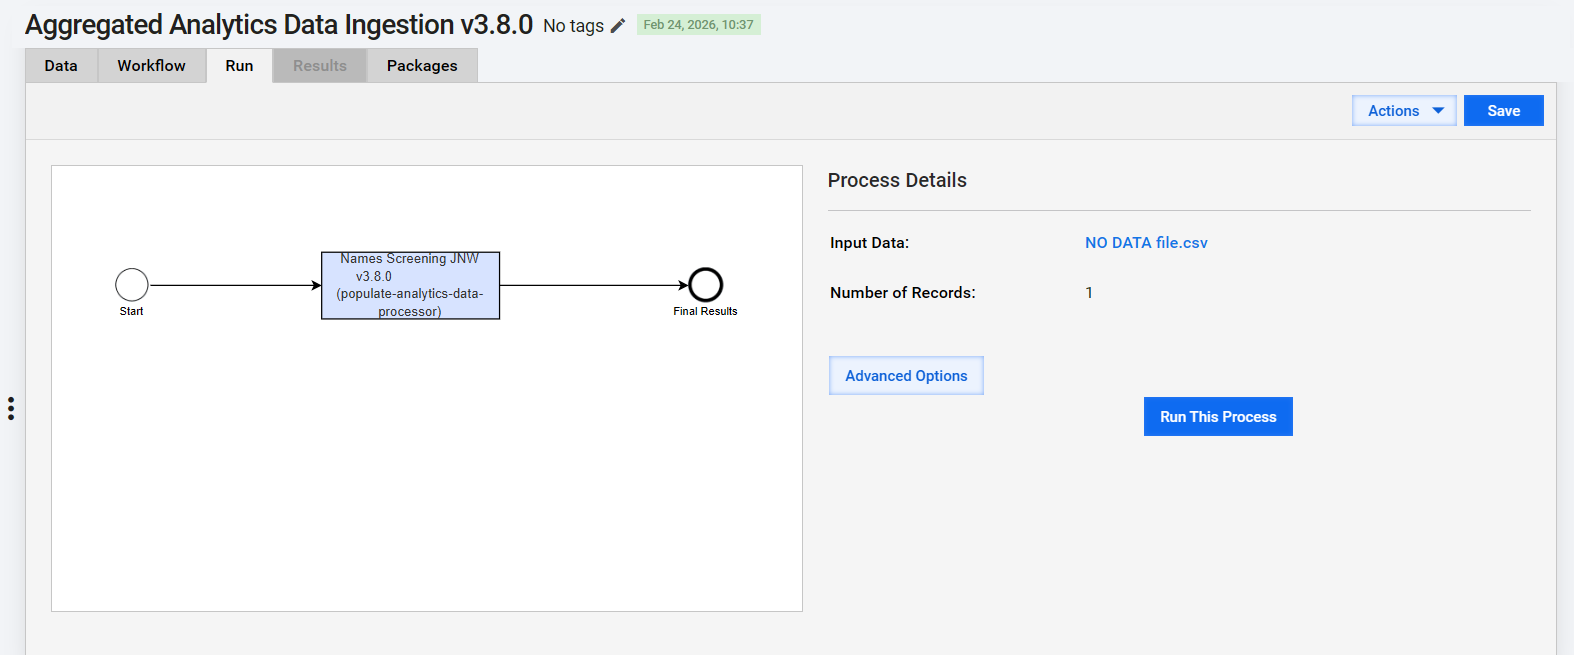
Go to the Run tab and click Run This Process.
You can also set the BP to run on schedule during off-peak hours to keep the master table current.
Call NSS REST API
You can invoke NSS by calling the WorkFusion REST API. To do it, set up an AI Agent variation to source data from WorkFusion API.
To configure REST endpoints, perform the following steps:
Open the required core BP definition. On the Data tab, select Streaming Records from External Sources. If needed, you can specify a custom signal ID.

On the Run tab, click the Run This Process button. Once the BP starts, go to the Run tab and click Show API... to find available generated endpoints.
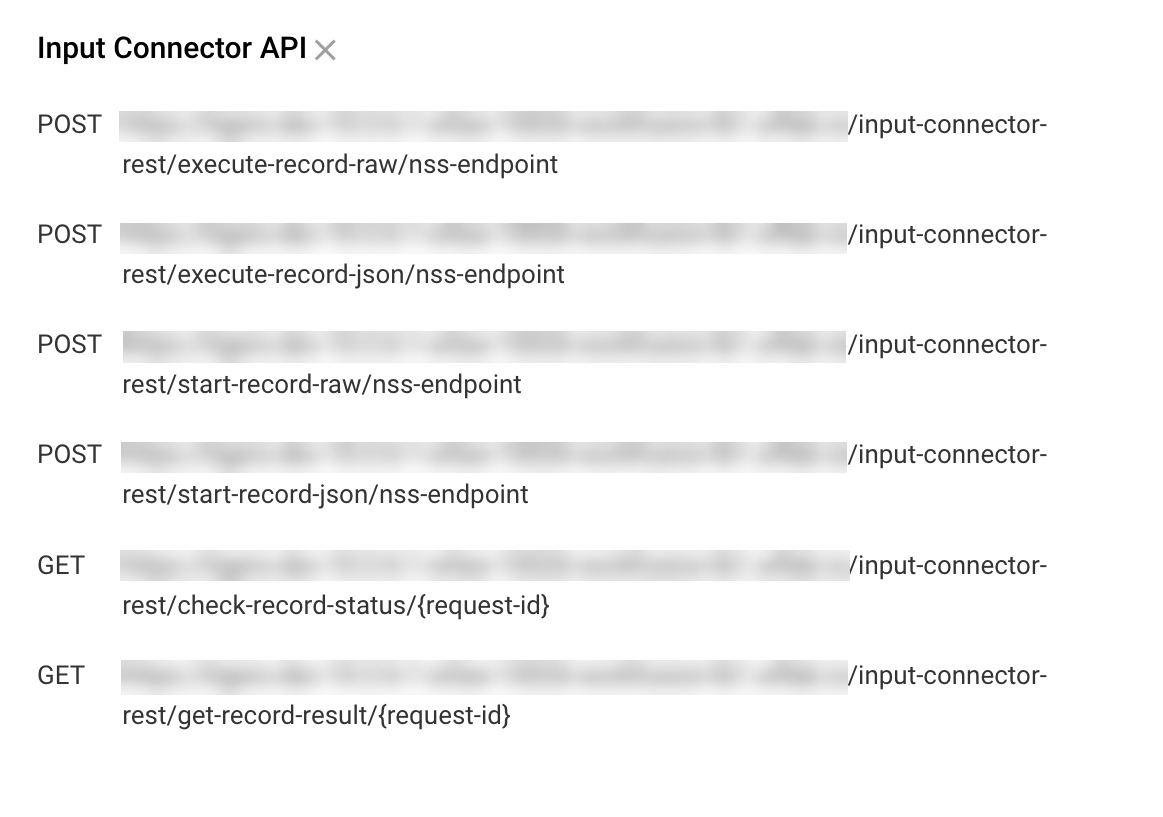
For NSS, only asynchronous invocation is supported. In this case, use only the following endpoints:
/start-record-rawto start a BP/check-record-statusto check the status of the running transaction/get-record-resultto get the result data of the completed transaction
- Running AI Agents via REST API to learn about invoking transactions and getting access to their token
- Evelyn API to see the detailed description of endpoints
- Process transactions with REST connector
REST API request format
Evelyn supports the following JSON structure for triggering screening. The structure depends on the selected screening system.
Additionally, a JSON request might include the following elements:
hitsconfiguration
Full alert screening JSON template
{
    "input_id": String (required),
    "input_full_name": String (required),
    "input_aliases": [
      alias1, alias2 ...
    ],
    "input_record_type": String,
    "client_id": String,
    "input_gender": String,
    "input_address": [
        {
            "type": String,
            "country": String,
            "state": String,
            "city": String,
            "street": String,
            "address": String
        },
        ...
    ],
    "input_date": [
        {
            "type": String,
            "year": String,
            "month": String,
            "day": String
        },
        ...
    ],
    "hits": [
        {
            "hit_id": String (required),
            "hit_matched_name": String (required),
            "hit_aliases": [
              alias1, alias2 ...
            ],
            "hit_record_type": String,
            "hit_gender": String,
            "hit_address": [
                {
                    "type": String,
                    "country": String,
                    "state": String,
                    "city": String,
                    "street": String,
                    "address": String
                },
                ...
            ],
            "hit_date": [
                {
                    "type": String,
                    "year": String,
                    "month": String,
                    "day": String
                },
                ...
            ]
        }
    ],
    "configuration":
    {
        "mt_assignee": String,
        "mt_title": String,
        "mt_force": String,
        "mt_filter_sla": String,
        ...
    }
}
Dow Jones Risk & Compliance, World-Check One, Thomson Reuters JSON template
The request JSON structure should contain only input elements. If the hits element is present, it is ignored.
{
  "input_id": String (required),
    "input_full_name": String (required),
    "input_aliases": [
      alias1, alias2 ...
    ],
    "input_record_type": String,
    "client_id": String,
    "input_gender": String,
    "input_address": [
        {
            "type": String,
            "country": String,
            "state": String,
            "city": String,
            "street": String,
            "address": String
        },
        ...
    ],
    "input_date": [
        {
            "type": String,
            "year": String,
            "month": String,
            "day": String
        },
        ...
    ],
    "configuration":
    {
        "mt_assignee": String,
        "mt_title": String,
        "mt_force": String,
        "filter_attribute_1": String,
        ...
    }
}
Firco Trust Case Manager API JSON template
Once the screening with Firco Trust System is initiated, all existing messages are processed via a BP.
Firco Trust business units and units coming from a REST request have a higher priority than the AI Agent configuration.
{
  firco_trust_b_unit: String,
  firco_trust_unit: ["unit_1", "unit_2"]
}
REST API response format
After a successful run, the BP sends a response. The response JSON structure can be different, depending on the selected screening system.
If you enable Quality Check (QC) or HTML reports when configuring the AI Agent, the REST response will include hyperlinks to the reports.
Full alert screening JSON template
{
    "input_id": String,
    "alert_resolution": String,
    "alert_explanation": String,
    "html_report_link": String,
    "qc_report_link": String,
    "hits": [
        {
            "hit_id": String,
            "hit_resolution": String,
            "hit_explanation": String
        }
    ]
}
Dow Jones Risk & Compliance, World-Check One JSON template
{
    "input_id": String,
    "alert_resolution": String,
    "alert_explanation": String,
    "html_report_link": String,
    "qc_report_link": String,
    "hits": [
        {
            "hit_id": String,
            "hit_resolution": String,
            "hit_explanation": String
        }
    ]
}
Firco Trust Case Manager API JSON template
{
    "report_link": []
}
Example of REST API response with hit decision scores
{
    "input_id": "1",
    "alert_resolution": "Needs further review",
    "alert_explanation": "This case can not be evaluated as false positive because there is a hit required additional review",
    "hits": [
        {
            "hit_id": "1",
            "hit_resolution": "False positive",
            "hit_explanation": "False Positive.\nStrong name mismatch (\"THE NEW BROWN FAMILY TRUST\", \"ABCD TEST T\"). ",
            "hit_score": "0.69"
        },
        {
            "hit_id": "2",
            "hit_resolution": "Need more information",
            "hit_explanation": "Please review manually. Not enough information to disposition.\nStrong name match (\"THE NEW BROWN FAMILY TRUST\", \"NEW BROWN FAMILY\"). \nWeak location mismatch (\"Los angeles, Ca, Usa\", \"VA USA\"). ",
            "hit_score": "1.0"
        }
    ],
    "html_report_link": "https://link.to.html_report.html",
    "qc_report_link": "https://link.to.qc_report.csv"
}
REST API configuration map
You can send a JSON configuration as part of REST requests to override the AI Agent's configuration associated with processing Manual Tasks (MT).
Default parameters
The following parameters, if sent, are processed by Evelyn to configure manual review assignments:
mt_assigneesets an assignee for an assignment in Workspace. For details, see Define task assignees.mt_prioritysets the assignment priority. For details, see Set assignment priority.mt_titlesets the assignment title. For details, see Adjust assignment title.mt_forceforces a request to go to the manual review step.- If the parameter is set to
true, the request goes to the manual review step regardless of the AI Agent's configuration. - If set to
false, the manual review step is skipped regardless of the AI Agent's configuration.
- If the parameter is set to
Additional parameters
In addition to the default ones, you can send any other parameters as part of the configuration map, including to create filter attributes.
Sample request
In the example, mt_filter_sla can be used to create filter attributes.
{
    "input_id": "183800066.6686744",
    "input_full_name": "PINKAL PATEL",
    "input_record_type": "INDIVIDUAL",
    "input_gender": "",
    "input_address":
    [
        {
            "type": "",
            "country": "USA",
            "state": "CT",
            "city": "BERLIN"
        }
    ],
    "input_date":
    [
        {
            "type": "DOB",
            "year": "1976",
            "month": "07",
            "day": "05"
        }
    ],
    "hits":
    [
        {
            "hit_id": "149868084",
            "hit_matched_name": "PINKAL P PATEL",
            "hit_record_type": "INDIVIDUAL",
            "hit_gender": "",
            "hit_address":[],
            "hit_date":[]
        }
    ],
    "configuration":
    {
        "mt_assignee": "aharhots1",
        "mt_title": "PINKAL PATEL - WKSFN2342",
        "mt_force": "true",
        "mt_filter_sla": "01/01/2024"
    }
}
QC Report Business Process API contract
The endpoint accepts filters to generate QC reports for either BP IDs or specific variations within a defined time range.
The endpoint is available with the following settings:
Method: POST
Path:
/qc-signal-idAuthorization: Bearer token
Content-Type:
application/json
Request body schema contains the following parameters:
business_process_ids: array of UUID strings. If provided together withvariations, this field takes precedence andvariationsis ignored.variations: array of strings. Used only whenbusiness_process_idsis not provided.last_x_hours: string integer ≥ 0. Mutually exclusive withlast_x_daysandlast_x_months. Only one of these relative-window fields can be provided.last_x_days: string integer ≥ 0. Mutually exclusive withlast_x_hoursandlast_x_months.last_x_months: string integer ≥ 0. Mutually exclusive withlast_x_hoursandlast_x_days.start_time: string; absolute start time. Required ifend_timeis provided. The format must beMM/DD/YYYY HH:mm:ss.end_time: string; absolute end time. Required ifstart_timeis provided. The format must beMM/DD/YYYY HH:mm:ss. Must be later thanstart_time.
Mind the following:
At least one of
business_process_idsorvariationsis required. If both are provided,business_process_idsis used.A time range is required: either exactly one relative window (
last_x_hours,last_x_days, orlast_x_months) or both absolute bounds (start_timeandend_time).Relative windows are interpreted as past N units from now. If
0is provided, the window starts at the beginning of the current unit (hour/day/month).
See request examples
- Request a QC report for a specific BP UUID for the last 10 hours:
{
    "business_process_ids": ["e5f9d47e-daf0-419f-91cc-3a274c1aaaf5", "2138aabd-cb42-4459-945c-36a14ac5cea1"],
    "last_x_hours": "10"
}
- Request a QC report for a specific BP UUID for the last 10 days:
{
    "business_process_ids": ["e5f9d47e-daf0-419f-91cc-3a274c1aaaf5", "2138aabd-cb42-4459-945c-36a14ac5cea1"],
    "last_x_days": "10"
}
- Request a QC report for a specific BP UUID for the last 2 months:
{
    "business_process_ids": ["e5f9d47e-daf0-419f-91cc-3a274c1aaaf5", "2138aabd-cb42-4459-945c-36a14ac5cea1"],
    "last_x_months": "2"
}
- Request a QC report for a specific BP UUID for a defined time range:
{
    "business_process_ids": ["e5f9d47e-daf0-419f-91cc-3a274c1aaaf5", "2138aabd-cb42-4459-945c-36a14ac5cea1"],
    "start_time": "03/07/2026 10:10:10",
    "end_time": "04/07/2026 10:10:10"
}
- Request a QC report for specific variations for the last 10 hours:
{
    "variations": ["3", "4"],
    "last_x_hours": "10"
}
- Request a QC report for specific variations for the last 10 days:
{
    "variations": ["3", "4"],
    "last_x_days": "10"
}
- Request a QC report for specific variations for the last 2 months:
{
    "variations": ["3", "4"],
    "last_x_months": "2"
}
- Request a QC report for specific variations for a defined time range:
{
    "variations": ["3", "4"],
    "start_time": "03/07/2026 10:10:10",
    "end_time": "04/07/2026 10:10:10"
}
API request status tracking
To support REST request tracking, Evelyn is enhanced with the capability to update a dedicated Data Store when an MT is created, saved, or completed.
The tracking feature works only if you meet the following requirements:
Select WorkFusion REST API as the input source during the AI Agent's configuration
Create a Secrets Vault entry using the following parameters:
- Alias:
workspace_url - Key: URL to Workspace
- Value: leave empty
If no Secrets Vault entry is found during NSS processing, the request status contains an error and prompts you to create a Secrets Vault entry.
- Alias:
Evelyn updates the dedicated uc_B_AML_PEP_request_status_v3_0 Data Store with the current request progress in the following cases:
When an MT is ready for review.
The current request ID in the Data Store is updated with the
READY_FOR_MTstatus. The message contains a link to the MT corresponding to the current alert.After the MT is resolved.
The current request ID in the Data Store is updated with the
MT_COMPLETEDstatus. The message is empty until record processing is in progress.After NSS processing is finished.
The current request ID in the Data Store is updated with the
FINISHEDstatus. The message is updated with the NSS REST output contract.
For more details, see Understand NSS data flow | Tracking request status table.
View and submit assignment in Workspace
Before reviewing assignments, make sure you have required Workspace permissions and a secret entry for the Workspace URL in Secrets Vault.
Once Evelyn triggers the human-in-the-loop capability, the respective Manual Task becomes available in Workspace as an assignment in the assignment list.

The assignment page displays the following details:
Input data
Hits
Original model decisions
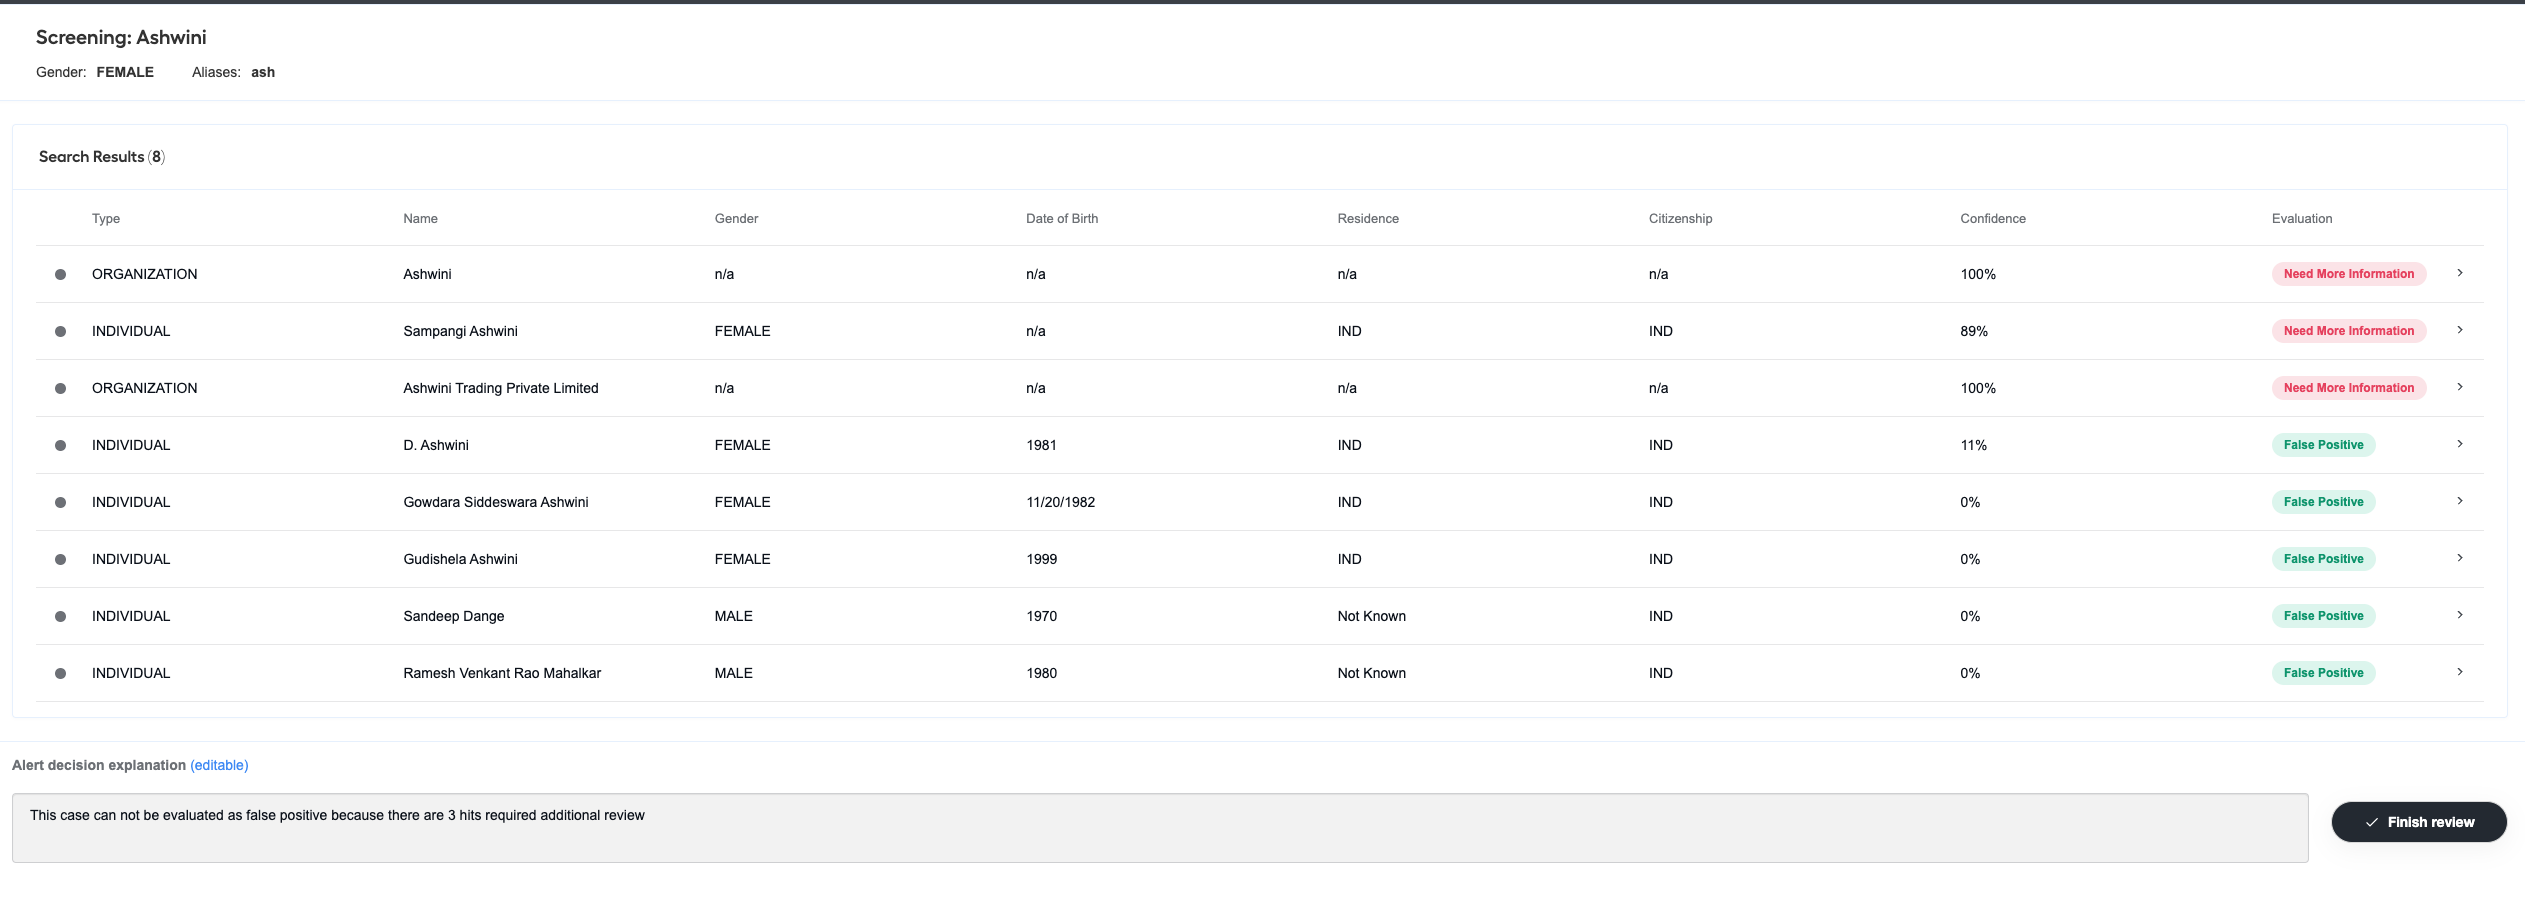
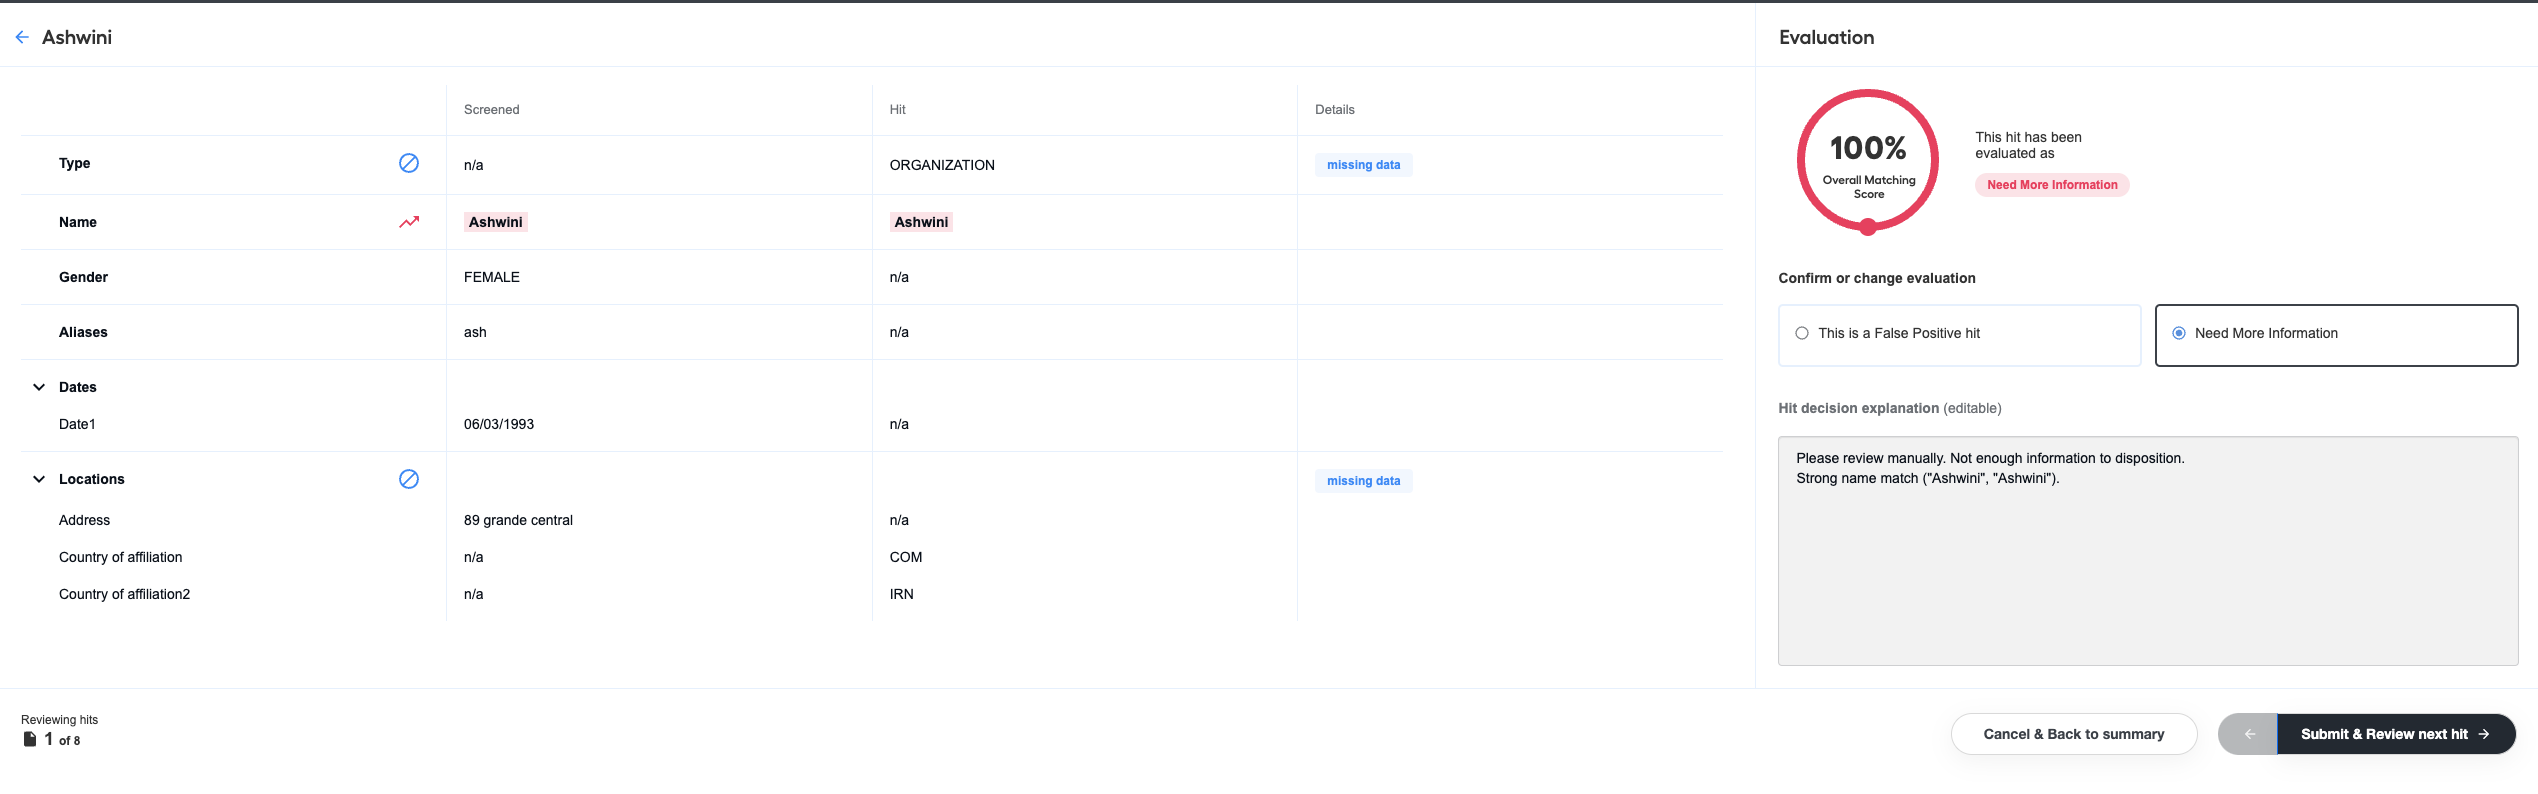
On the page, click any hit to drill down to its details page, review all information related to the hit, and verify or modify the original model decision and the explanation.
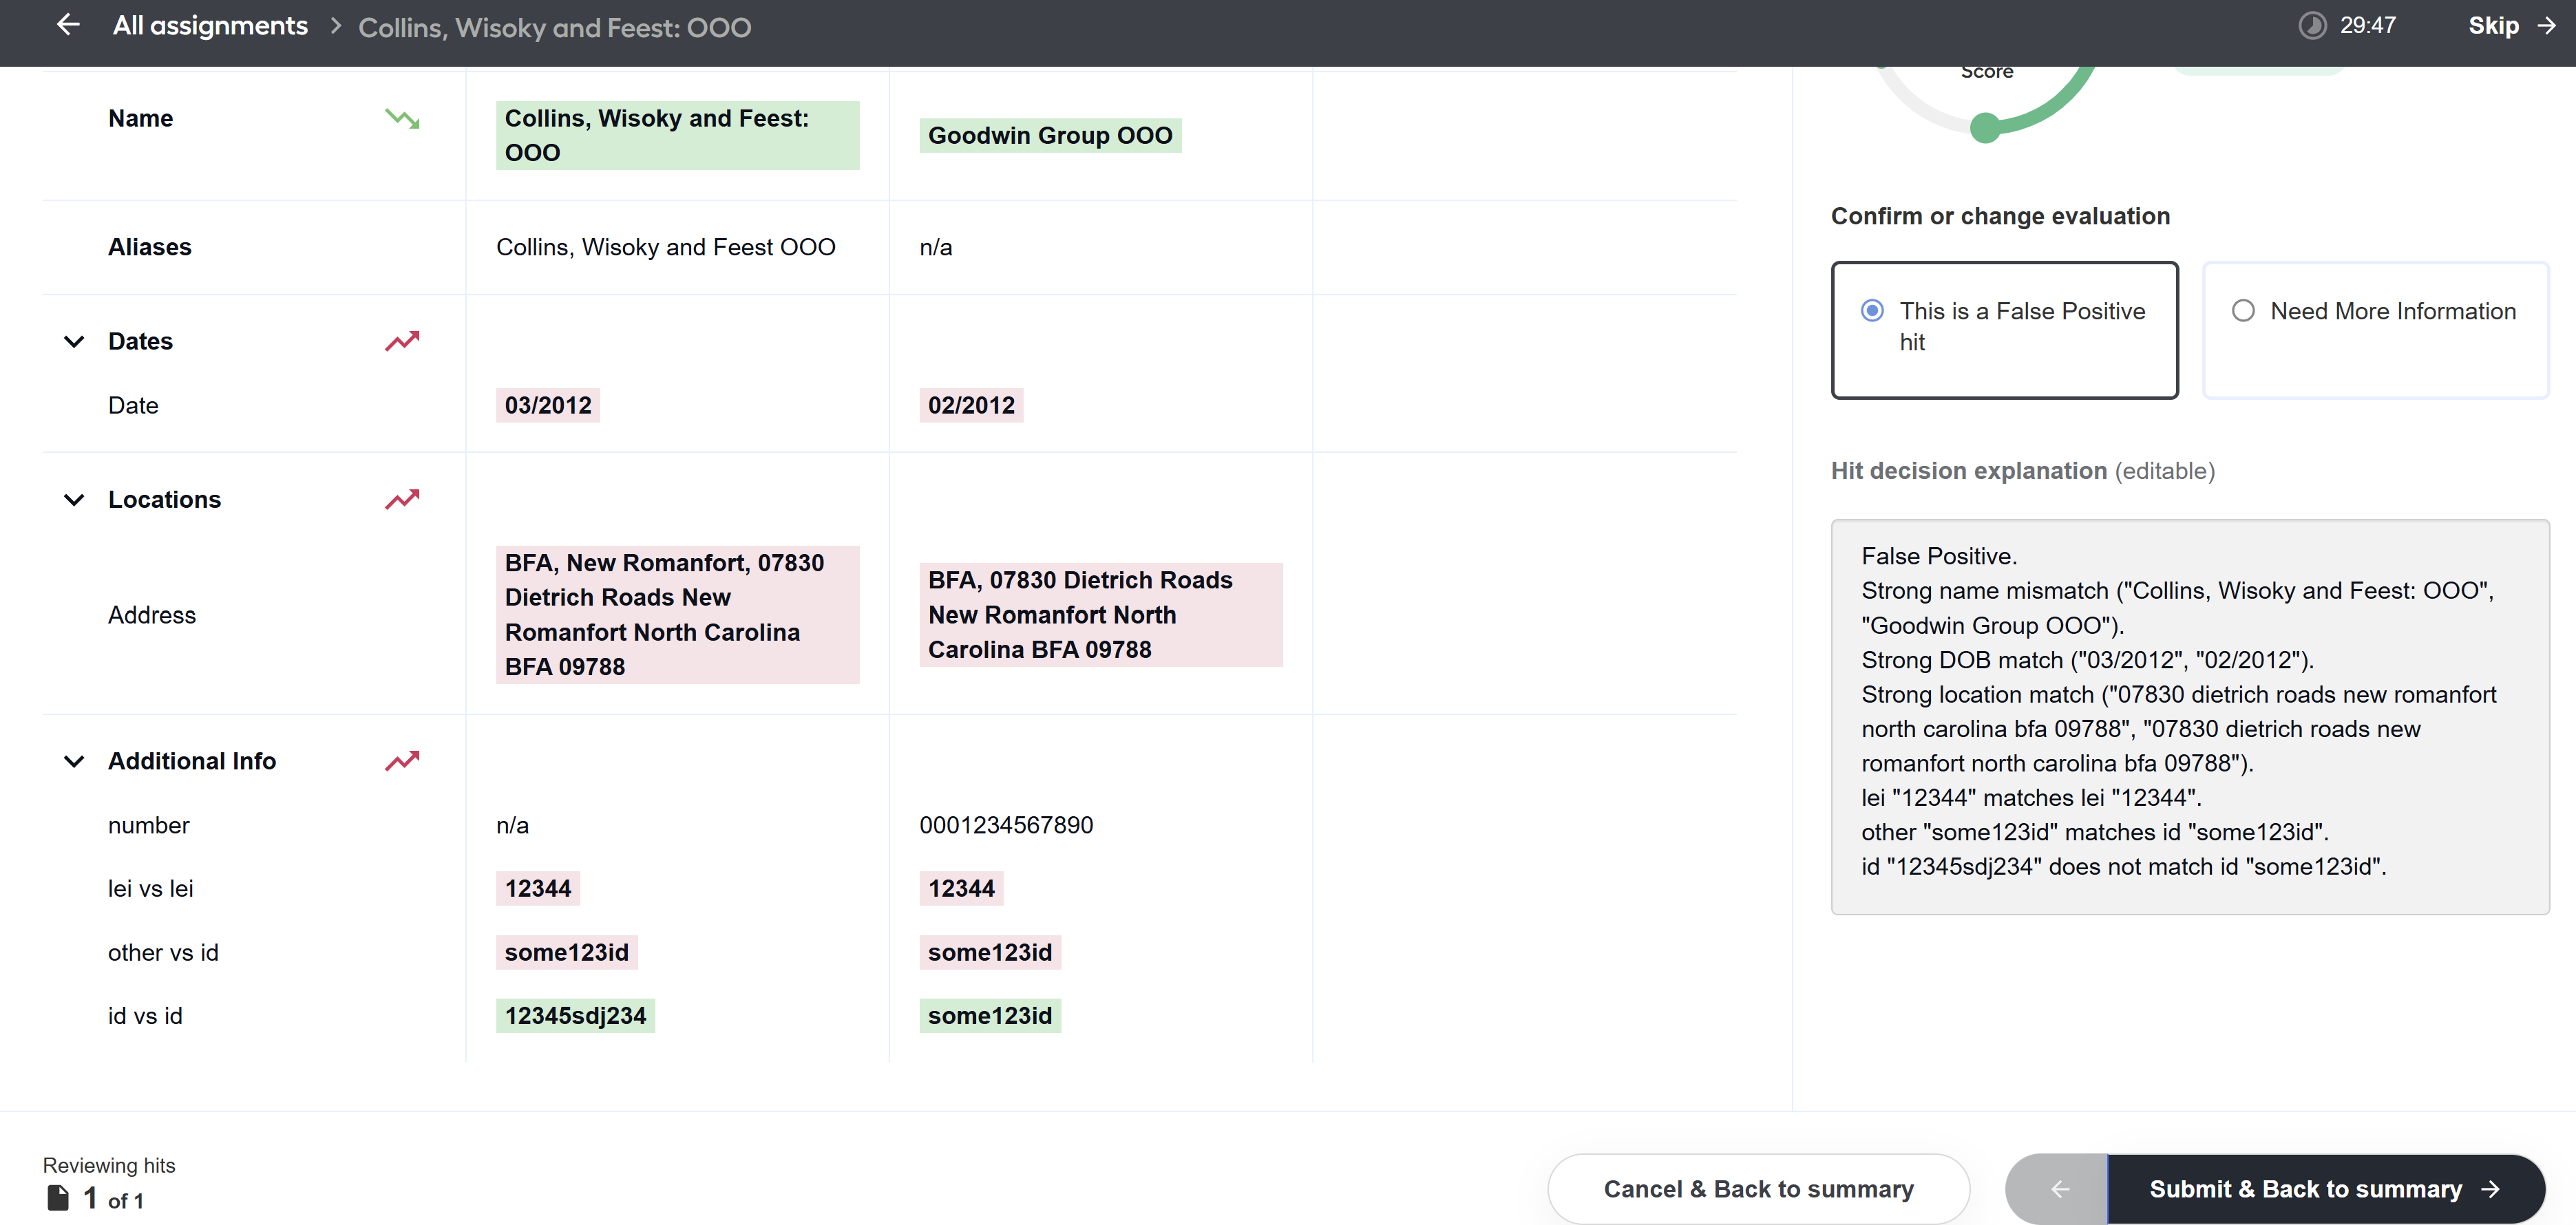
Manual Tasks display comparison results for each pair of entities. Comparison result values are color-coded according to the model decision. For example, red corresponds to a match and green to a mismatch.
After you review all hits, you can submit the assignment, and its results are fed back to the BP. Upon submission, the reviewer's decision and explanation are also updated in the NSS analytics.
Review screening results
You can review screening results in either of the two ways:
Review assignments in Workspace if you set up the Human in the Loop step when configuring the AI Agent.
View the results of the BP execution in the Quality Check or HTML reports.
View log details
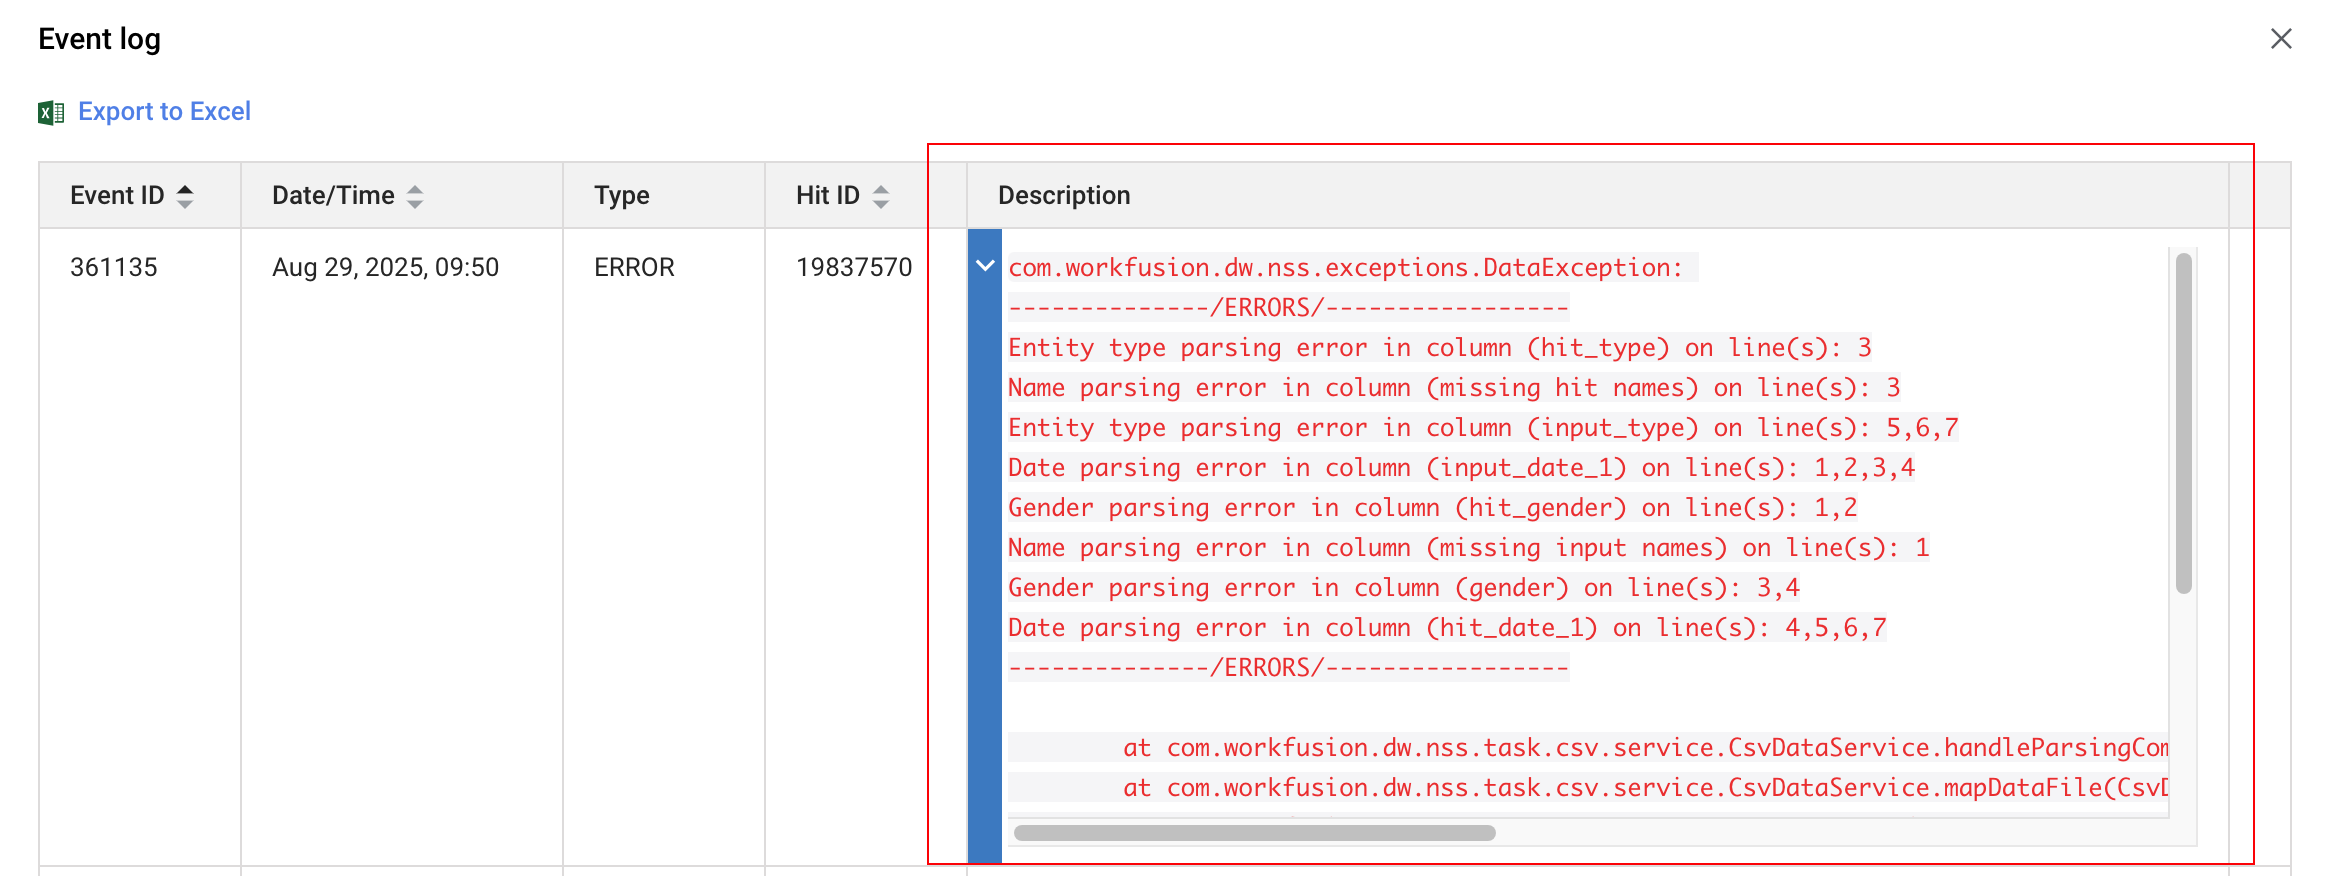
To provide clear and actionable feedback, errors are logged in a standardized format that specifies the type of error, the affected column, and the exact line numbers in the CSV file.
The syntax is as follows: [Error Type] in column (Client Column Name) on line(s): [Line Numbers]
For example, the log Date Parsing error in column (input_date_1) on line(s): 2,7,15 indicates that the values in the input_date_1 column on lines 2, 7, and 15 of the CSV file could not be parsed as valid dates. CSV headers are indexed at 0 so that line numbers start from 1.
See an example of a full error log from a BP:
You can also trace logs using a client ID and a transaction UUID added to each log entry generated by a BP. These identifiers make it easier to track the flow of a transaction from start to finish and to troubleshoot client-specific issues.
When a BP is initiated and a transaction is created, Evelyn performs the following actions:
Generates a unique transaction UUID (
transaction_uuid). A universally unique identifier is created for each record and persists throughout its lifecycle.Retrieves the client ID (
client_id). The client account under which the transaction is running is identified.Prepends identifiers to logs. The client ID and transaction UUID are added to all log entries generated by a BP instance.
If a BP runs but no transaction is created or if transaction creation fails, no client ID and transaction UUID are added to the logs.
Identifiers appear at the beginning of each log entry, enclosed in square brackets:
Standard format: both the client ID and the transaction UUID are displayed, separated by a colon.
Syntax:
[clientId:transactionUUID]Example:
[352:f47ac10b-58cc-4372-a567-0e02b2c3d479]Conditional format: a special condition applies when the BP is run by the default client with an ID of 1. For such logs,
client_idis omitted to reduce noise and improve readability.Syntax:
[:transaction_uuid]Example:
[:f47ac10b-58cc-4372-a567-0e02b2c3d479]