
Set up local workstation development environment
To start exploring Open Development Framework, prepare your workstation, and use Quickstart Archetypes to generate an initial ODF-based project. Follow this guide for detailed instructions.
ODF is released for the following versions of Intelligent Automation Cloud Enterprise:
- 10.2.x
- 10.1.x
- 9.4.2-9.4.3
- 9.3.4
- 9.3.0-9.3.3
- 9.2.2
- 9.2.0-9.2.1.
Such version fragmentation is due to the availability of certain WorkFusion features. For example, Asset Bundle import API is available for v10.1.x, v9.3.4, v9.2.2. This guide contains steps adjusted for v10.1.x.
Install Java 8 SDK
Download Java 8 SDK from the Oracle website and install it.
Install local Nexus
Refer to the guide to download and install a Nexus server on your workstation.
With the local Nexus, you have full control over the repository that works with your local Control Tower. You can use the local Nexus for deploying Bot Config Bundles (BCBs) to the local Control Tower. These can be BCBs originating from your WorkFusion Studio or copied from the public WorkFusion Nexus.
Configure local environment
Configure Maven
Configure Maven's settings.xml file located in the C:/User/\[USER\_HOME\]/.m2 directory:
<settings>
    <servers>

        <!-- Nexus Credentials for Maven to download WF dependencies for building a project. Read-only permissions are needed for this user. -->
        <server>
            <id>wf-dependencies</id>
            <username>odf-user</username>
            <password>********</password>
        </server>

        <!-- Credentials for using Package Import API to deploy to local or server Control Tower -->
        <server>
            <id>control-tower</id>
            <username>ctuser</username>
            <password>********</password>
        </server>

        <!-- Credentials to deploy BCBs to Nexus. Subsequently, the local or server Control Tower pulls BCBs from Nexus. Write permissions are needed for this user.  -->
        <server>
            <id>bcb-repository</id>
            <username>admin</username>
            <password>********</password>
        </server>

    </servers>

    <profiles>
        <profile>
            <id>wf-repo</id>
            <repositories>
                <repository>
                    <id>wf-dependencies</id>
                    <url>https://repository.workfusion.com/content/groups/dependencies</url>
                </repository>
            </repositories>
        </profile>
    </profiles>

    <activeProfiles>
        <activeProfile>wf-repo</activeProfile>
    </activeProfiles>

</settings>
note
If you don't have the .m2 directory with settings.xml, create it manually in the C:/Users/[USER_HOME] directory.
If you use custom Nexus (not https://repository.workfusion.com), your default settings.xml file must be as shown below:
Expand
<settings>
    <servers>

        <!-- Nexus Credentials for Maven to download WF dependencies for building a project. Read-only permissions are needed for this user. -->
        <server>
            <id>wf-dependencies</id>
            <username>someUser1</username>
            <password>********</password>
        </server>

        <!-- Credentials for using Package Import API to deploy to local or server Control Tower -->
        <server>
            <id>control-tower</id>
            <username>someUser2</username>
            <password>********</password>
        </server>

        <!-- Credentials to deploy BCBs to Nexus. Subsequently, the local or server Control Tower pulls BCBs from Nexus. Write permissions are needed for this user.  -->
        <server>
            <id>bcb-repository</id>
            <username>someUser3</username>
            <password>********</password>
        </server>

    </servers>

    <profiles>
        <profile>
            <id>wf-repo</id>
            <repositories>
                <repository>
                    <id>wf-dependencies</id>
                    <!-- URL to Nexus with dependencies, such as https://repository.workfusion.com/content/groups/dependencies  -->
                    <url>nexusURL</url>
                </repository>
            </repositories>
        </profile>
    </profiles>

    <activeProfiles>
        <activeProfile>wf-repo</activeProfile>
    </activeProfiles>

</settings>
Install Intelligent Automation Cloud Developer
Intelligent Automation Cloud Developer is a special version of Intelligent Automation Cloud built for developers.
note
Download Intelligent Automation Cloud Developer v10.1.6 and install it. For the download link and installation instructions, refer to Install IA Cloud Developer.
Launch Intelligent Automation Cloud Developer and start Server components
Launch IA Cloud Developer and click the icon in the top right corner to switch to the Code perspective.

Now, you are ready to start Server components (local Control Tower, WorkSpace, Minio File Storage, RPA Agent). Switch the toggle to the ON position.
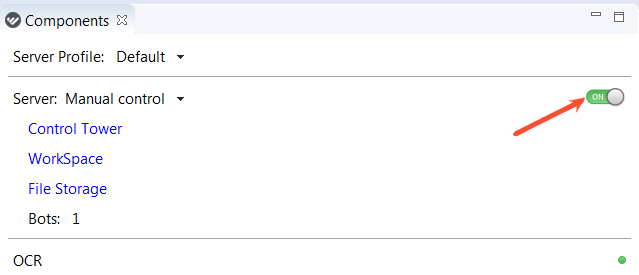
Wait for one minute until you see the links to Server components. Once they appear, go to Control Tower.
To log in to Control Tower, use the credentials created during the installation of Intelligent Automation Cloud Developer.
Configure local Control Tower with local Nexus
Reconfigure IA Cloud Developer to connect it with local Nexus:
In your browser, go to the user interaface of the local Secrets Vault: https://127.0.0.1:18280. Add a security exception.
Log in with the username and password for Intelligent Autiomation Cloud Developer.
Navigate to secrets > secret > policy > IA Cloud Developer > workfusion\WFInternal.
Change the following three items:
nexus.passwordnexus.urlnexus.user
To do that, click each item and modify the XML file.
{
"alias": "nexus.url",
"key": "nexus.url",
"lastUpdated": 1568208163552,
"value": "http://localhost:8081/nexus/"
}
Click Save.
Use the local Nexus parameters:
nexus.url: http://localhost:8081/nexus/nexus.user: adminnexus.password: admin123
Restart Server components. Switch the toggle OFF and wait for about one minute. Then, switch the toggle ON and wait until the links to the Server applications appear below the toggle.
Deploy ODF artifacts to local Control Tower
- Create the ODF-required data stores as described in the guide.
- Create the ODF-required Control Tower Use Cases as described in the guide.
- Deploy
odf-bcb.jarinto your local Nexus:- Download the latest version corresponding to that of
odf-bcb-X.X.X.X.jarof your Intelligent Automation Cloud. - Create the wf-machine-config-bundle Maven repository (Allow Redeploy) in the local Nexus. This repository is used for all JAR transfers between WorkFusion Studio and Control Tower.
- Upload
odf-bcb-X.X.X.X.jarmanually into wf-machine-config-bundle. - Select the wf-machine-config-bundle repository > Artifact.
- Upload and set the following GAV:
Group: com.workfusion.odf
Artifact: odf-bcb
Version: X.X.X.X (specify the same version as in the downloaded JAR)
- Download the latest version corresponding to that of
- Trigger the odf-bcb import from the local Control Tower as described in the guide. This step brings all the pre-packaged ODF components into local Control Tower.
important
Use local Nexus for wf-machine-config-bundle only. Leave all the other required Maven repositories (archetypes, dependencies) with their default settings as per the project's pom.xml—use the WorkFusion public Nexus.
This saves time on additional configuration and reduces efforts to update dependencies when upgrading to a newer ODF version.
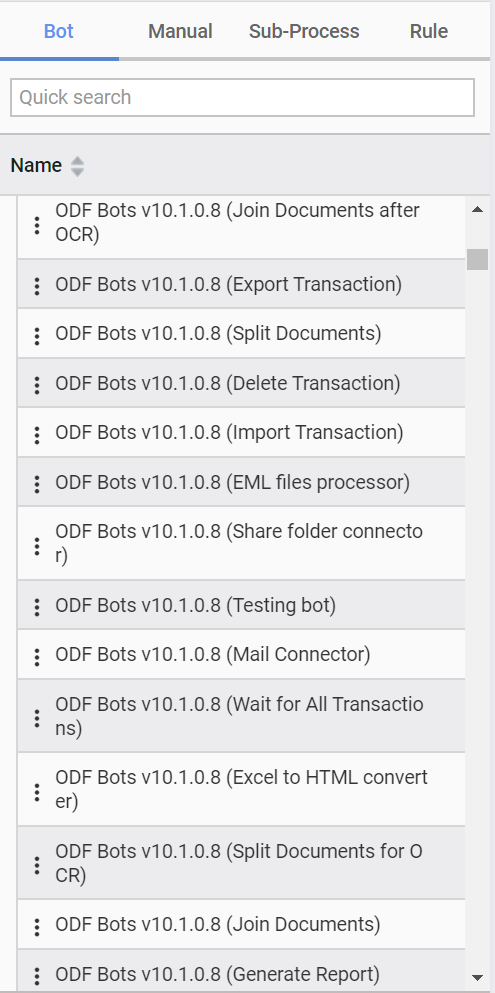
ODF Bot Tasks are deployed successfully to your Control Tower if you can see reusable Bot Tasks while editing a new business process. On the right panel of reusable bot components, you can see the number of bot tasks.
Set up project
Configure Archetypes catalog in WorkFusion Studio
Launch WorkFusion Studio and switch to the Code perspective.
Click Window > Preferences > Maven > Archetypes > Add Remote Catalog.\
Set Catalog File to https://repository.workfusion.com/content/repositories/archetypes and Description to ODF Release Archetypes.
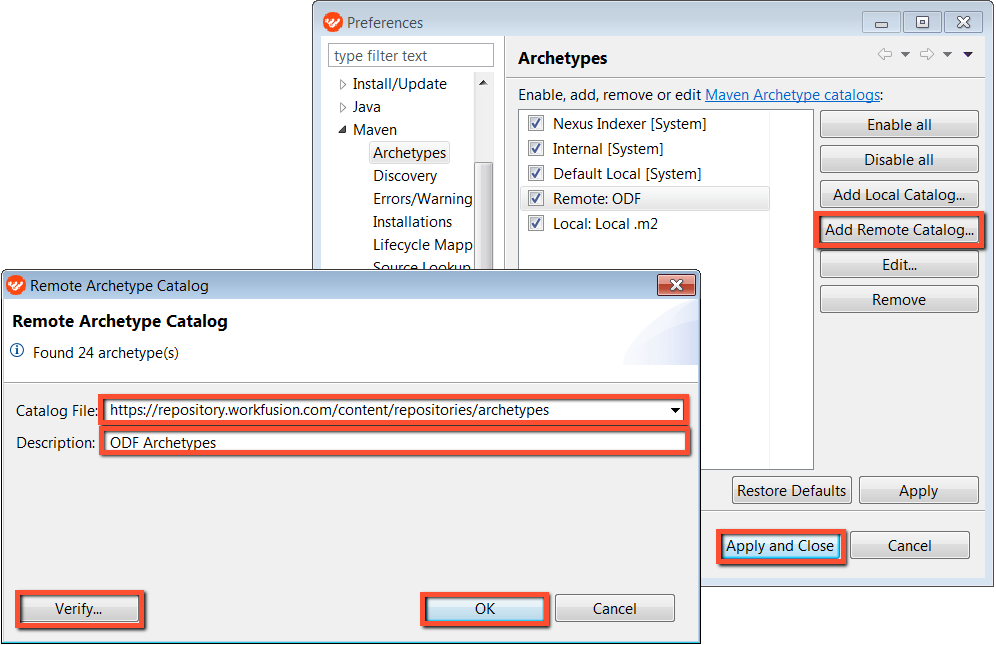
Verify that the catalog contains archetypes by clicking the Verify... button. Then, click OK.
Generate project from Archetype
Maven archetypes are project templates that enable developers to quickly start new projects based on a set of core files. To generate a new project from WorkFusion Studio, use the wizard:
In WorkFusion Project Navigator, right-click New > Other > Maven > Maven Project.
Click Next.
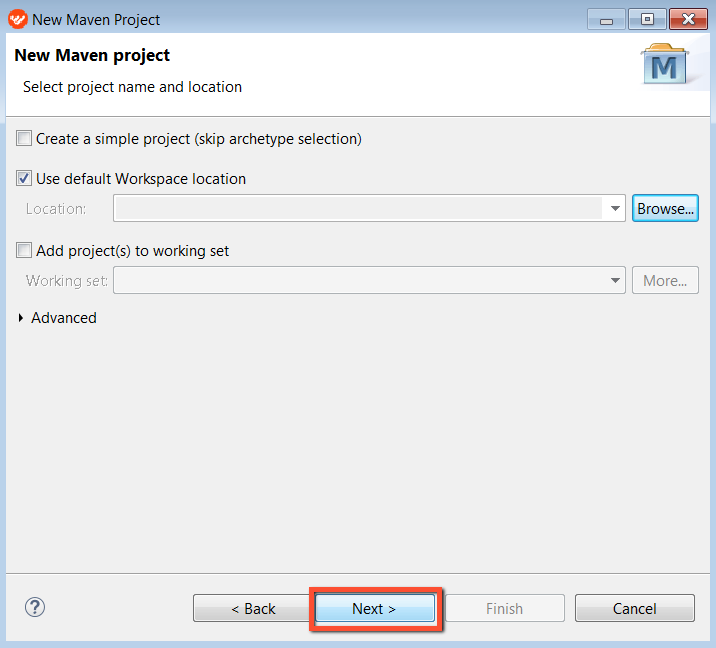
Select the ODF Release Archetypes catalog. Clear the Show the last version of Archetype only checkbox to see the archetypes for all previous ODF versions. Out of the archetypes available for your version of Intelligent Automation Cloud, choose the one that best fits your project. Compare using the Archetypes for ODF table in the section below.
Click Next.
Choose archetypes for ODF
In the table below, you can see a number of Quickstart Archetypes. Choose the archetype version based on the Intelligent Automation Cloud Enterprise version. Refer to the compatibility matrix.
# |
Archetype |
Brief description |
|---|---|---|
| 1 | full-bundle-classification-quickstart |
Generates a project with three modules:
|
| 2 | full-bundle-ie-quickstart |
Generates a project with three modules:
|
| 3 | minimal-bundle-quickstart |
Generates a project with the Package module only (for Asset Bundle import) |
| 4 | rpa-bundle-quickstart | Generates a project with two modules:
|
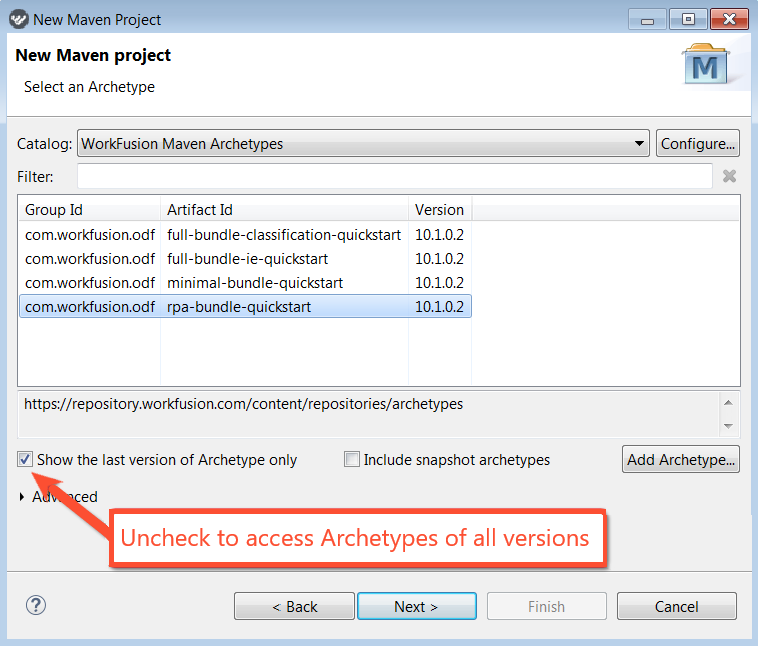
Once you select an archetype to start from, the wizard asks to define the initial settings for your Maven project. Follow the instructions below:
- Enter Group Id and Artifact Id
- Use the Release type versioning (for example, 0.0.1 or 1.0) because the default Nexus configuration requires repositories of this type. If you use the Snapshot type (for example, 0.0.1-SNAPSHOT) and specify the -SNAPSHOT postfix in the version, deployment to Nexus fails.
- Configure the Control Tower URL. This setting is used for deploying projects to the server Control Tower using Asset Bundle Import API.
- Click Finish.
tip
Artifact Id defines the main Maven project name. For your automation use case, use a name common within your organization. We suggest giving intuitive names to projects and modules so as not to confuse your peer developers. Keep names short, use lower-case Latin characters and the "-" symbol.
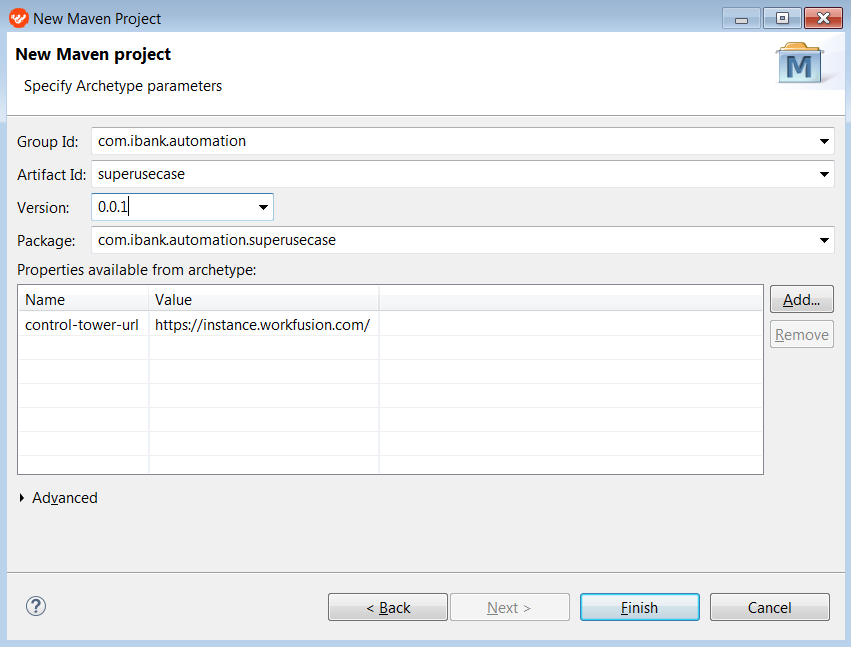
Now, your initial project structure is generated.
Depending on which archetype you selected, you get a project with one to three Maven modules. You can use them to code an automation solution, as well as to build and deploy the solution to Control Tower.
To generate a project from an archetype using the command line, follow the instructions:
To link the WorkFusion public archetypes repository to Maven, add this to your Maven's
settings.xmlbefore the<servers>section:<profiles> <profile> <id>all</id> <repositories> <repository> <id>wf-archetypes</id> <name>WorkFusion Nexus Repository - dependencies</name> <url>https://repository.workfusion.com/content/repositories/archetypes/</url> <layout>default</layout> <releases> <updatePolicy>daily</updatePolicy> </releases> <snapshots> <enabled>false</enabled> </snapshots> </repository> </repositories> </profile> </profiles> <activeProfiles> <activeProfile>all</activeProfile> </activeProfiles>Execute the command from the console:
mvn archetype:generate -DgroupId=com.workfusion.myproject -DartifactId=test-arch-project -Dversion=1.0.0 -DarchetypeGroupId=com.workfusion.odf -DarchetypeArtifactId=minimal-bundle-quickstart -DarchetypeVersion=X.X.X.X -DinteractiveMode=false -Dcontrol-tower-url=http://myenv.com
Build Maven project
To build a project, follow the instruction:
Right-click the main
pom.xmlfile and select Run As > Maven install.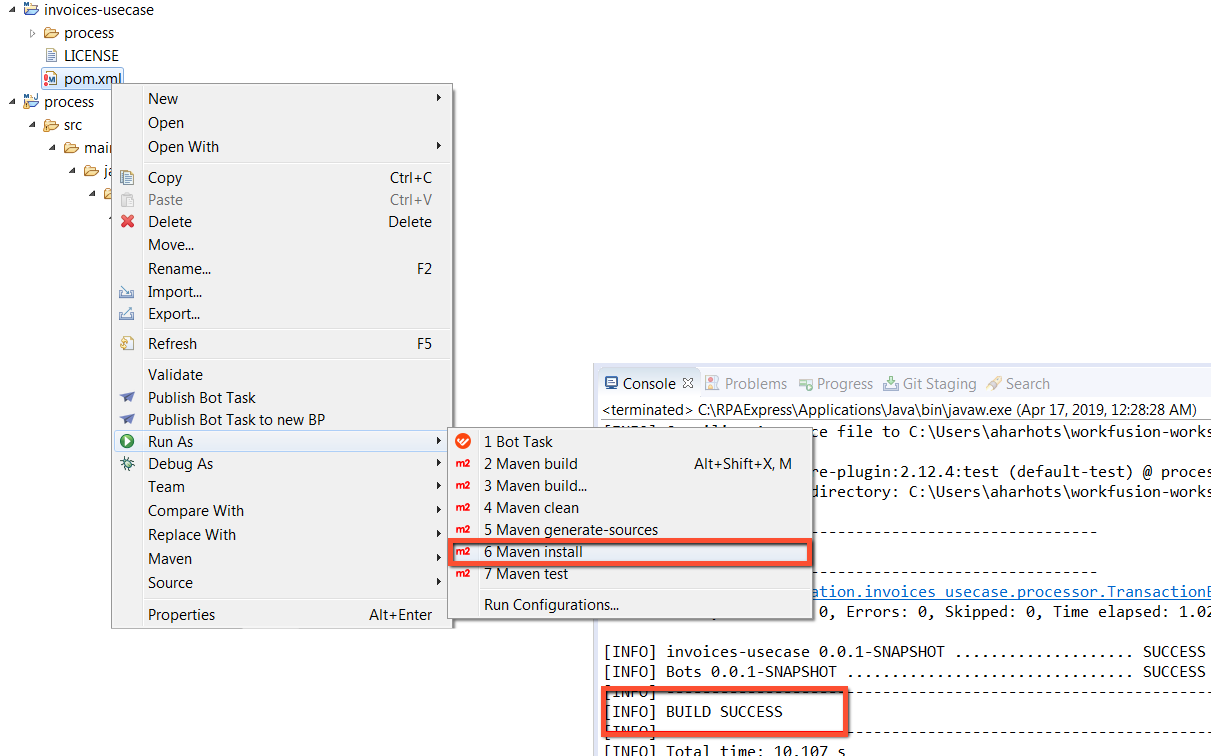
As soon as you see the BUILD SUCCESS message in the console, create your own components.
After you add or modify the Java code, select Maven install again to execute the Bot Task with changes.
Mind known issue
You can get the "PKIX path building failed" exception during the Maven build. It is a known issue. For details, visit the page.
To fix this, add the following JVM parameters:
MAVEN_OPTS="-Dmaven.wagon.http.ssl.insecure=true -Dmaven.wagon.http.ssl.allowall=true -Dmaven.wagon.http.ssl.ignore.validity.dates=true"
Another solution is to open the nexus/central repo in your browser, download the certificate, and then import it to the Java TrustStore on a local machine.
Run or debug Bot Task
Now, test one of the pre-generated Bot Tasks from WorkFusion Studio.
- Open
Transaction Supplier Example.xmlfrom the [ARTIFACT]-bcb project. - Select Run As (or Debug As) > Bot Task.
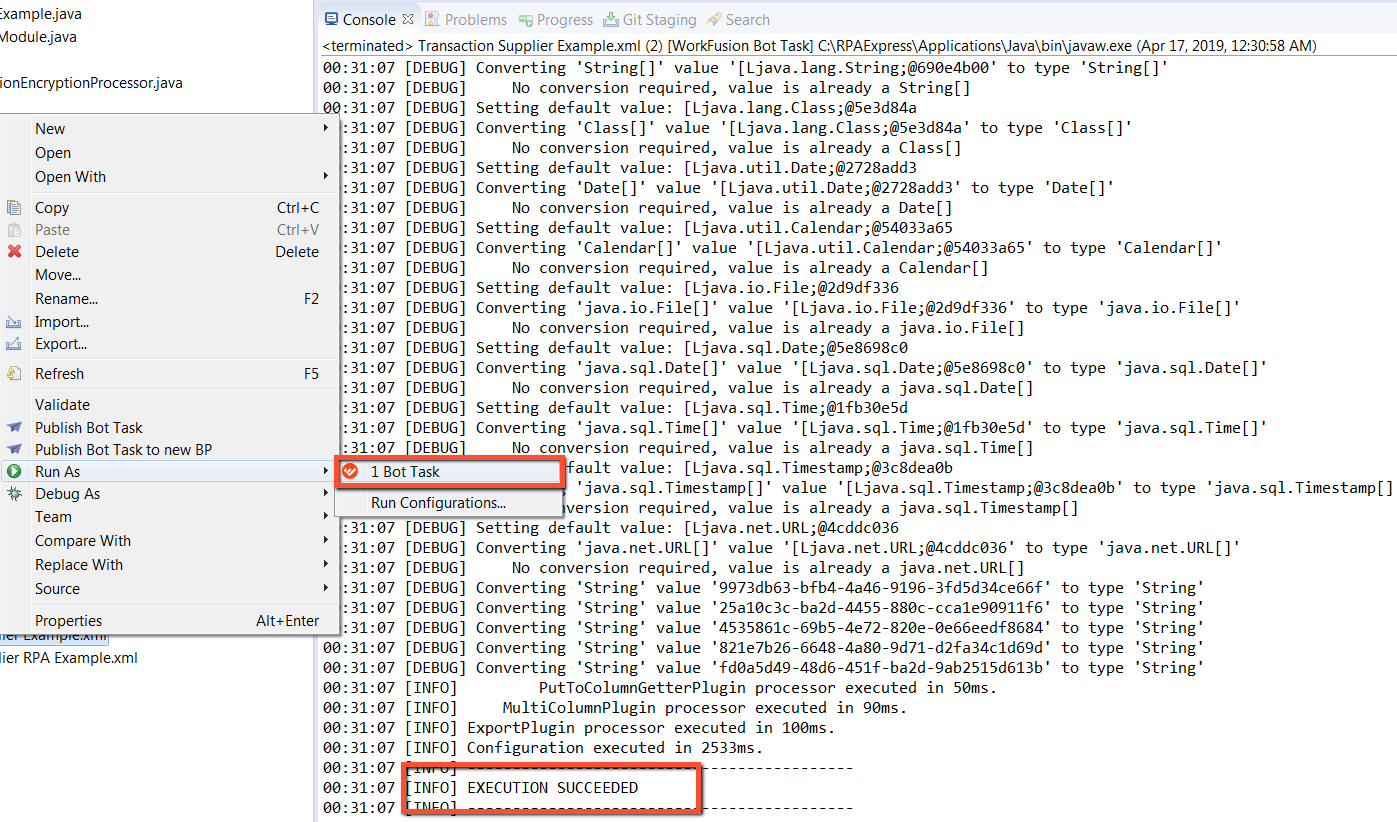
In case of Debug, make sure to first add breakpoints to Java classes.
As soon as you see the EXECUTION SUCCESS message in the console, you are ready to test the Bot Tasks on a workstation.
Deploy to local Control Tower
You can deploy a BCB project to a local Control Tower for initial testing. Most of the automation code is in the [ARTIFACT]-bcb module, which you can deploy as BCB to Control Tower.
Make sure that:
TThe user specified in
settings.xmlunder thebcb-repositoryserver id exists in local Nexus.The local Nexus user has the deployment privilege for the wf-machine-config-bundle repository. Alternatively, you can use the default admin user with ALL privileges.
In
[ARTIFACT]/pom.xml, you have the setting specifying the Nexus repository where your JARs are to be installed. Set it to local Nexus:<bcb.repository.url>http://localhost:8081/nexus/service/local/repositories/wf-machine-config-bundle/content/</bcb.repository.url>
Run
mvn deployfor[ARTIFACT]-bcb/pom.xml. This command builds and deploys the project JAR to local Nexus. It can be eye-checked via Nexus UI: http://localhost:8081Go to the local Control Tower > Advanced > Bot Configurations and click the Import From Repository button.
Deploy to server Control Tower
IA Cloud Enterprise enables one to deploy an automation project via Asset Bundle Import API.
Each Archetype provided by ODF generates the [ARTIFACT]-package module. It contains a pre-configured Asset Bundle structure where you can put additional static resources if required.
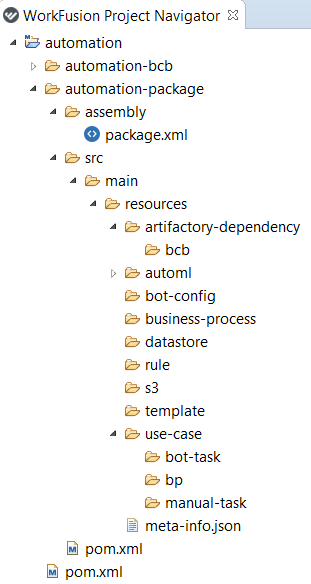
For instructions on publishing Asset Bundles with Maven goals, use this guide.
Study project structure
In the generated boilerplate project, start with exploring the following classes and Bot Tasks.
The Intake Engine example comes with AppBuilderExample, which is a class providing the API for building.
package com.ibank.automation.invoices_usecase.app;

import com.workfusion.intake.core.App;
import com.workfusion.intake.core.Module;
import groovy.lang.Binding;

import java.util.List;

public class AppExample extends App {

    protected AppExample(Binding context, List<Module> additionalModules, List<Module> overrideModules, Object injectContext) {
        super(context, additionalModules, overrideModules, injectContext);
    }

    public static AppBuilderExample init(Binding binding) {
        return new AppBuilderExample(binding);
    }
}
The ModuleExample and CipherModule modules come together and are used in the AppBuilderExample class. SecurityModule is used for access with credentials.
package com.ibank.automation.invoices_usecase.app;

import com.workfusion.intake.core.Module;
import groovy.lang.Binding;

import java.util.Arrays;
import java.util.HashMap;
import java.util.List;
import java.util.Map;

public class AppBuilderExample {
    private Binding context;
    private Map<String, String> params = new HashMap<>();
    private List<Module> overrideModules;
    private Object injectContext;

    public AppBuilderExample(Binding context) {
        this.context = context;
    }

    public AppBuilderExample params(Map<String, String> params) {
        this.setParams(params);
        return this;
    }

    public AppBuilderExample override(Module... modules) {
        overrideModules = Arrays.asList(modules);
        return this;
    }

    public AppBuilderExample injectFields(Object context) {
        this.injectContext = context;
        return this;
    }

    public AppExample get() {
        Module myModule = new ModuleExample();
        Module cipherModule = new CipherModule();
        Module securityModule = new SecurityModule(context);

        List<Module> modules = Arrays.asList(myModule, cipherModule, securityModule);
        return new AppExample(context, modules, overrideModules, injectContext);
    }

    public Map<String, String> getParams() {
        return params;
    }

    public void setParams(Map<String, String> params) {
        this.params = params;
    }
}
Below is a Bot Task showing how to invoke TransactionEncryptionProcessor from XML.
<config xmlns="http://web-harvest.sourceforge.net/schema/1.0/config" scriptlang="groovy">
<script></script>
<!-- Nothing additional required to export. All data was saved inside Transaction. -->
<export include-original-data="true">
</export>
</config>
Below is a Bot Task showing how to invoke TransactionSupplierExample from XML.
<config xmlns="http://web-harvest.sourceforge.net/schema/1.0/config" scriptlang="groovy">
<script></script>
<export include-original-data="false">
<multi-column list="${result}" split-results="true">
<put-to-column-getter name="_sys_transaction_id" property="transaction_id"/>
</multi-column>
</export>
</config>
Below is a Unit Testing example with the TransactionEncryptionProcessor class.
package com.ibank.automation.invoices_usecase.processor;

import java.util.ArrayList;
import java.util.List;
import javax.inject.Inject;
import lab.lab.app.AppExample;
import com.workfusion.odf.api.domain.Document;
import com.workfusion.odf.api.domain.Transaction;
import com.workfusion.odf.core.Module;
import com.workfusion.rpa.core.plugin.s3.S3PluginAdapter;
import groovy.lang.Binding;
import com.ibank.automation.invoices_usecase.processor.TransactionEncryptionProcessor;
import lab.lab.utils.Cipher;
import org.codejargon.feather.Provides;
import org.junit.jupiter.api.BeforeEach;
import org.junit.jupiter.api.Test;
import org.mockito.Mockito;
import org.slf4j.Logger;

public class TransactionEncryptionProcessorTest {

    @Inject
    private TransactionEncryptionProcessor transactionEncryptionProcessor;

    private S3PluginAdapter s3PluginAdapter;
    private Cipher cipher;
    private Logger logger;

    private Module testModule = new Module() {
        @Provides
        public S3PluginAdapter s3PluginAdapter() {
            return s3PluginAdapter;
        }

        @Provides
        public Cipher cipher() {
            return cipher;
        }

        @Provides
        public Logger logger() {
            return logger;
        }
    };

    @BeforeEach
    public void init() {
        s3PluginAdapter = Mockito.mock(S3PluginAdapter.class);
        cipher = Mockito.mock(Cipher.class);
        logger = Mockito.mock(Logger.class);
        Binding binding = new Binding();
        AppExample.init(binding).override(testModule).injectFields(this).get();
    }


    @Test
    public void transform() {
        //given
        final Transaction transaction = getTransaction();
        byte[] content = "link1.txt".getBytes();

        //when
        Mockito.when(s3PluginAdapter.get(Mockito.any())).thenReturn(content);
        Mockito.when(cipher.encode(Mockito.any())).thenReturn(new byte[0]);
        final Transaction processedTransaction = transactionEncryptionProcessor.transform(transaction);

        //then
        Mockito.verify(cipher, Mockito.times(1)).encode(content);
    }

    private Transaction getTransaction() {
        final Transaction transaction = new Transaction();
        transaction.setId("1");
        final List<Document> docs = new ArrayList<>();

        Document doc = new Document();
        doc.setId("1");
        doc.setTextLink("link1.txt");
        docs.add(doc);
        transaction.setDocs(docs);

        return transaction;
    }
}
Below is an example of the TransactionSupplier class generating N transactions.
package com.ibank.automation.invoices_usecase.supplier;

import com.workfusion.intake.api.connector.TransactionSupplier;
import com.workfusion.intake.api.domain.Document;
import com.workfusion.intake.api.domain.Transaction;
import com.workfusion.rpa.core.storage.S3Manager;
import org.springframework.http.MediaType;

import javax.inject.Inject;
import java.io.ByteArrayInputStream;
import java.util.ArrayList;
import java.util.Arrays;
import java.util.Collection;
import java.util.UUID;

public class TransactionSupplierExample implements TransactionSupplier {

    private S3Manager s3Manager;

    @Inject
    public TransactionSupplierExample(S3Manager s3Manager) {
        this.s3Manager = s3Manager;
    }

    @Override
    public Collection<Transaction> get() {
        Collection<Transaction> transactions = new ArrayList<>();
        for (int i = 0; i < 5; i++) {
            Transaction transaction = new Transaction();
            transaction.setId(uuid());
            transaction.setDocs(Arrays.asList(createDocument()));
            transactions.add(transaction);
        }
        return transactions;
    }

    private Document createDocument() {
        Document document = new Document();
        document.setId(uuid());
        document.setName("Example Document");
        document.setTextLink(generateAndUploadDocument());
        return document;
    }

    private String generateAndUploadDocument() {
        return s3Manager.putFile(
                uuid() + ".txt",
                new ByteArrayInputStream("Some very important text".getBytes()),
                MediaType.TEXT_PLAIN_VALUE);
    }

    private String uuid() {
        return UUID.randomUUID().toString();
    }
}