
View AutoML SDK workflow
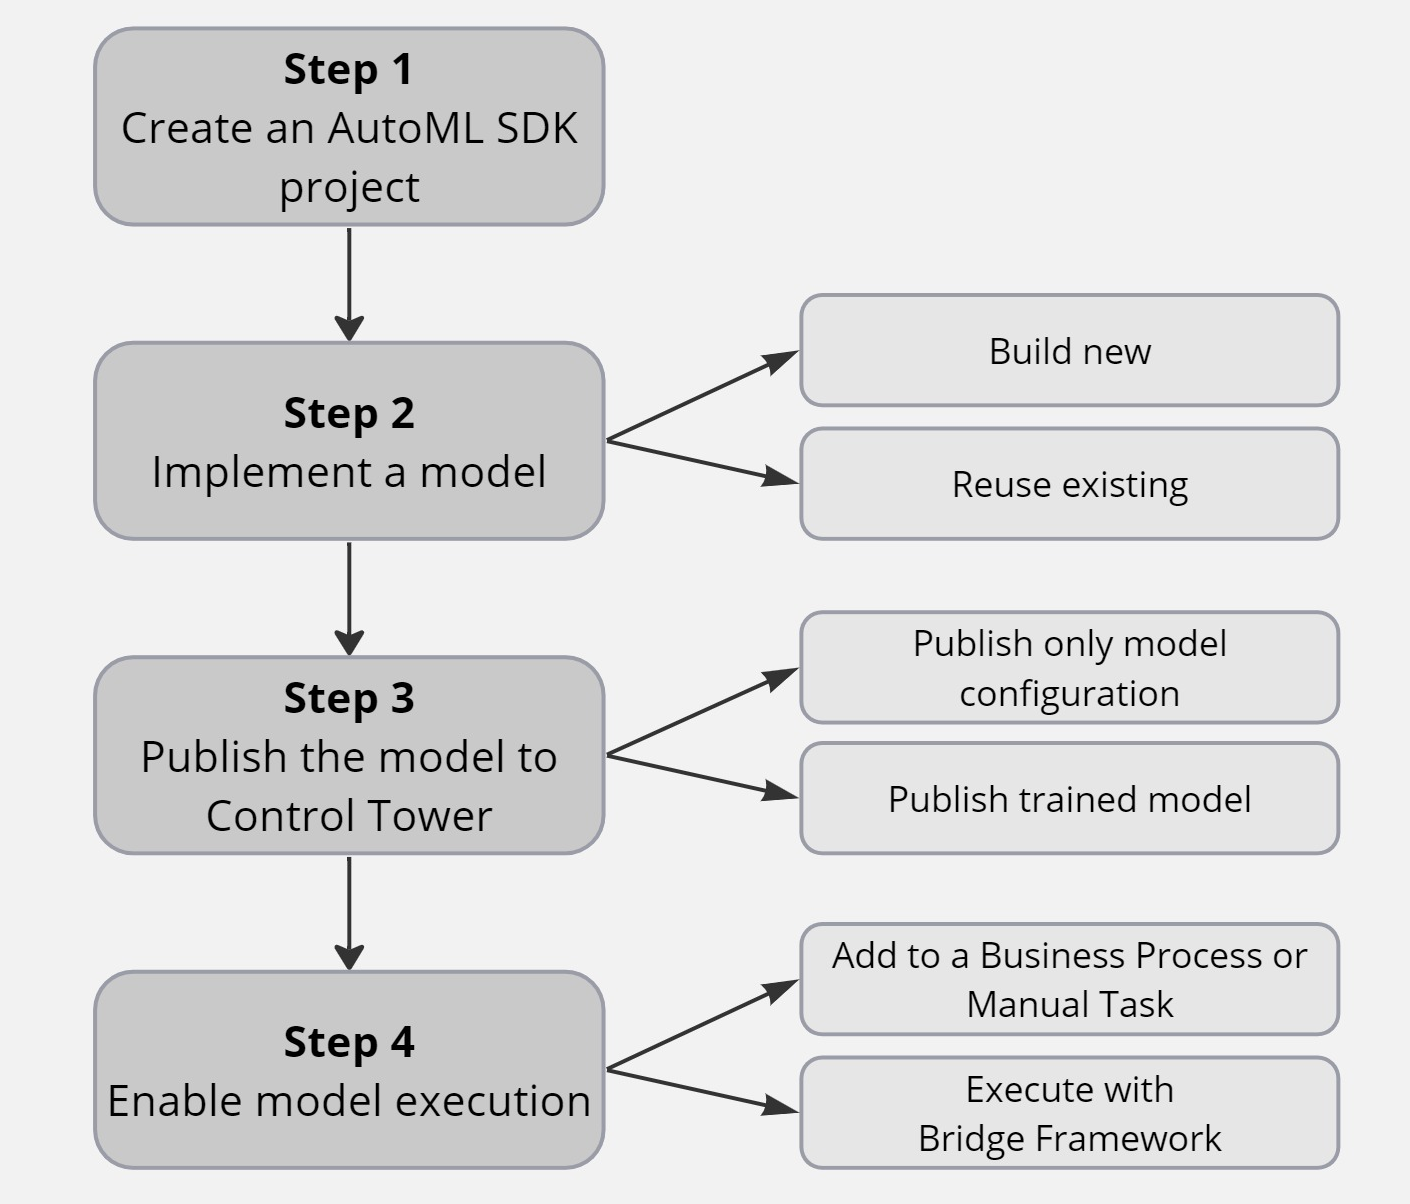
The article features a high-level overview of how you can develop a Machine Learning (ML) model with AutoML SDK and publish it to Control Tower (CT) for further use in a Business Process (BP). The general flow is shown in the figure below:
Create Maven project
Using an AutoML Maven Archetype, create an AutoML SDK project as described below:
Make sure you have access to the repository with AutoML Archetypes and dependencies. Choose between the two options:
- Use the public WorkFusion Nexus repository server, if allowed within your organization. To access repositories, you need WorkFusion credentials.
- Use your company’s on-premise repository server that is a part of every IA Cloud Enterprise installation and is typically used from the DEV instance.
Configure a local environment as detailed in the guide.
Start a new Maven project from an AutoML Archetype as described in the Start from Archetype article.
Implement model
Now that you have a ready-to-go AutoML SDK project, implement a generic model as described below:
- Configure
ModelTrainingRunnerto extract required fields in accordance with the Train model locally guide. - Run
ModelTrainingRunnerin accordance with the instruction. - Check the model's statistics in the
output/model-results-statsfolder.
Improve trained model
In some cases, you may need to improve one or more fields in an already existing trained model. Retraining the entire model is a time-consuming operation. To save time, you can improve only the required field and replace the artifact folder containing the old field with a new one containing updates.
To improve a model, follow the steps below:
Make a separate copy of your AutoML SDK project.
Import one or more configurations to the AutoML SDK configuration file for all fields. In this case, AutoML skips the smart selection of components, which significantly reduces the time of further retraining.
Comment all fields in your
ModelTrainingRunner, uncommenting the ones that need to be improved.tip
- If a model extracts fields but they are formatted incorrectly, consider adding Post-Processors to your AutoML SDK configuration.
- If a model extracts wrong fields, consider adding Feature Extractors and Annotators to your AutoML SDK configuration.
Run
ModelTrainingRunnerwith the updated AutoML SDK configuration.
Reuse existing model
The development flow reusing an existing model is almost identical to that when a model is created. Instead of configuring a new project, import an existing one.
To start developing based on an existing model, follow the steps below:
Make sure you have access to the repository with AutoML Archetypes and dependencies. Choose between the two options:
- Use public WorkFusion Nexus repository server, if allowed within your organization. To access repositories, you need WorkFusion credentials.
- Use your company’s on-premise repository server that is a part of every IA Cloud Enterprise installation and is typically used from the DEV instance.
Configure a local environment as detailed in the guide.
Import your existing AutoML SDK project to IDEA IDE or WorkFusion Studio (Eclipse).
Then, use the model as is or make improvements.
Publish model
After you successfully implement a new model or reuse an already existing one, your next step is to publish it to production. This means you need to build a bundle containing the model and deploy it to an IA Cloud Enterprise instance.
There are two options to publish your model:
Publish model configuration only. In this case, training is performed on a remote Control Tower (CT) instance. After that, the model becomes available for execution.
Publish a trained model with all training artifacts. This scenario allows you to avoid remote model training and use the model for extraction or classification immediately.
Publish model configuration
Under this scenario, all you have to do is to build a bundle and deploy it to IA Cloud Enterprise. No local model training or manual deletion of generated model artifacts is required.
To publish a model configuration to IA Cloud Enterprise, follow the steps below:
Run
maven clean installusing thepom.xmlfile in the root of the project to generate the/deployfolder.Run
mvn deployusing thepom.xmlfile in the [PROJECT]-package module of the project. The target instance URL is defined in the remote profile of your rootpom.xml. The credentials are in your Maven’ssettings.xml.note
Mind the import logs in the console. If the configuration is correct, you see a success message once the model is deployed. Otherwise, analyze and fix an error.
Check the availability of the published model configuration in CT in one of the following ways:
Via AutoML UI by checking the Pipelines list.
Via AutoML SDK API by sending a
listHyperModelsrequest.Via Manual Task configuration in CT: navigate to a Manual Task > Configure AutoML > Machine Learning Pipelines. You new model should be available in the Machine Learning Model drop-down box.
tip
Alternatively, you can import a pipeline via the AutoML UI in CT. For details, refer to Manage models | Import pipeline.
Mind that the AutoML menu becomes visible only if you have the Manage models permission in CT. For instructions on setting the permission, refer to the Manage Control Tower roles and permissions article.
After you make sure the model configuration is published successfully, you can proceed to configure training in CT in one of the following ways:
Navigate to AutoML > Models and follow the instruction.
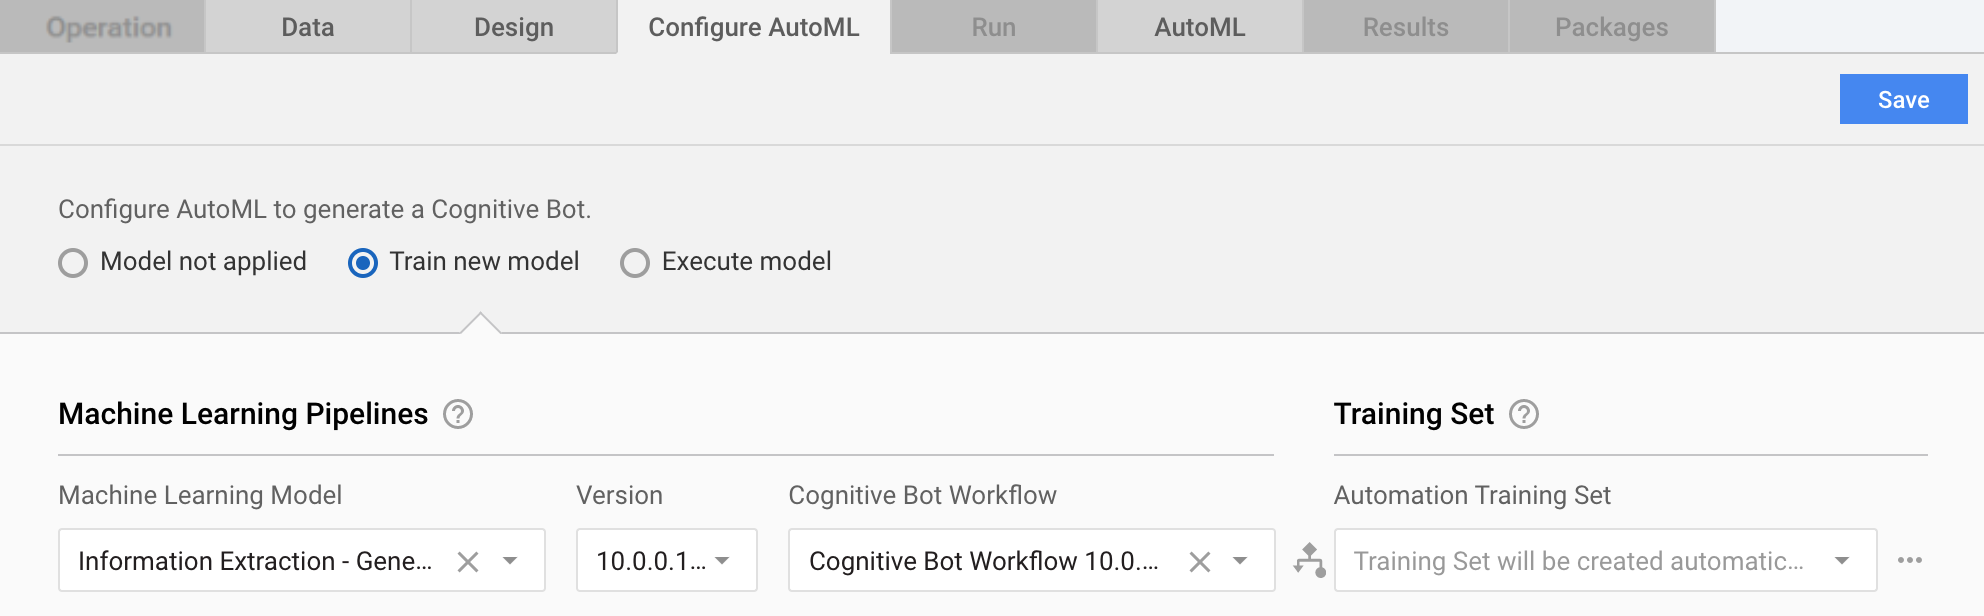
Go to a Manual Task > Configure AutoML > Train new model and, in the Machine Learning Pipelines section, select the imported model.
To test a trained model in the CT user interface, navigate to AutoML > Experiments. For details, refer to the Run experiments topic.
Publish trained model
Under this scenario, you need to first train and test your model locally and then build a bundle and deploy it to IA Cloud Enterprise. Follow the steps below:
- Train the model locally as described in the Implement model section.
- Publish the resulting model configuration together with training artifacts as described in the section above.
tip
You can also import a trained model via the AutoML UI in CT. For details, refer to Manage models | Import model.
Mind that the AutoML menu becomes visible only if you have the Manage models permission in CT. For instructions on setting the permission, refer to the Manage Control Tower roles and permissions article.
Execute model
important
Large pipelines and trained models exceeding 500 MB can cause high IOPS (high iowait) when Workers are launched.
Use model in Business Process or Manual Task
To use the new model in a Business Process, add it to an AutoML Business Process in CT. At this point, you can create a Manual Task or reuse an existing one.
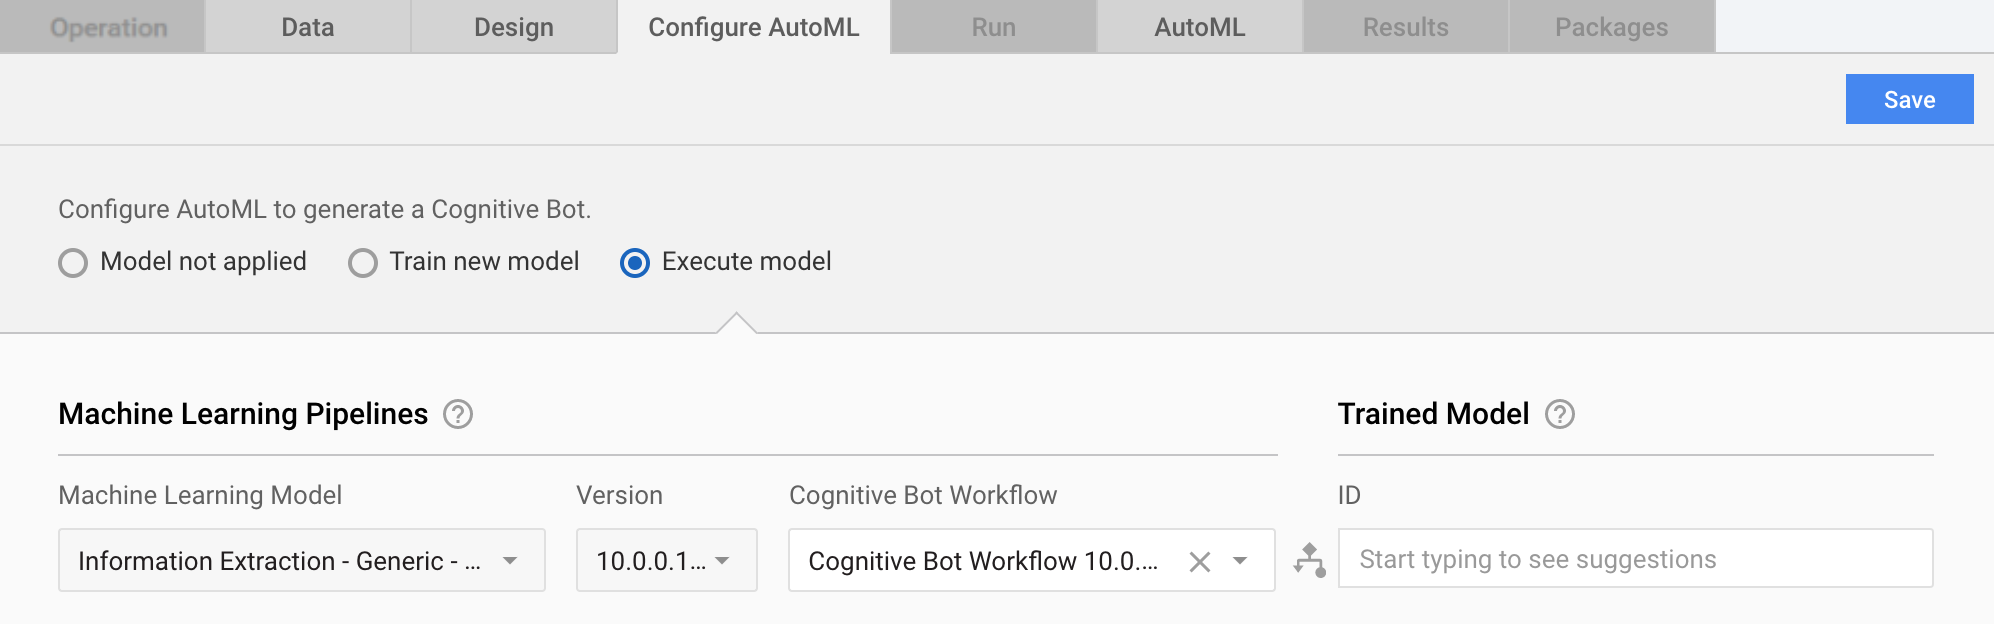
To add the model to an AutoML Business Process, follow the steps below:
- Open the created or reused Manual Task and navigate to the Configure AutoML tab.
- On the tab, fill in all fields, accounting for the following rules:
- The Machine Learning Model drop-down menu fetches a title from the
model.descriptionfile of your AutoML SDK project. Make sure to give your model a meaningful name before you deploy it. - Training Model ID is the name of the folder from your project in WorkFusion Studio—in this case,
/training. - Group ID stands for combined results for Information Extraction.
- The Machine Learning Model drop-down menu fetches a title from the
- Click Save.
- Click the AutoML tab > Activate Cognitive Bot to open the Automation BP wizard.
Execute with Bridge Framework
To execute an AutoML model by using the WorkFusion Control Tower's Bridge Framework, a special AutoML bot step—Execute AutoML Model: Bridge—is introduced out of the box.
- The step is implemented over ETL Bot Config and shouldn't be changed.
- The step processes based on the one document by one model principle.
- First you collect correct data, send it to Bridge, and get results—that is the internal CT logic that you cannot influence.
- Bot Sources are not supported.
- Stateless execution is supported.
For more information, go to the Execute AutoML Model: Bridge guide.