Automate Windows desktop applications
Automate Calculator
If you have Windows 8 or higher, download and install the old Windows 7 calculator and install it to C:/Windows/System32/calc1.exe.
View the code
<?xml version="1.0" encoding="UTF-8"?>
<config xmlns="http://web-harvest.sourceforge.net/schema/1.0/config" scriptlang="groovy">
<robotics-flow>
<robot name="bb8" driver="desktop" close-on-completion="true">
<capability name="SEARCH_ALL_WINDOWS" value="true" />
<script></script>
</robot>
</robotics-flow>
<export include-original-data="false">
<loop item="rpaVar">
<list>
<script return="keys">
keys = new ArrayList(rpaVariables.keySet())
</script>
</list>
<body>
<single-column name="${rpaVar}">
<template>${rpaVariables.get(rpaVar.toString())}</template>
</single-column>
</body>
</loop>
</export>
</config>
Automate Notepad
You can automate Notepad with Save as dialog.
View the code
<?xml version="1.0" encoding="UTF-8"?>
<config xmlns="http://web-harvest.sourceforge.net/schema/1.0/config" scriptlang="groovy">

    <robotics-flow>
        <robot name="bb8" driver="desktop" close-on-completion="true">
            <capability name="SEARCH_ALL_WINDOWS" value="true" />
            <script> <![CDATA[

                def path = 'D:\\_temp\\new.txt'
                Resource.createFileOverwrite(path)
                Resource.append(path, 'This is a content of the temporary txt file', 'utf-8')

                open('notepad.exe ' + path)
                switchTo().window('[CLASS:Notepad]')
                sleep(500)

                editor = $('[CLASS:Edit; INSTANCE:1]')

                // Navigate to the document's end.
                editor.sendKeys('^{END}')

                // Add new content.
                editor.sendKeys("\n\nThis is a new content which is added by \"WorkFusion Bot\".")

                // Try to close the notepad.
                driver().close()
                sleep(500)

                // Switch to the "Save changes" dialog.
                switchTo().window('[CLASS:#32770]')

                // Click the "Save" button.
                $('[CLASS:Button; INSTANCE:1]').click()
                sleep(2000)

                // Validate the result.
                open('notepad.exe ' + path)
                sleep(2000)

            ]]></script>
        </robot>
    </robotics-flow>
    <export include-original-data="false"/>
</config>
Explore Excel window
Use Inspector to get Excel UI and document controls
In this example, you practice the usage of Inspector, a built-in tool to explore properties and values of objects located in the application, providing functionality for quick element selector search.
Here, you can use Inspector to automate a Windows desktop application on the example of MS Excel. Let's assume you have the following table in an Excel file.

Having Euro as the base currency, scrap five currencies:
- Open the file with 1,000 rows and filter by date = today and the currency code.
- Set the exchange rate to euro.
- Take the following currencies: USD, AUD, INR, GBP, SGD.
- Set the date to 28.11.2018.
Using Inspector, you can get appropriate fields. For example, get the selector of the A1 cell.
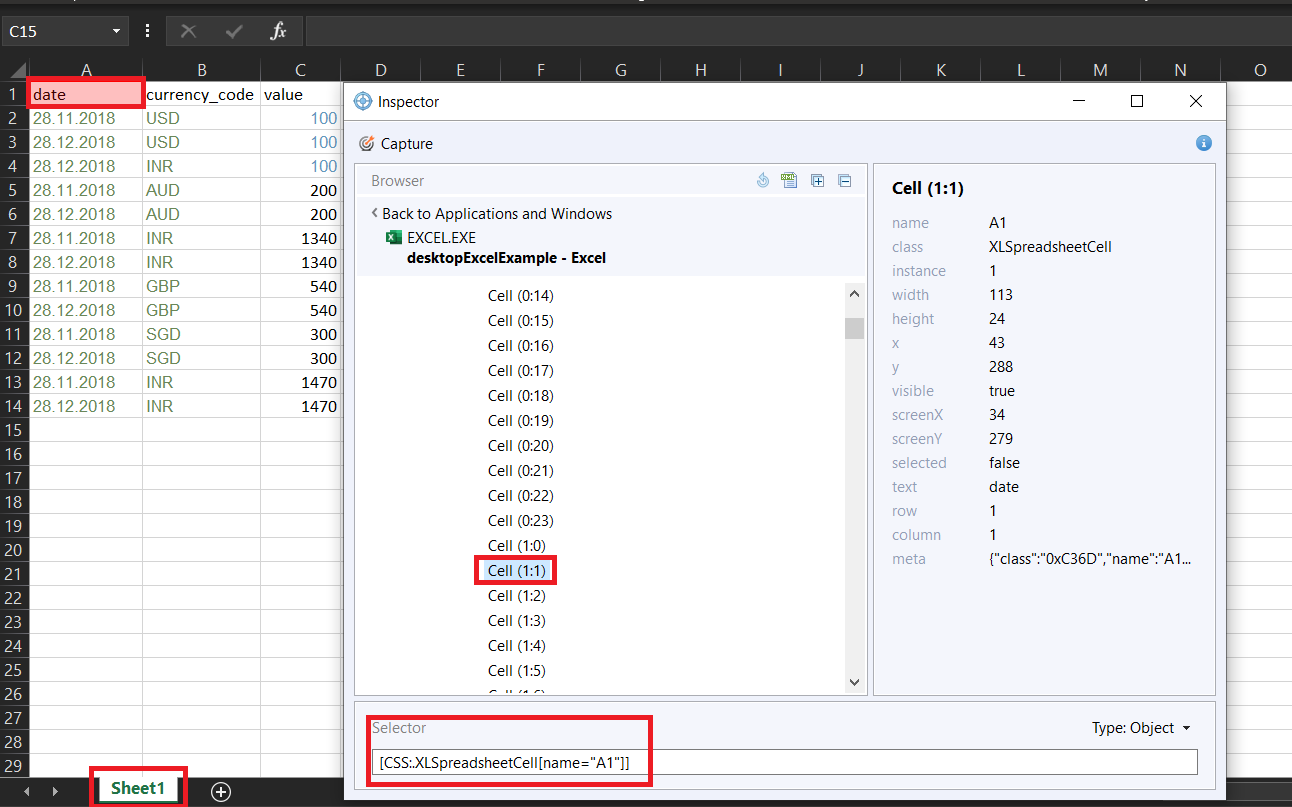
You can also navigate through the cells using the Inspector attributes.
Use identified selectors in Bot Task code
You can design the Bot Task source code in the following way:
View the code
<?xml version="1.0" encoding="UTF-8"?>
<config xmlns="http://web-harvest.sourceforge.net/schema/1.0/config" scriptlang="groovy">
<robotics-flow>
<robot driver="desktop" close-on-completion="true"> <!--Open desktop driver.-->
<capability name="SEARCH_ALL_WINDOWS">true</capability>
<script><![CDATA[
import java.awt.Toolkit;
import java.awt.datatransfer.DataFlavor;
String path = downloadFileOnAgent('https://wf-vr-training.s3.amazonaws.com/trainings/rpa_examples/test_xlsx.xlsx') //downloadFileOnAgent with path to Excel file with initial data.
String fileName = path.substring(path.lastIndexOf('\\') + 1, path.size() - 5) //Get file name from path.
Map currencyMap = [:] //Create a Map for currencies with a value in EUR.
currencyMap.put("USD", 0.878028) //Adding data to the map.
currencyMap.put("AUD", 0.643376)
currencyMap.put("INR", 0.0125605)
currencyMap.put("GBP", 1.12634)
currencyMap.put("SGD", 0.640738)
switchToRootWindow() //Setting target for the desktop driver.
sendKeys('{LWIN}Excel{ENTER}') //Open Excel.
sleep(1000)
switchTo().window('[CLASS:XLMAIN; TITLE:Excel]') //Switch to the Excel window.
$('[CLASS:NetUIRibbonTab; NAME:Open]').click() //Click the "Open" button in the main menu.
$('[CLASS:NetUISimpleButton; NAME:Browse]').click() //Click the "Browse" button.
switchTo().window('[CLASS:#32770; TITLE:Open]') //Switch to the "Open" window.
$('[CLASS:Edit]').sendKeys(path) //Enter the path in the "Edit" field.
sendKeys('{ENTER}') //Press Enter.
switchTo().window('[CLASS:XLMAIN; TITLE:' + fileName + ' - Excel]') //Switch to the Excel open file window.
$('[CLASS:HeaderItem; NAME:1]').click() //Select the first row with headers.
sendKeys(Keys.chord(Keys.LEFT_CONTROL, 'c')) //Press "Ctrl + C" to copy.
String data = (String) Toolkit.getDefaultToolkit().getSystemClipboard().getData(DataFlavor.stringFlavor)//Getting data from the clipboard in String format.
List headers = data.replaceAll("\n", "").split("\t") //Delete a blank line and split the data to get a List of headers.
$('[CLASS:DataItem; NAME:A2]').click() //Select cell A2.
sendKeys(Keys.chord(Keys.LEFT_SHIFT,'{RIGHT ' + (headers.size() - 1) + '}')) //Select all columns with headers starting at cell A2.
sendKeys(Keys.chord(Keys.LEFT_SHIFT,Keys.LEFT_CONTROL,'{DOWN}')) //Select all data below the previously selected cells.
List table = [] //Create a List to store data from the table.
int rowID = 1 //Initialize a variable with the row number.
sendKeys(Keys.chord(Keys.LEFT_CONTROL, 'c')) //Press "Ctrl + C" to copy.
data = (String) Toolkit.getDefaultToolkit().getSystemClipboard().getData(DataFlavor.stringFlavor); //Get data from the clipboard in the String format. //Start parsing data from the Excel table into simple Groovy objects.
for(String item : data.split("\n")){ //Separate the copied data into lines and work with each line separately in the cycle.
Map row = [:] //Create a Map to store row data.
rowID++ //Increment the "rowID" variable.
row.put("id", rowID) //Put the row number on the Map.
int index = 0 //Create an "index" variable to get the headers from the first to the last one.
for(String rowItem : item.split("\t")){ //Separate data on the row to obtain cell values and work with each separately in the loop.
row.put(headers.get(index), rowItem) //Put the cell value with the appropriate header on the map.
index++ //Increment the "index" variable.
}
table.add(row) //Add a Map with row data to a List for table data.
}
String date = "28.11.2018" //Initialize the date value for the first data filter.
List result = [] //Create a List to store data from the table with the applied filters.
for(Map item : table){ //Perform a work cycle with each Map from the List with table data.
if(item.get("date") == date){ //Apply filter by date.
for(String currency : currencyMap.keySet()){ //Perform a work cycle with each currency name from the List with all keys from the Map with currency.
if(item.get("currency_code") == currency){ //Apply a filter by currency.
Map newValue = [:] //Create a Map to store past data filters.
newValue.put("id", item.get("id")) //Put the row number on the Map.
newValue.putAt("value", Double.parseDouble(item.get("value"))*currencyMap.get(currency))//Put the calculated value in EUR on the Map.
result.add(newValue) //Add a Map with new data to a List for result data.
break; //Make a cycle break.
}
}
}
}
sendKeys(Keys.chord(Keys.LEFT_SHIFT,Keys.LEFT_CONTROL,'{UP}')) //Select the first two rows to access cell A1.
$('[CLASS:DataItem; NAME:A1]').click() //Select cell A1, see Fig.1.
sendKeys('{RIGHT ' + headers.size() + '}result{ENTER}') //Switch to the first empty column and add the "result" header.
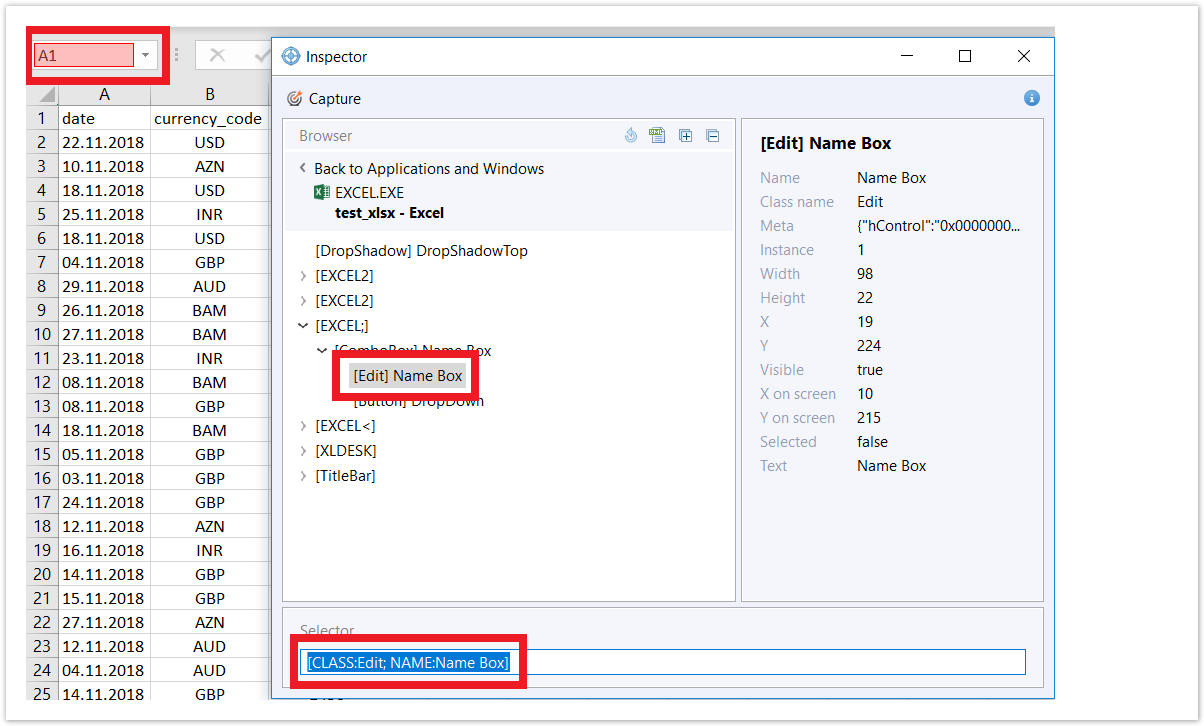
$('[CLASS:Edit; NAME:Name Box]').click() //Select the "Name Box" field.
sendKeys(Keys.chord(Keys.LEFT_CONTROL, 'c')) //Press "Ctrl + C" to copy.
sendKeys('{BACKSPACE}') //Delete text from the "Name Box" field.
data = (String) Toolkit.getDefaultToolkit().getSystemClipboard().getData(DataFlavor.stringFlavor) //Get data from the clipboard in the String format.
String columnName = data.substring(0, 1) //Get the column name "result".
.
for(Map item : result){ //Perform a work cycle with each Map from the List with result data.
$('[CLASS:Edit; NAME:Name Box]').click() //Click the "Name Box" field, see the picture below.
sendKeys(columnName + item.get("id") + '{ENTER}' + item.get("value").toString() + '{ENTER}') //Enter the cell address and new data.
}
sendKeys(Keys.chord(Keys.LEFT_CONTROL, 's')) //Click the "Save As" button in the main menu.
$('[CLASS:NetUIAppFrameHelper; NAME:Close]').click()
def fileContent = downloadFileFromAgent(path) //Download the file from the computer to a variable.
deleteFileOnAgent(path) //Delete the file from the computer.
sys.defineVariable("file", fileContent) //Define a variable with a XLSX file in the XML space.
sys.defineVariable("file_name", fileName + ".xlsx") //Define a variable with a filename and format in the XML space.
]]></script>
</robot> <!--Close desktop driver.-->
</robotics-flow>
<var-def name="s3_link"> <!--Upload file to S3.-->
<s3 bucket="wf-vr-training">
<s3-put path="temp.bucket/temp/${file_name}" content-type="application/ms-excel" acl="PublicRead">
<var name="file"/>
</s3-put>
</s3>
</var-def>
<export include-original-data="false">
<single-column name="s3_link" value="${s3_link}"></single-column>
</export>
</config>
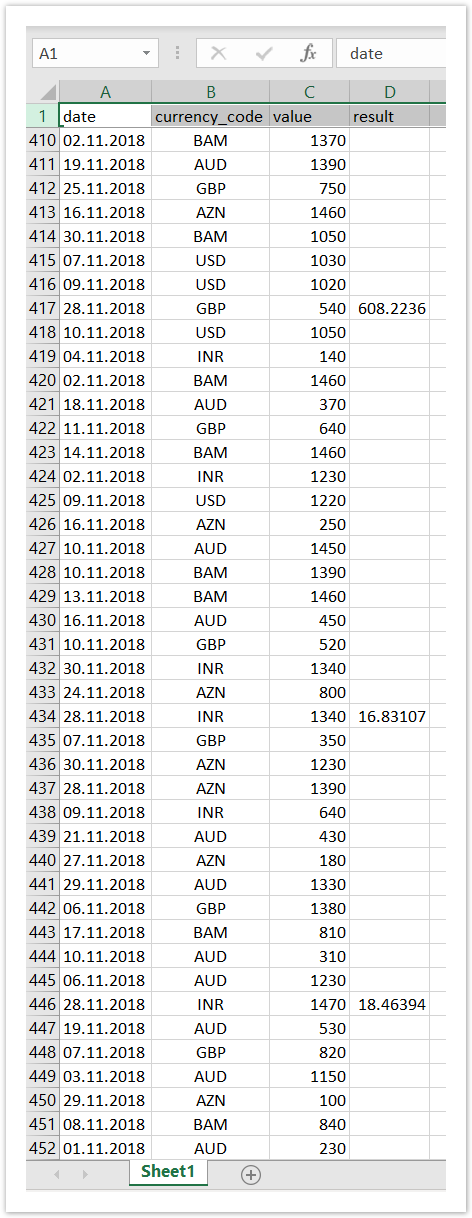
The resulting file looks as follows: