
BI Windows Server installation
Run installation of WorkFusion Analytics Server as Windows Administrator.
Prerequisites
- Ports are open.
- Installation packages are uploaded to the server(s) and unzipped.
WorkFusionAnalyticsInstaller.zipcontains two folders:WorkfusionAnalyticsServerandWorkfusionAnalyticsDesktop - License keys for WorkFusion Analytics Server and Desktop (optional) provided by the Workfusion team.
- Predefined common variables:
- WorkFusion group. Default is wfuser- WorkFusion user.
Default is wfuser - WorkFusion Home Directory.
Defaults are WorkfusionAnalyticsServer
D:\WorkFusionServerWorkfusionAnalyticsDesktopandD:\WorkFusionDesktop - WorkFusion Installer Directory. Default is
D:\WorkfusionAnalyticsServer. - DNS of Application server (APP) e.g.
app.example.com. - FileBeat service: filebeat installation directory. Default is
C:\filebeat. - Analytics server hostname e.g.
bi.example.com. - APM server hostname e.g.
apm.example.com. - Port of APM Logstash service. Default port is 4567.
- WorkFusion group. Default is wfuser- WorkFusion user.
Default is wfuser - WorkFusion Home Directory.
Defaults are WorkfusionAnalyticsServer
WorkFusion Analytics Server installation
The installation process can take about 20-25 minutes.
Start the Command Prompt (cmd) and go to the
WorkfusionAnalyticsServerfolder in the unpacked installation package.Launch the installation Batch file (
install_server.bat) with the following parameters: installation directory and APP hostname:install_server.bat <INSTALL_DIR> <APP_HOSTNAME>Example:
install_server.bat D:\WorkFusionServer app.exapmle.comOpen Manager Product Keys and enter the license key: Start > All Programs > Manage Product Keys.
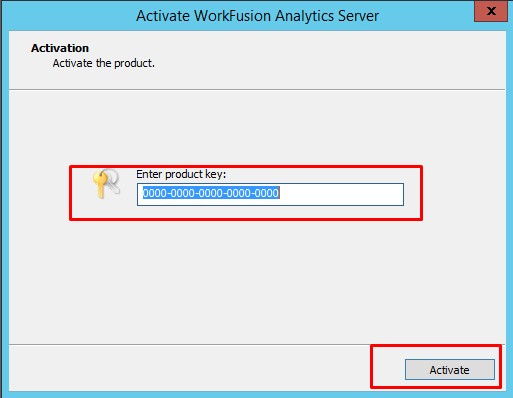
For more details about Activation refer to WorkFusion Analytics License.
Open
http://localhostin the browser on BI Server. Create a server administrator account.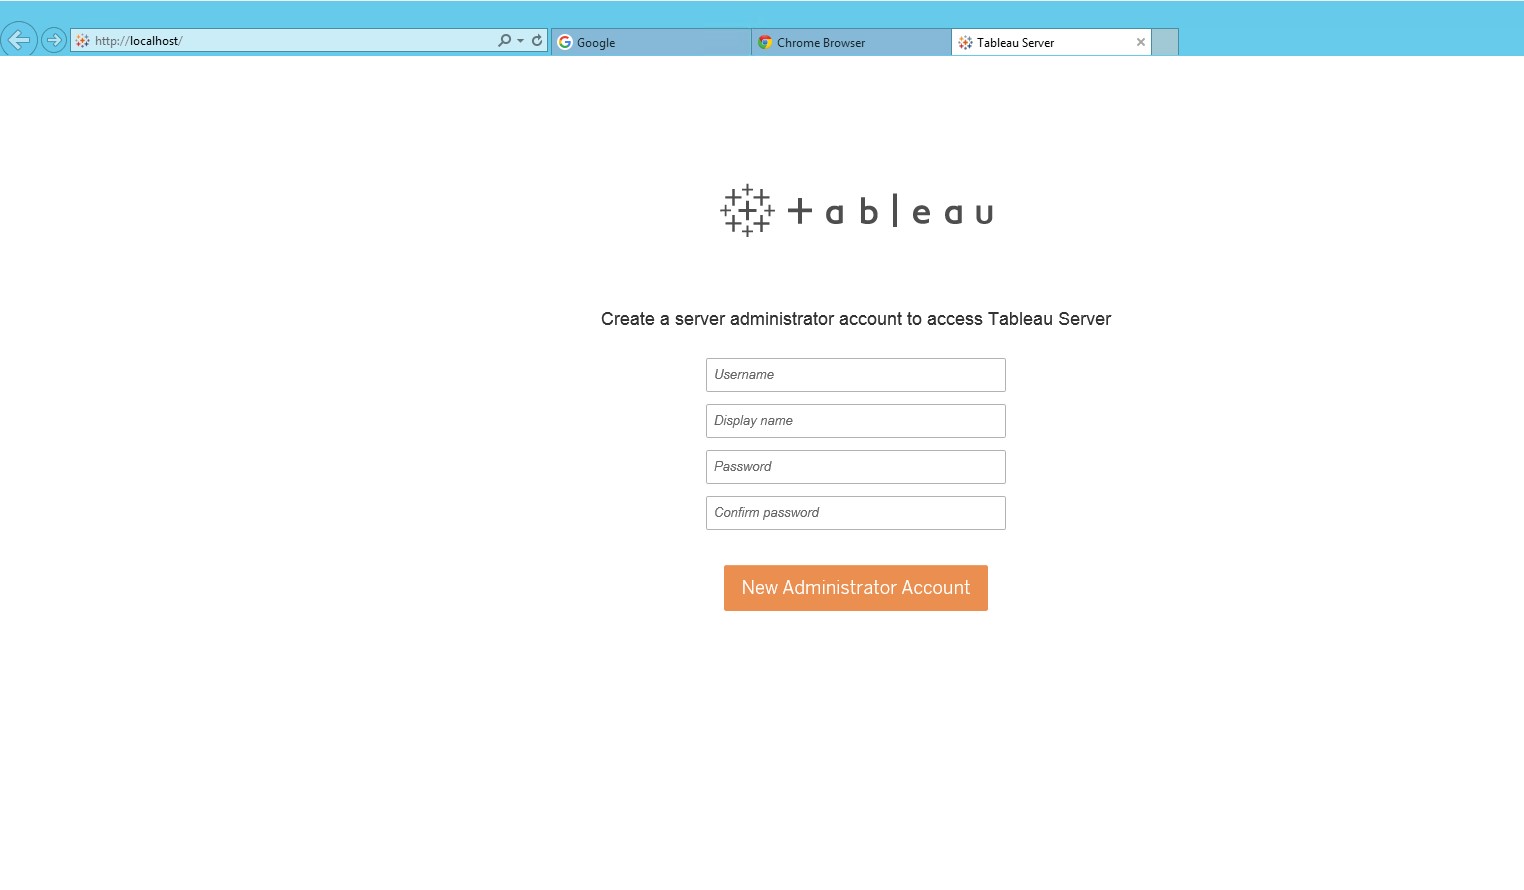
caution
Do not use '%', '&', '^' or '=' characters and other special symbols in the password ('$' symbol is allowed).
WorkFusion Analytics Desktop installation
Start the Command Prompt (cmd) and go to the
WorkfusionAnalyticsDesktopfolder in the unpacked installation package.Launch the installation Batch file (
install_desktop.bat) with the following parameter – installation directory:install_desktop.bat <INSTALL_DIR>Example:
install_desktop.bat D:\WorkFusionDesktopStart WorkFusion Analytics Desktop using the Desktop shortcut and enter the license key.
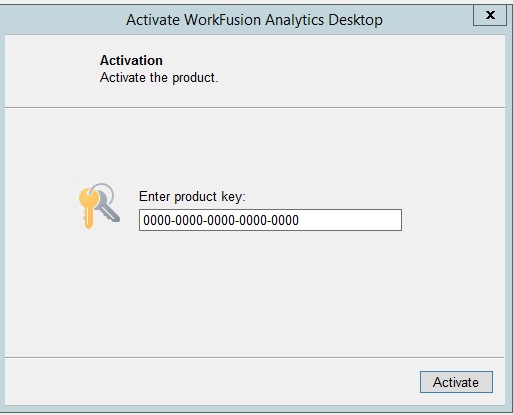
For more details about Activation refer to WorkFusion Analytics License.
WorkFusion Analytics Filebeat installation
Start the Command Prompt (cmd) and go to the Filebeat folder in the unpacked installation package.
For log gathering, launch the installation file (
install_filebeat.bat) with the following parameters (use<INSTALL_DIR>forWorkfusionAnalyticsServer):install_filebeat.bat <FILEBEAT_DIR> <INSTALL_DIR> <BI_HOSTNAME> <APM_HOSTNAME>:<PORT>Example:
install_filebeat.bat D:\filebeat D:\WorkFusionServer bi.exapmle.com apm.exapmle.com:4567Copy the root certificate
CA.crtfile generated during the preparation steps to BI server into<FILEBEAT_DIR>and update the<FILEBEAT_DIR>/filebit.ymlconfig file with a path to the certificate: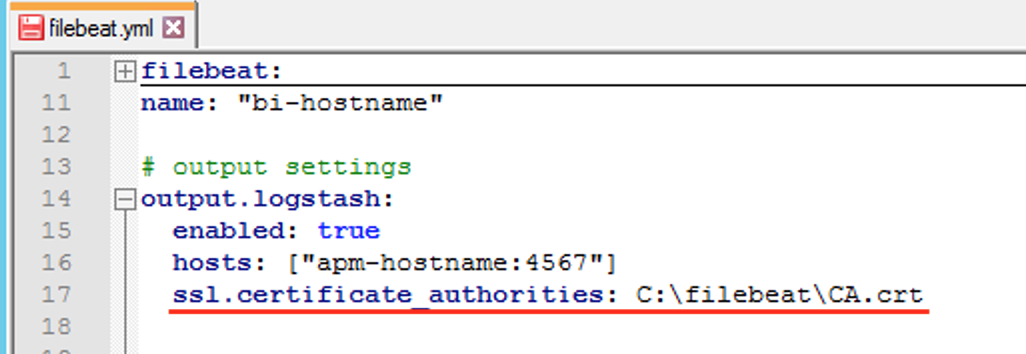
Start the filebeat service:
sc start filebeat
Configure SSL WorkFusion Analytics Server
SSL configuration is mandatory in case the whole environment is configured with a secure connection.
Import BI certificate and a key generated during the preparation steps and place it to
<INSTALL_DIR>.Add to Tableau config
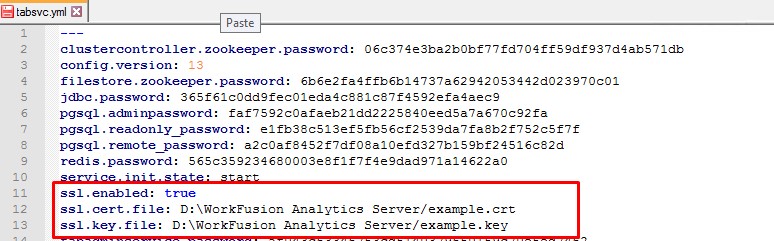
<INSTALL_DIR>\WorkFusion Analytics Server\conf\tabsvc.ymlon BI Server.ssl.enabled: true ssl.cert.file: <path to the certificate> ssl.key.file: <path to the key>Example:
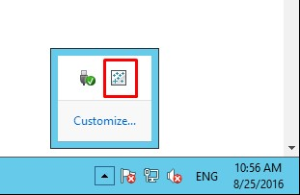
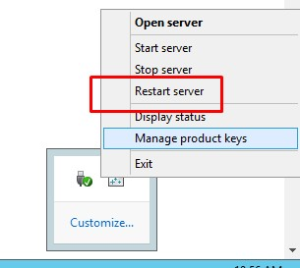
Restart WorkFusion Analytics Server.
Deploying Workbooks to WorkFusion Analytics Server
This section describes deployment of Tableau workbooks to Tableau 10 Server OEM (WorkFusion Analytics Machine).
Pre-installed Software:
- Microsoft Server 2008 R2 or newer
- WorkFusion Analytics Server 10.5.2 OEM or newer
- Workbooks packages are uploaded to the server(s) and unzipped.
WorkFusionAnalitycsWorkbooks.zipcontains the following folders:deploy_scripts,dashboards,wf_automation
Workbook deployment
Log in to the BI server where WorkFusion Analytics Server is installed and follow the next steps:
Create folders for installation files:
Create a folder
c:\tdeploy_home\install.Copy files from
deploy_scriptsfolder toc:\tdeploy_home\install.
Pre-installation directories after unpacking a ZIP file:
c:\tdeploy_home
    \install    (file: install.cmd)
        \lib    (installation file pack)
Run the installation procedure. Open the Command Prompt and run the command. Run
install.cmd.cd c:\tdeploy_home\install install.cmd c:\tdeploy_homeCreated files and directories after
install.cmd:c:\tdeploy_home \deploy (files: create_sitefolder.cmd, publish.cmd, manage_server.cmd) \config (files: config._sample_.cmd, config._sample_WFA_.cmd, deploy_config.cmd, import_users.csv) \lib (files: deploy_workbook.cmd, deploy_datasource.cmd, get_datetime.vbs, get_logfile.cmd, log_echo.cmd, replace_str.vbs) \to_deploy (empty) \deployed (empty) \log (empty)The installation log file is created in
c:\tdeploy_home\install\named asinstall_YYYY-MMDD-HHMI.log.Create folders for a new site:
cd c:\tdeploy_home\deploy
create_sitefolder.cmd site_name
Where site_name is a part of the APP instance host. For example, if APP is hosted at
https://wfapp.company.com/the command parameter iswfapp(a site and a project with the same name will be created on WorkFusion Analytics Server).
To create more than one site folder need to specify several parameters for the create_sitefolder.cmd command.
This command creates the new configuration files (copied from deploy\config\config._sample_.cmd and config._sample_WFA_.cmd) and a few new folders.
New files and directories after create_sitefloder.cmd:
c:\tdeploy_home
    \deploy
        \config
            config.site_name.cmd      (settings for the site "site_name")
            config.site_name_WFA.cmd  (settings for WF-Automation)
        \to_deploy
            \site_name                (dashboards for deploying)
                 \automation          (WF-Automation dashboards)
                 \dashboard           (generic dashboard)
                 \datasource          (data sources for generic dashboard)
        \deployed
            \site_name                (already deployed dashboards: are being moved from \to_deploy\site_name during deploy process)
                 \automation
                 \dashboard
                 \datasource
Final directory structure:
c:\tdeploy_home
    \install
        \lib
    \deploy
        \config
        \lib
        \to_deploy
            \site_name
                 \automation
                 \dashboard
                 \datasource
        \deployed
            \site_name
                 \automation
                 \dashboard
                 \datasource
        \log
Configuration files preparation
You can download the configuration files from APP server. Find the detailed information at Preparation of RPA and BI configurations.
Edit the configuration files manually.
In c:\tdeploy_home\deploy\config, specify the appropriate values in config.site_name.cmd and config.site_name_WFA.cmd.
Common config parameters:
REM DB options
SET DATABASE_SERVER_NAME=servername     (DB_HOSTNAME)
REM PostgreSQL options
SET DATABASE_NAME_PGSQL=dbname
SET DATABASE_PORT_PGSQL=0000
SET DATABASE_USERNAME_PGSQL=dbuser
SET DATABASE_PASSWORD_PGSQL=dbpass
REM WorkFusion Analytics (Tableau) Server options
SET TABLEAU_SERVER_URL="https://tableau.com"
SET TABLEAU_SERVER_BIN="C:\Program Files\Tableau\Tableau Server\<version>\bin"
SET TABLEAU_SITE=usersite               (site_name)
SET TABLEAU_PROJECT=usersite            (for config.site_name_WFA.cmd predefined value is 'WF-Automation')
SET TABLEAU_USERNAME=tabuser            (user role must be Server Administrator)
SET TABLEAU_PASSWORD=tabpass
Specific parameter for config.site_name.cmd:
REM MySQL options
SET DATABASE_NAME_MYSQL=dbname
SET DATABASE_PORT_MYSQL=0000
SET DATABASE_USERNAME_MYSQL=dbuser
SET DATABASE_PASSWORD_MYSQL=dbpass
REM Timezone correction parameter in hours (0 for UTC)
SET TIMEZONE_SHIFT=0
Specific parameter for config.site_name_WFA.cmd:
SET SERVICE_WFBI_NAME=swfbiurl.com
| Config parameter | Values for Control Tower {{ x }} - Ansible variable defined earlier |
Values for AutoML {{ x }} - Ansible variable defined earlier |
Description |
|---|---|---|---|
|
|
{{ db_hostname }} |
DNS name of the database server |
|
|
not specified | data source's database name |
|
|
not specified | default values:3306 for MySQL |
|
{{ wfdb_read_user }} |
not specified | wfdb_read_user from secrets.yml |
|
{{ wfdb_read_pass }} |
not specified | wfdb_read_pass from secrets.yml |
|
wf_datastore
|
part of |
data source's database name |
|
|
|
default values:5432 for PostgreSQL |
|
{{ workfusion_analytics_user }} |
{{ wfbi_db_user }} |
Variables from secrets.yml |
|
{{ workfusion_analytics_pass }} |
{{ wfbi_db_pass }} |
Variables from secrets.yml |
|
URL of the Tableau Server | ||
|
Full path to the \bin directory of Tableau Server |
||
|
site_name |
site_name |
part of the
if APP is hosted at https://wfapp.company.com/ the value will be wfapp
|
|
site_name |
WF-Automation |
should be equal to TABLEAU_SITE value in case of dashboards, not automation |
|
Tableau Server user name with "Server Administrator" rights | ||
|
"Server Administrator" user's password | ||
|
not specified | part of {{ wfbi_access_url }} |
Service WFBI name
if service-wfbi is hosted at https://wfapp.company.com/service-wfbi the value will be wfapp.company.com
|
|
not specified | default value: 'Plus' symbol (+) for time zones should not be mentioned (only number). |
Update user's credentials
In
c:\tdeploy_home\deploy\config, specify the appropriate values inimport_users.csv.A new user will be created on WorkFusion Analytics Server and should be used for Control Tower - Analytics integration. It will be added with the Interactor role.
Replace the existing values with already configured credentials. Name and Password should be equal to the
{{wf_tableau_dashboard_username}}and{{wf_tableau_dashboard_password}}properties generated during the preparation steps in thesecrets.ymlfile.
import_users.csv:
tableau_user,tableau_pass,,,,,email@example.com
caution
Do not use '%', '&', '^' or '=' characters and other special symbols in the password ('$' symbol is allowed). Do not add or delete any commas in import_users.csv.
Create WorkFusion Analytics site, project and new user
Run the manage_server.cmd command in the Command Prompt:
cd c:\tdeploy_home\deploy
manage_server.cmd site_name
A site and a project are created on WorkFusion Analytics Server as site_name and WF-Automation respectively. A new user is added to the newly created site.
To create more than one site on WorkFusion Analytics Server, specify several parameters for the manage_server.cmd command.
Prepare new workbook files
Download the Workbook packages (provided by WorkFusion team).
Copy files from folder
dashboards/workbookto:c:\tdeploy_home\deploy\to_deploy\site_name\dashboardand from
wf_automationto:c:\tdeploy_home\deploy\to_deploy\site_name\automationThe
datasourcefolder remains for backward compatibility.
Publish new workbook files
Run
publish.cmdto consequently publish (add or replace) each file on WorkFusion Analytics Server.cd c:\tdeploy_home\deploy publish.cmd site_nameTo publish workbooks on more than one site on WorkFusion Analytics Server, specify several parameters for the
publish.cmdcommand.The command also moves the published file to the following folders respectively:
c:\deploy\deployed\site_name\dashboard
c:\deploy\deployed\site_name\automation
The log file will be created in \deploy\log.
As a result the new (updated) workbooks should appear at WorkFusion Analytics or the Automation tab.
::caution
Do not use TWB or TWBX files located in deploy\to_deploy or \deploy\deployed directories repeatedly. Reload them from the delivery package each time.
:::
Refresh Extracts Schedule Configuration
A Schedule should be configured by an Administrator.
Log into WorkFusion Analytics Server.
There are several pre-configered Schedules on the Server. A new Schedule for correct data refresh should be added too.
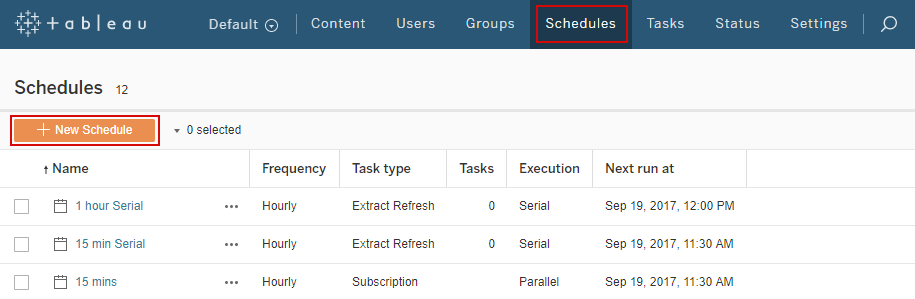
Create a Schedule. Go to the Schedules page and click New schedule.
Configure the Schedule. Enter a name and choose appropriate values.
Minimal frequency is 15 minutes.
Select the Serial execution type for correct data refresh.
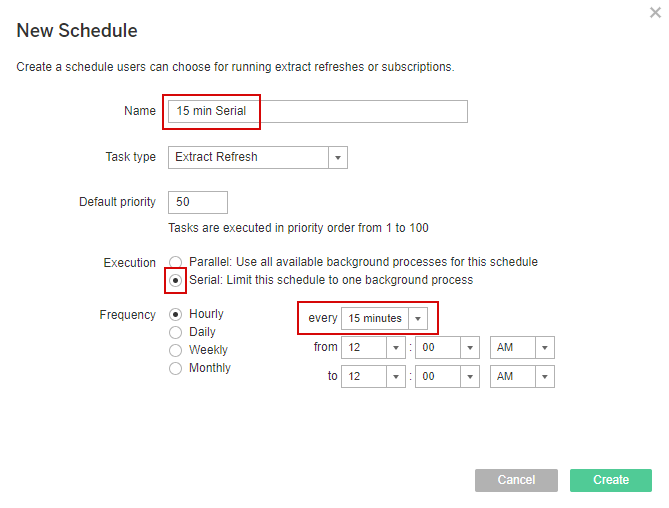
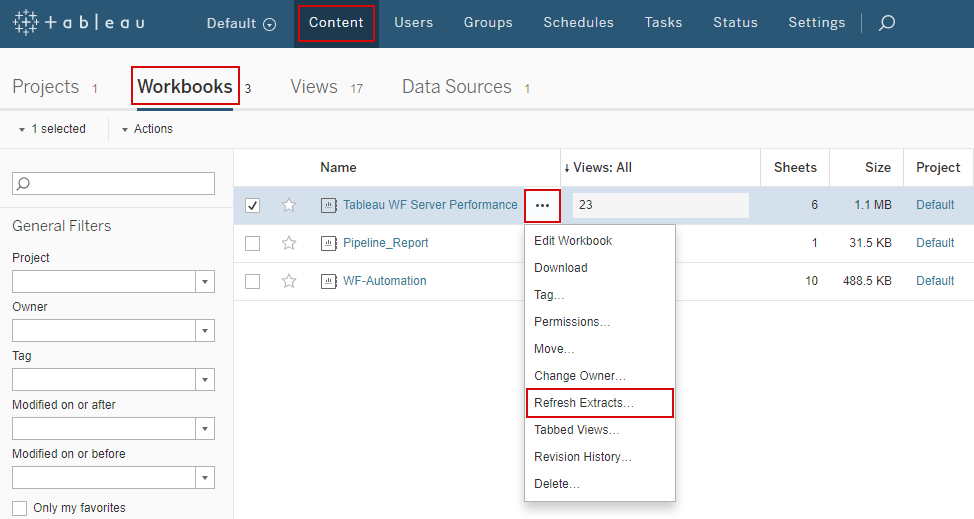
Assign the Schedule to a Workbook.
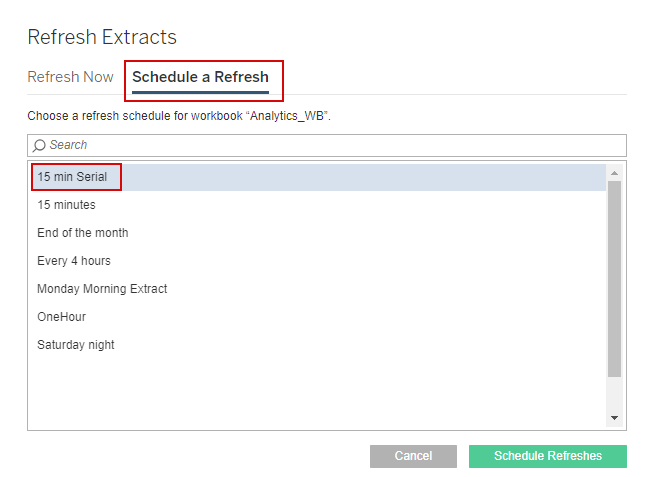
- Go back to Content > Workbooks, click '...' to expand the options of the required Workbook, then click Refresh Extracts.... Schedule should be assigned to "AA_ETL_process" and Analytics_WB workbooks.
- Choose Schedule a Refresh, select the required refresh time and click Schedule Refreshes.
Define the Workbooks Refresh Order.
Priority for ETL workbook should be changed to prevent data gap.
- Go to Tasks > Extract Refreshes, click '...' on AA_ETL_process workbook to expand the options, then click Change Priority....
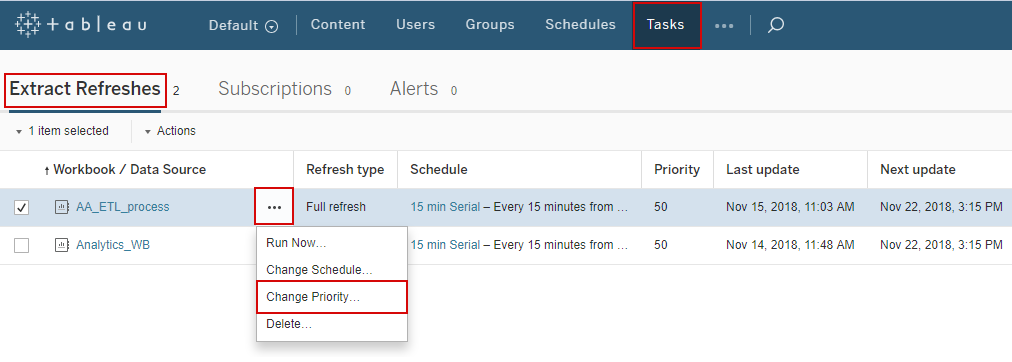
- Set Priority to 10 and click Change Priority.
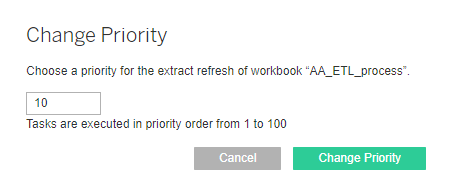
The ETL workbook will be refreshed first.
Enable WorkFusion Analytics Dashboard in Control Tower
The following actions should be performed to enable BI Analytics Server in the WorkFusion platform:
Install WorkFusion Analytics server as described in WorkFusion Analytics Server Installation.
Deploy workbooks to WorkFusion Analytics server as described in Deploying Workbooks to WorkFusion Analytics Server.
Enable WorkFusion Analytics server in the WorkFusion platform:
Check and configure the secure properties file (Vault) on DB server (should be already configured before installation). Refer to How to view secrets to view the secure properties.
<!-- Set DNS name of BI server -->
tableau.dashboard.host=https://bi.example.com
tableau.automation.host=https://bi.example.com

<!-- Set login and password for connection to BI server -->
tableau.dashboard.username=tableau_user
tableau.dashboard.password=tableau_pass
tableau.automation.username=tableau_user
tableau.automation.password=tableau_pass
Property Name
Example Value
Description
Required for
tableau.dashboard.hostWorkFusion Analytics Server website url for Dashboard WorkFusion Analytics Dashboard tableau.automation.hostWorkFusion Analytics Server website url WorkFusion Analytics UI tableau.dashboard.usernametableau_userWorkFusion Analytics Server website username for Dashboard (was used in import_users.csv) WorkFusion Analytics Dashboard tableau.dashboard.passwordtableau_passWorkFusion Analytics Server website password for Dashboard (was used in import_users.csv) WorkFusion Analytics Dashboard tableau.automation.usernametableau_userWorkFusion Analytics Server website username for WF-Automation. Automation is published on the same server so the same credentials as for tableau.dashboardshould be used.WorkFusion Analytics UI tableau.automation.passwordtableau_passWorkFusion Analytics Server website password for WF-Automation. Automation is published on the same server so the same credentials as for tableau.dashboard should be used. WorkFusion Analytics UI Restart Workfusion service on APP server.
sudo su - wfuser; wfmanager restart workfusionWait for about 1 minute and check, that there are no any errors in the Control Tower application logs:
sudo su - wfuser; tailf -n 50 /opt/workfusion/supervisord/log/workfusion.out.log
Check results
Open the following URL
https://<hostname>/in a browser to go to the APP instance. The following menu appears: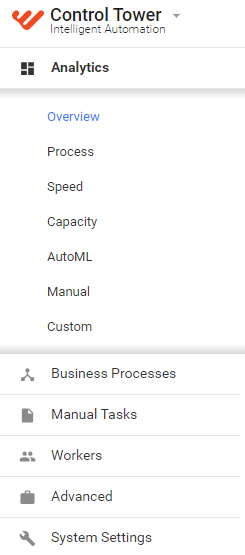
Go to the Analytics section in the main menu to see dashboard. Overview is a default tab. Verify that WorkFusion Analytics displays dashboard:
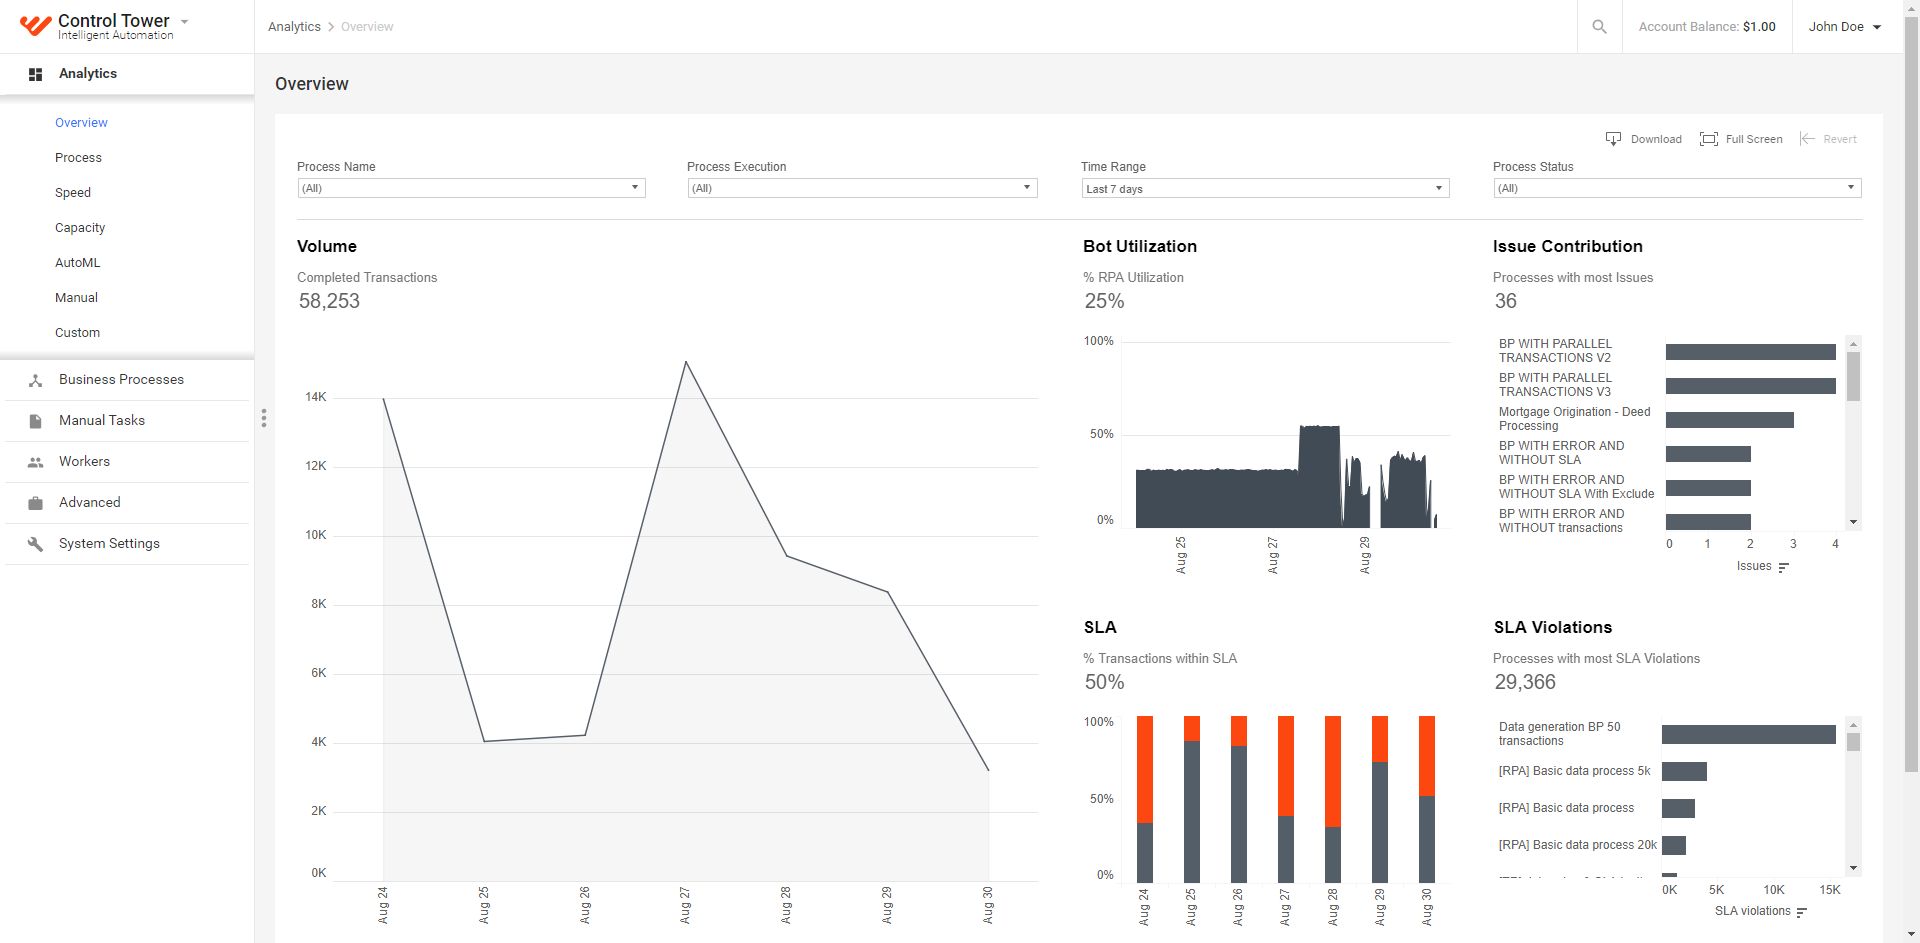
Go to Manual Tasks > View All and click the Cognitive Bot Ready label to see the Automation.