Design Manual Task via Code Editor
The section refers to the legacy Manual Task design via Code Editor. Before reading the article, see the Design Manual Task in Task Designer mode topic.
To understand and effectively use the instructions below, the following knowledge is essential:
- HTML
- CSS
- JavaScript
- FreeMarker
- Bootstrap framework
- jQuery framework
Design Manual Task via code changes
For simple Manual Task (MT) designs, use the WYSIWYG editor. To add extra functionality, switch to the Code Editor mode and modify the source code carefully:
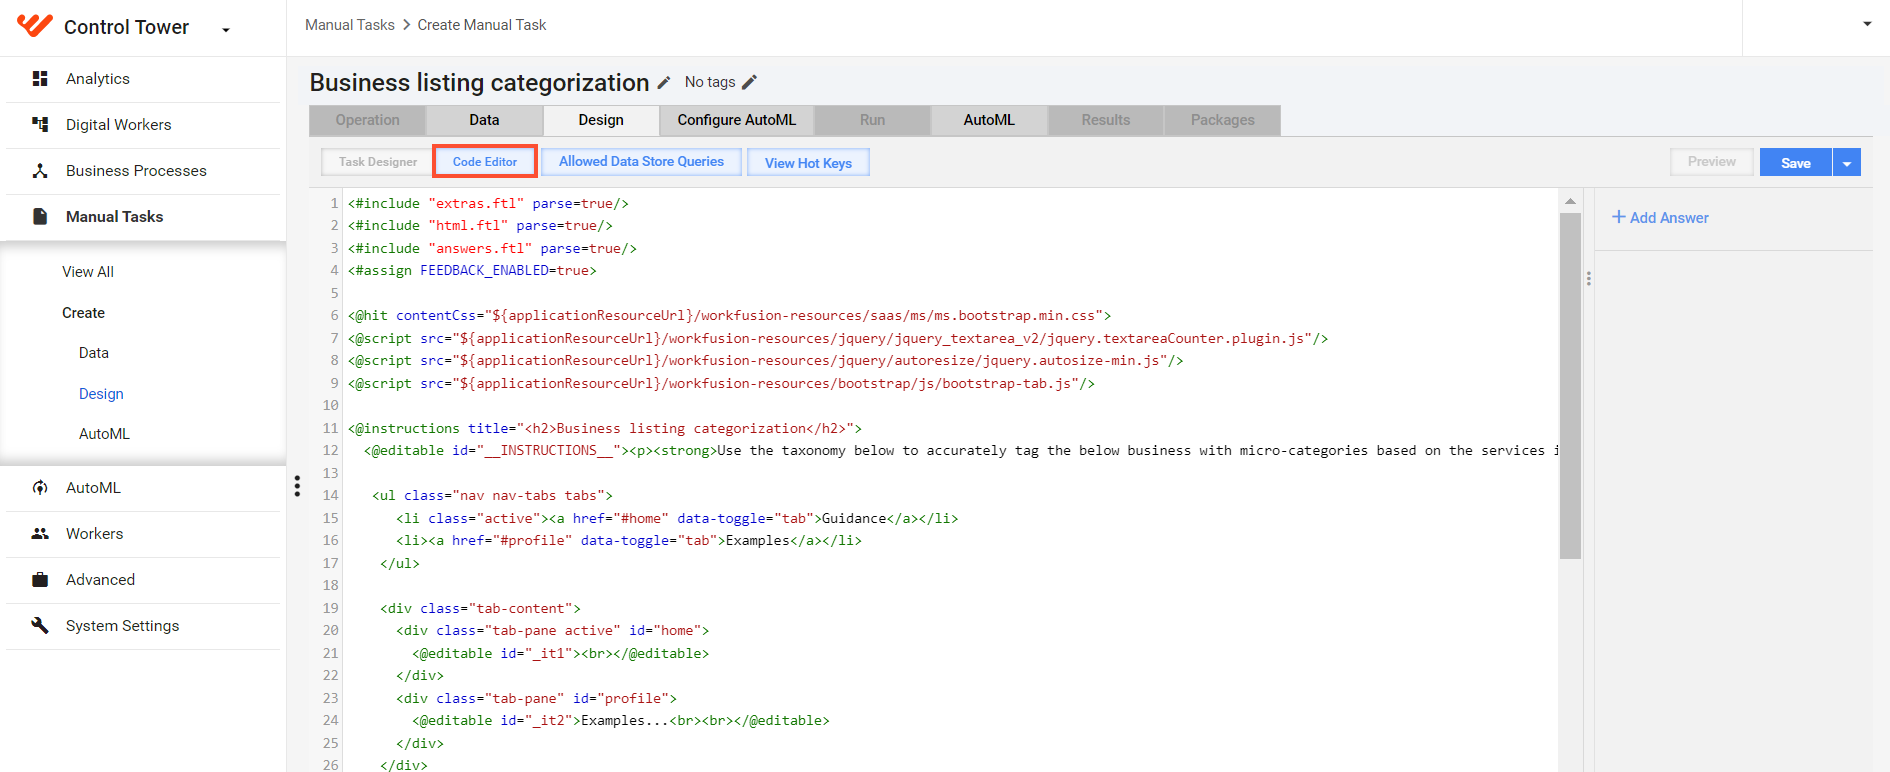
In the Code Editor mode, the working flow is as follows:
- Copy the original code and save it on your local machine or in a cloud.
- Start making necessary changes.
- Preview the MT after significant edits.
- Depending on the result, save the MT or, in the Code Editor, use the CTRL+Z combination to undo the changes. You can periodically save your code to a new file or file version on your local machine.
Below is a typical MT code example:
See code example
<#include "extras.ftl" parse=true/>
<#include "html.ftl" parse=true/>
<#include "answers.ftl" parse=true/>
<#assign FEEDBACK_ENABLED=true>

<@script src="https://s3.amazonaws.com/crowdcontrol.taglib/bootstrap/js/bootstrap-tab.js"/>

<@hit>

  <style>
      .cc-decorate:nth-child(even){margin-left:5px}
      .cc-decorate{float:left;}
      .cc-input.text{width:60px !important}
      .thumbnail{display:table !important}
      .place{padding:0px}
      .imgblock{width:580px;float:left;}
      .imgwrap{width:570px;height:180px;background-color:lightGrey;text-align:center}
      .imgwrap img{max-width:600px;max-height:180px}
      .answrap{overflow: auto;width:460px;height:280px;background:white}
  </style>

  <@instructions title="<h2>Identify an appropriate age and gender combination</h2>">
    <@editable id="__INSTRUCTIONS__">
      <p>The goal of this project is to correctly identify an appropriate age and gender combination for each person depicted in the images below.</p>
    </@editable>
  </@instructions>

  <@form  validate=false>

    <#if questions??>
      <div class="place" style="display:table">

        <#list questions as question>
          <@report include="mediaid,url" question=question/>

          <div class="imgblock">
            <div class="thumbnail">
              <div class="imgwrap">
                <@editable id="__DATA__">
                  <img src="${question.data['url']}" border="0" data-mce-src="${question.data['url']}"><br/>
                  <p>${question.data['url']}</p>
                </@editable>
              </div>

              <div class="answrap">
                  <@answers question=question />
              </div>
            </div>
          </div>

        </#list>
      </div>
    </#if>

    <@submit text="Submit Answers" />

  </@form>
</@hit>
Use FTL templates
MTs are coded using FreeMarker Template Language (FTL). An FTL template comprises the following sections:
| Section | Example |
|---|---|
| Text | HTML or regular text |
| Interpolations (variables) | ${question.data['element_name']} |
| FTL tags | <#list questions as question>, <@form validate=false> |
| Comments | <#-- some comment... --> |
For additional information, refer to the official FTL documentation.
Macro templates
To insert a FreeMarker file specified in the path parameter into your MT template, use the <include> directive, for instance, as in the example below:
<#include "my_custom_template.ftl" parse=true/>
The output from the included template is inserted at the point where the <include> tag is located. The included file shares its variables with the including template as if the code were copy-pasted.
To manage FTL macro templates, go to Advanced > Templates. In the template list filter, select Macro to see the entire list of existing macro templates.
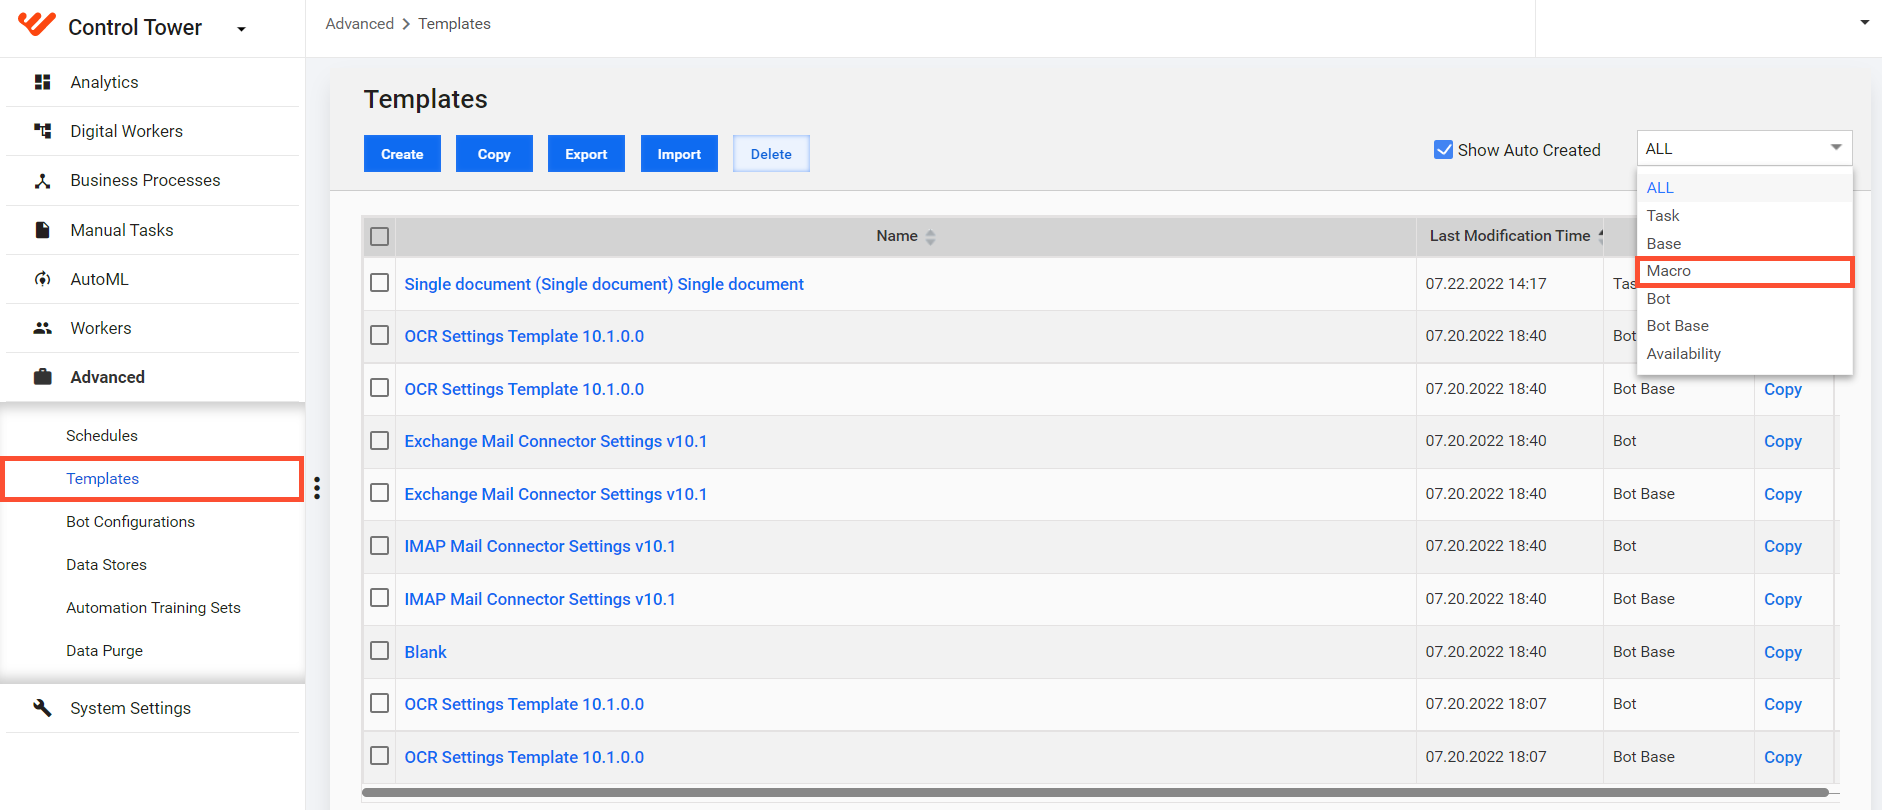
By default, the following templates are included in the MT code:
html.ftlconverts data and scripts it to HTML with appropriate formatting.answers.ftlcontains macros for all defined Answer Types.extras.ftlincludes gold data macros.
Do not delete the default templates.
You can create custom macro templates with the FTL extension and include them in your Manual Task FTL.
Directives
Directives are instructions to FreeMarker used in FTL templates. Directives are called using FTL tags. Syntactically, the tags are as follows: <#list animals as animal> and <#list>.
This is similar to the HTML or XML syntax, except that the tag name starts with #. If a directive doesn't have any nested content—the content between the start and the end tags, use the start tag only with no end tag.
There are two types of directives: predefined and user-defined.
Predefined directives
The following directives are often used in the MT code:
| Directive | Usage |
|---|---|
<#if condition > | Checks if the input data exists: <#if questions??>. |
<#list sequence as item > | Repeats the nested code for each item in a sequence. This case is valid when an MT has the Block Size > 1: <#list questions as question>. |
<#assign name=value > | Creates or replaces a variable. In this example, the directive enables feedback for workers: <#assign FEEDBACK_ENABLED=true>. |
User-defined directives
For user-defined directives, use @ instead of #, for example, <@mydirective parameters>.
The following WorkFusion-specific directives are defined in macro templates (html.ftl, answers.ftl, extras.ftl):
<@hit>
This is the main mandatory directive that defines the Manual Task HTML code. All other directives and text must be written inside the <@hit></@hit> section.
<@instructions>
The related section contains the following blocks:
- The
Titleattribute defines the MT name and can contain HTML tags. - The
@editabledirective enables the WYSIWYG editing area. - The Instructions block is available for inclusion from the Control Tower UI only. Instructions are collapsible and shown when changed or unread. For details, see the Title and Instructions article.
The macro defining the Instructions block is located in the html.ftl file as shown below:
<@instructions title="<h2>Identify the people</h2>">

<@editable> ...WYSIWYG editor... </@editable>

<div>Some html code</div>

</@instructions>
<@editable>
The directive adds a TinyMCE WYSIWYG editor to the Task Designer and must contain a unique id attribute. Below is a directive example:
<@editable id="__INSTRUCTIONS__" preview=__PREVIEW__!false>

<p>HTML code automatically created by WYSIWYG editor</p>

</@editable>
When you create the MT content using the WYSIWYG editor, it is rendered as HTML code inside the @editable section. You can insert several @editable sections with different ids.
<@form>
The directive defines a form together with attributes and inputs. You can use the following attributes:
validationset totrueby defaultformMethodset to"POST"by defaultactionset to"${mturkExternalSubmit!}"by default
The @form macro is located in the html.ftl file and contains hidden inputs (workerId, questionId, and so on), validation logic, and HTML form code. See the example below:
<@form formMethod="POST" action="${mturkExternalSubmit!}" validate=false>
    <#if questions??>
      <div class="bwizard">
        <#list questions as question>
            <@report question=question includeAll=true/>
            <div class="questions">
              <@editable id="__DATA__">
                <p>some html and interpolations ${questions[N].data['element_name']}</p>
              </@editable>
            </div>
            <div class="answers">
              <@answers question=question/>
            </div>
        </#list>
      </div>
    </#if>
    <@submit text="Submit" />
</@form>
Only one <@form> directive is possible even if the Block Size is more than 1. The <@submit> directive must be inside the <@form> one.
<@report>
This directive is intended for including all or specific columns from an input data file into a result data file, depending on the include attribute value:
includeAll = true: all columns from the input data file are included.include = "column_1, column_2": only specified columns are included.
The @report macro is located in the extras.ftl file. See the examples below:
<@report question=question include="mediaid,url" />
OR
<@report question=question includeAll=true />
<@answers>
The directive adds all Answers created in Task Designer to the form. To add styles for Answers, see the Add CSS rules topic.
The @answers macro is located in the answers.ftl file and has the structure as shown below:
<@answers question=question />
<@submit>
The directive adds a submit button to a form and triggers the form submission and validation. You can alter the submit button caption by adding a text attribute as shown below:
<@submit text="Submit Answers" />
<@script>
This directive is intended for including scripts in an FTL file. It is recommended to use it instead of the <script> HTML tag because the <@script> directive checks whether the script has already been included and optimizes the code reusage.
Below is an example of the <@script> directive:
<@script src=" https://your_cdn.js " />
Interpolations (Variables)
In the output, interpolations are replaced with a calculated value and allow you to use the unique content from the input data file in each worker's MT. See the example below:
<#list questions as question>
    ${question.data['element_name']}**
</#list>
where element_name is any column header in the input data file. If element_name does not correspond to any column header, go to the Upload Data tab to map it.
To use interpolations outside the #list directive, use the following notation: ${questions[N].data['element_name']}, where N = (Record # in Block Size) - 1.
When the Block Size is > 1, to display Record #, include the following interpolation: ${question_index + 1}.
For the FreeMarker engine special variables, refer to the documentation. For WorkFusion context variables, see the Manage templates article.
Include resource files
To optimize the MT FTL file size and readability, try including the following:
FTL files:
<#include "my_custom_template.ftl" parse="true"\>Some frameworks and fonts, such as jQuery, Bootstrap, Font Awesome, are already included in
html.ftl. To find out the framework version, see the related FTL code (Advanced > Templates > Macro).Scripts:
<@script src="https://your_cdn.js"/>CSS:
<link href="https://your_cdn.css"/>
- Use your CDN links with https:// protocol only.
- Check the HTTP Headers (especially Content-Type) for all resource files.
You can also include publicly available docs with instructions. Upload your docs on Google Drive, Dropbox, Box, Amazon s3, OneDrive, or another cloud storage and share them. Make sure that the share link has the HTTPS protocol and the cloud service provides a large and stable bandwidth.