User management
An essential part of server administration is managing who has access to your server and what type of access that person has. The article describes multiple areas related to user accounts in the Windows operating system (OS).
Each user must have a user account. Windows OS lets you create multiple user accounts with different permissions, depending on whether you are adding an administrator or a regular user. This allows everyone to have a personal user space with their settings and customizations.
User account types in Windows
There are generally two types of user accounts:
- Administrators have unlimited access to everything. Administrators can do whatever they need: install and uninstall programs, change system settings, manage other users and security policies.
- Standard users have limited access. Users can only manage their files and settings, but they cannot add or remove programs of other users, change system settings, or manage security.
For security reasons, there should be only one user with administrator access on a computer. This user is responsible for managing the computer configuration and all software on it. All other users should have limited access to systems settings.
Computer Management tool
The Computer Management tool allows to create and manage Windows accounts. You will perform all of your user management from this tool.
To open the Computer Management tool, do as follows:
In a command prompt or in a PowerShell console, type
compmgmt.msc.Press Enter.
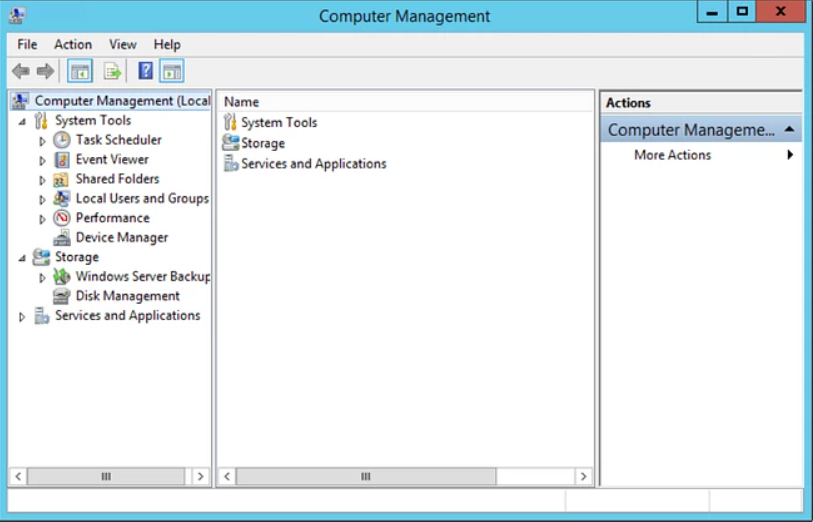
There is another way how Computer Management can be opened. Right-click the start button and select Computer Management. You’ll see a tool similar to the following:
Creating accounts
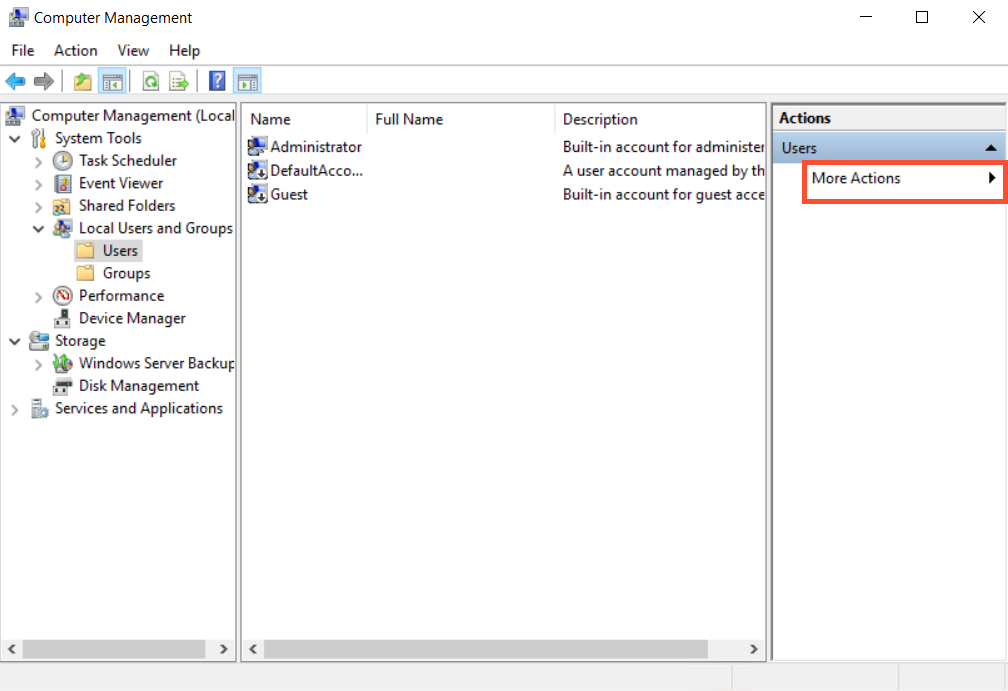
While using the Computer Management tool, expand Local Users and Groups and click the Users folder. On the right-hand panel, you can now see all existing user accounts on the server.
To create a new user, follow the steps:
Right-click the right-hand panel and select New User. Alternatively, under the Actions panel on the right, select More Actions and then select New User.
The New User window pops up where you can fill out the following information:
- User Name (required)
- Full Name (optional)
- Description (optional)
- Password (optional)
The following options are available upon creating a new user account:
- The user must change the password upon login. Select this if you are creating an account for someone other than yourself.
- The user cannot change the password. This is optional, required for specific use cases only.
- The password never expires. Typically, the option is used for service accounts.
- The account is disabled. This is optional, required for specific use cases only.
When you are ready to go, hit the Create button, and a new user account is created.
User group in Windows
In Windows OS, a user group is a collection of multiple user accounts that share the same access rights to the computer and network resources and common security rights. User groups can be divided into two different types:
Local groups are user groups that exist on your Windows computer or device. They are defined locally and can be managed from the Local User And Groups tool.
Security groups have security descriptors associated with them. Security groups are used in Windows domains with Active Directory.
Creating groups and adding existing users to group
Often, there is a need to create a custom group. There might be different use cases why such a user group should be created, for instance, to assign special rights to access specific folders and network resources.
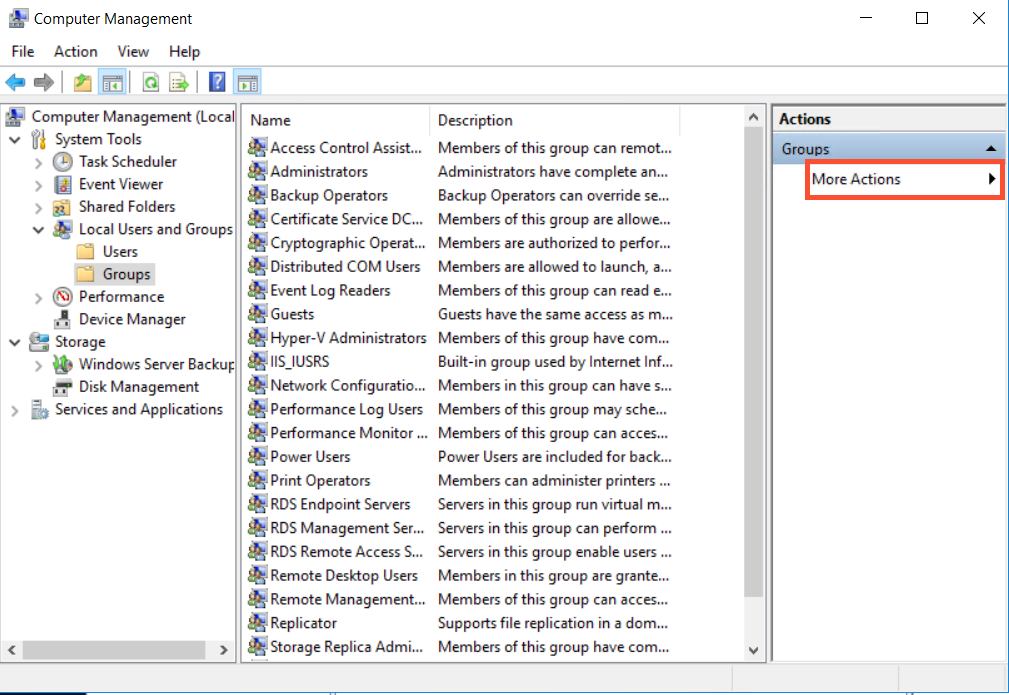
While in the Computer Management tool, expand Local Users and Groups and click the Groups folder. On the right-hand panel, you can now see all existing groups on the server.
To create a new group, follow the steps:
Right-click the right-hand panel and select New Group. Alternatively, under the Actions panel on the right, select More Actions and select New Group.
The New Group window pops up where you can fill out the following information:
- Group Name (required)
- Description (optional)
- Members (optional): to add a user to this group, hit the Add button and choose the user to add.
Hit the Create button, and a new user group is created.
There might be another use case when there is an existing group with users added, and a new user has been created, and now this user should be added to this group. This can be essential, for instance, for giving newly created users special rights the user group has. Here are the steps to add a new user to an existing user group:
- In Windows Management, expand Local Users and Groups and click the Groups container.
- In the middle panel, right-click the user group you want to edit.
- Select properties to expose the group properties window.
- Under the General tab, select the Add button.
- Specify the user you want to add to the user group and hit the OK button.
Removing and disabling users
When users no longer require access to a server, you might want to revoke their access by deleting or disabling their account. Typically, you will want to disable accounts for a short period before deleting them. This allows you to recover from issues that might arise from removing an account.
To disable an account in the Windows Management tool, follow the steps:
In Windows Management, expand Local Users and Groups and click the Users container.
Right-click the user account you want to edit.
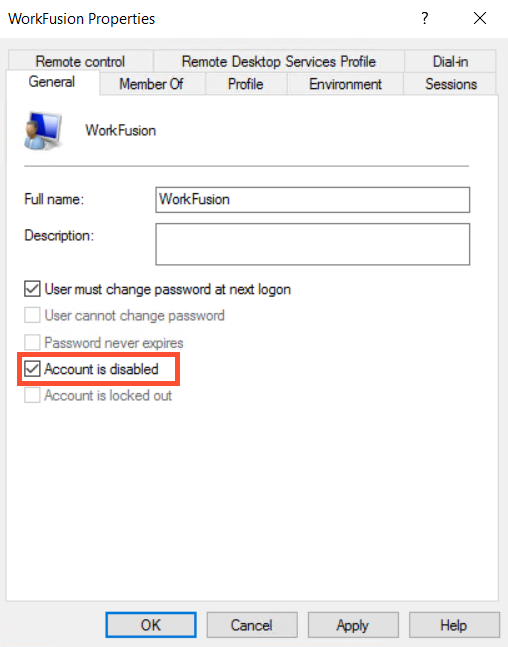
Select Properties to open the account properties window.
Under the General tab, select the Account is disabled box and hit OK.
To delete an account in the Windows Management tool, follow the steps:
- In Windows Management, expand Local Users and Groups and click the Users container.
- In the middle panel, right-click the account you want to edit.
- Select Delete.
- Read the notice and select Yes when ready.
Removing user groups
When a user group is no longer required, it can be removed using the Computer Management tool.
When you remove a user group, the accounts belonging to the group are not removed.
To remove a user group in the Windows Management tool, follow the steps:
- In Windows Management, expand Local Users and Groups and click the Groups container.
- Locate the user group you want to delete and right-click the group.
- Select Delete.
- Read the notice and select Yes.