
Inspector
Inspector is a built-in tool to explore properties and values of objects located in the application which you automate with your recording, providing functionality for quick element selector search.
Selectors can be extracted only with the help of specific tools, one of which is Inspector as a part of WorkFusion Studio. The usual workflow contains the following steps: Inspect UI controls > Check selectors > Apply selectors.
General overview
To perform actions in any desktop application, a bot has to find particular elements to interact with (type, click, focus, etc.). For that purpose, a selector, or a unique link to a window or UI control, is used.
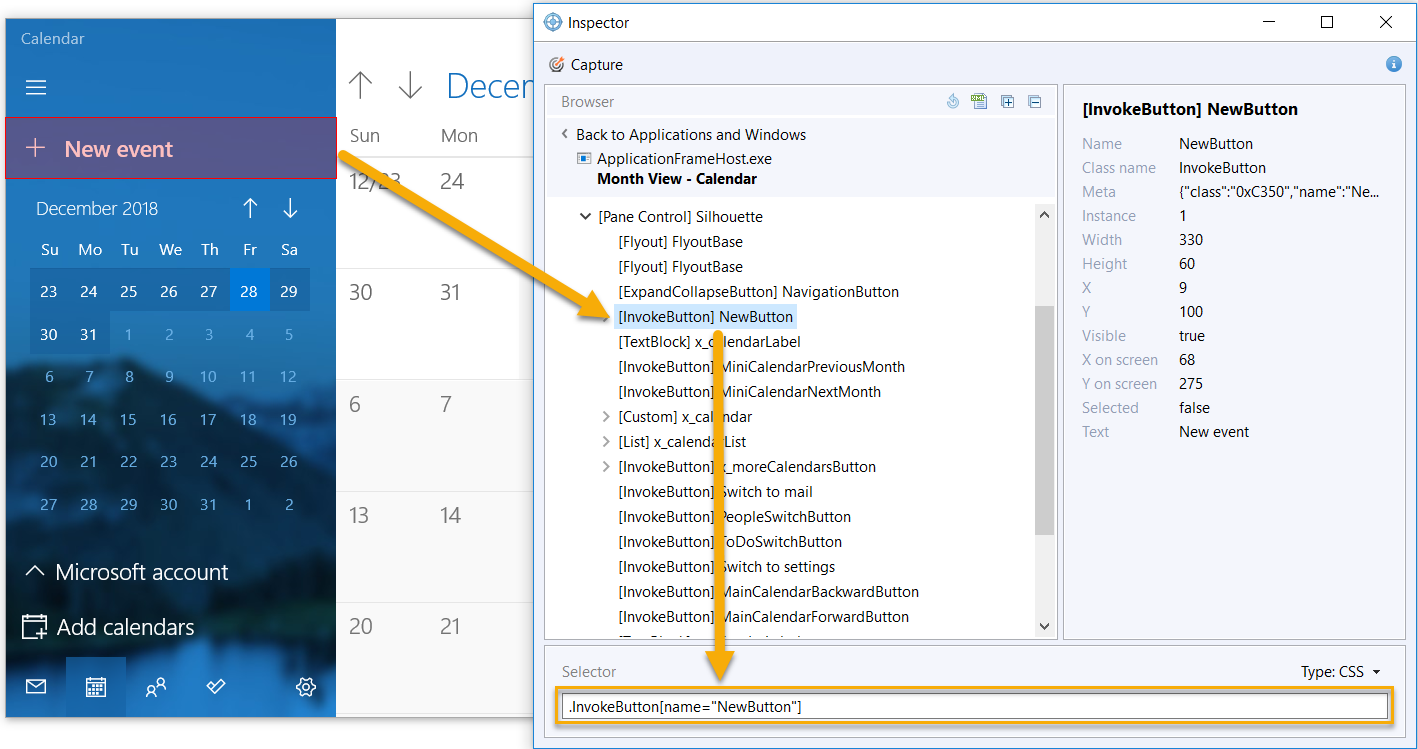
A selector is a unique property or the combination of several unique properties related to windows or UI controls. It is captured as a property name and a property value. The result is inserted into the Selector field to let the bot know which object to click. The most commonly used selector properties are enumerated in the table below.
| Property | Description | CSS Selector | Object Selector | XPath selector |
|---|---|---|---|---|
CLASS | class | .TextBlock | [CLASS:TextBlock] | //*[@class='TextBlock'] |
TITLE | title | .ApplicationWindow[title="Calendar"] | [CLASS:ApplicationWindow; TITLE:Calendar] | //*[@class='ApplicationWindow'][@title='Calendar'] |
NAME | instance name | .TextBlock[name="calendarLabel"] | [CLASS:TextBlock; NAME:calendarLabel] | //*[@class='TextBlock'][@name='calendarLabel'] |
TEXT | text attribute | .TextBlock[text="2019"] | [CLASS:TextBlock; TEXT:2019] | //*[@class='TextBlock'][@text='2019'] |
INSTANCE | instance number | .TextBlock[instance="48"] | [CLASS:TextBlock; INSTANCE:48] | //*[@class='TextBlock'][@instance='48'] |
The class and title properties are used to define both applications and UI controls, while others are applied for UI controls only.
Launch Inspector
To open Inspector, do as follows.
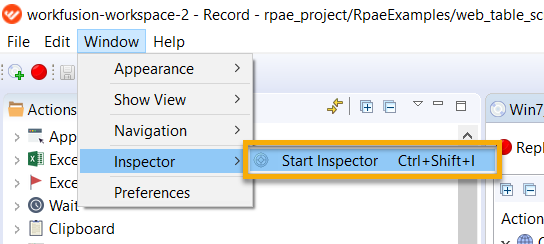
Press the Start Inspector button on the RPA Recorder toolbar, or
Use Ctrl + Shift + I, or
Go to Window > Inspector > Start Inspector.
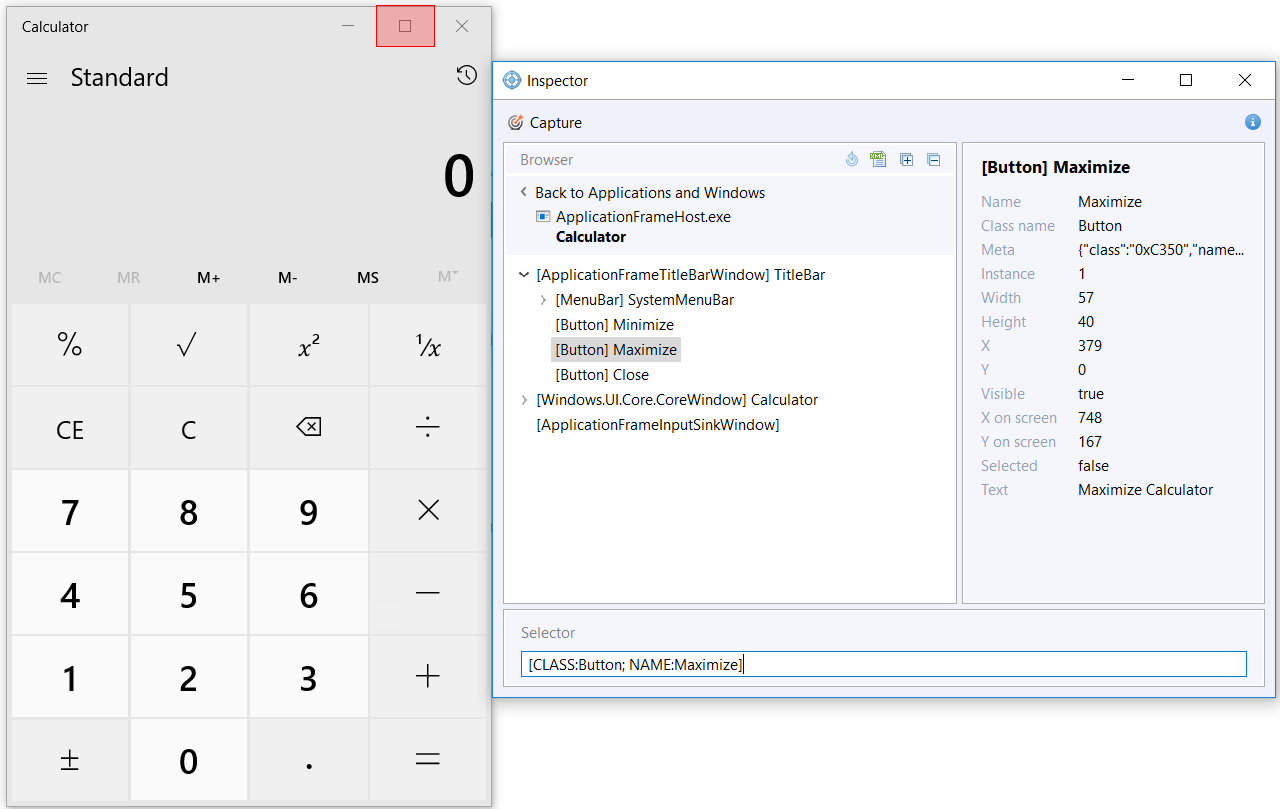
Once you invoke Inspector, its window appears on the screen.
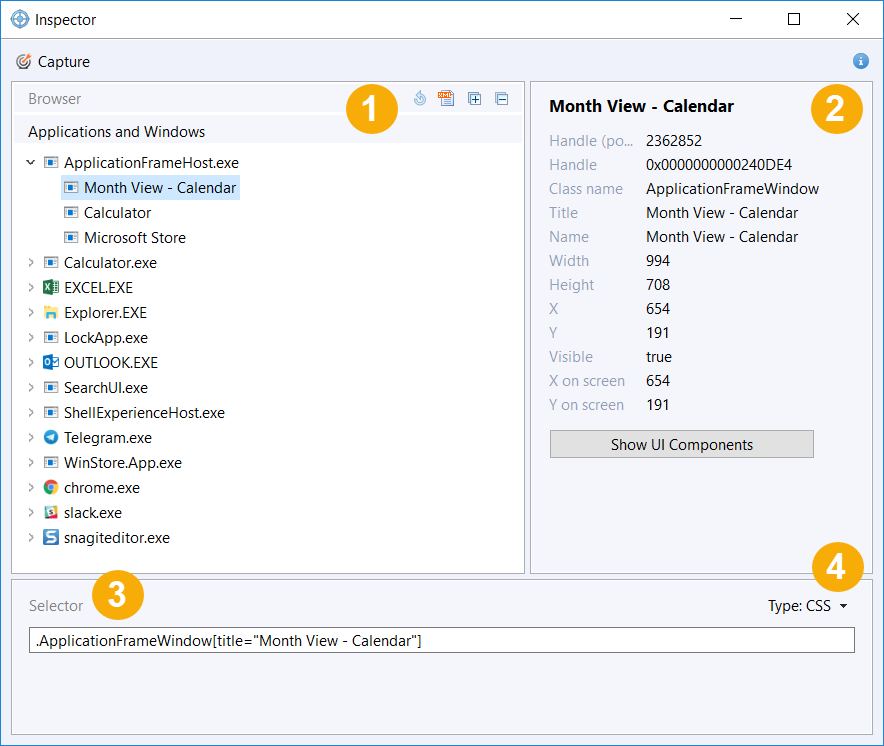
(1) Browser contains either all the currently running applications, or the list of UI controls when exploring the selected window.
(2) Result List displays the list of all properties related to the selected window or UI control.
(3) Selector is the field to hold a unique selector.
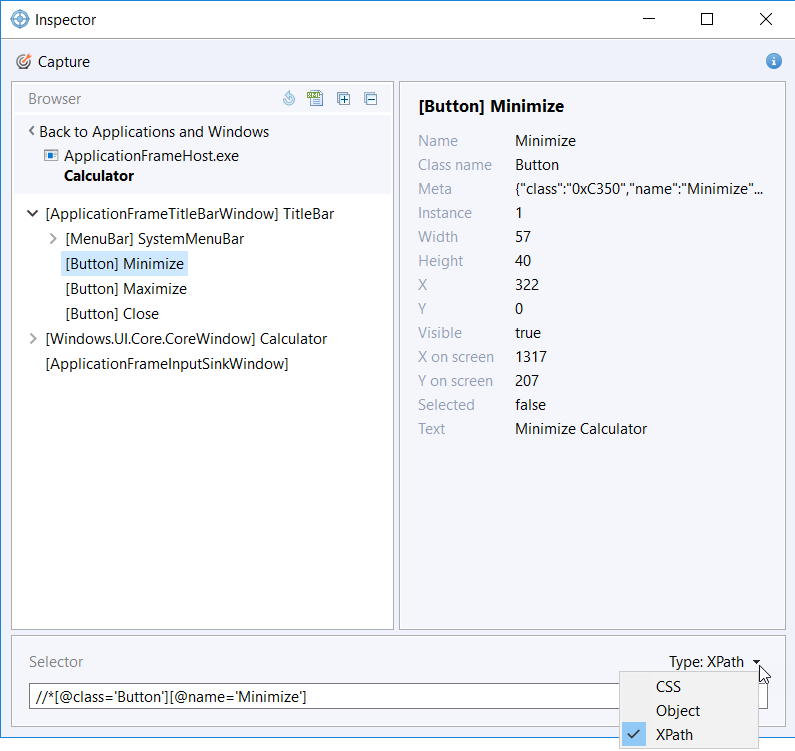
(4) Type allows to switch between selector types. On selecting an item in the Type filter, the selector string is rebuilt to match the given notation. There are three selector types you can choose from:
- CSS:
.Button[name="Maximize"] - Object:
[CLASS:Button; NAME:Maximize] - XPath:
//*[@class='Button'][@name='Maximize']
Inspect UI controls
You can inspect UI controls by different ways.
- Сapture (inspect) controls by hovering over them.
- Select controls in the Browser tree as in developer tools.
- Check how UI controls work in applications by setting commands.
- Test if controls match given selectors by using the search function.
To start exploring application components, select the application you want to inspect in Browser .
tip
In case you launched an application after launching Inspector, click Refresh Browser to update the list.
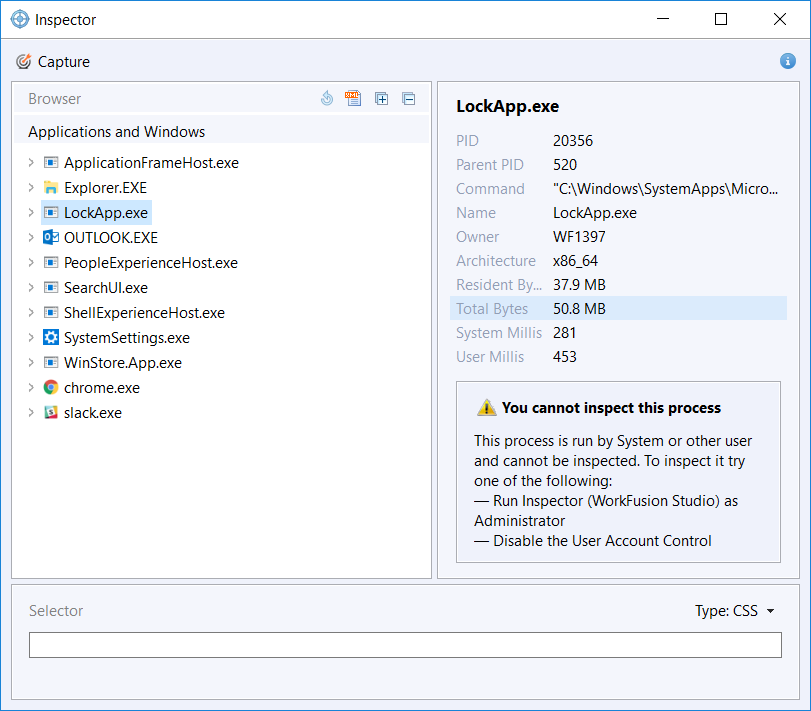
If a process is run by the system or other user, it cannot be inspected. Then, you are notified about a necessity either to run Inspector as Administrator or disable the user account control.
caution
Inspection of SAP GUI desktop client differs from the usual inspecting workflow. To see more information on the topic, refer to SAP GUI desktop automation.
Capture
Inspector provides the Capture option enabling you to enter the inspection mode and explore properties of application components on hovering over them.
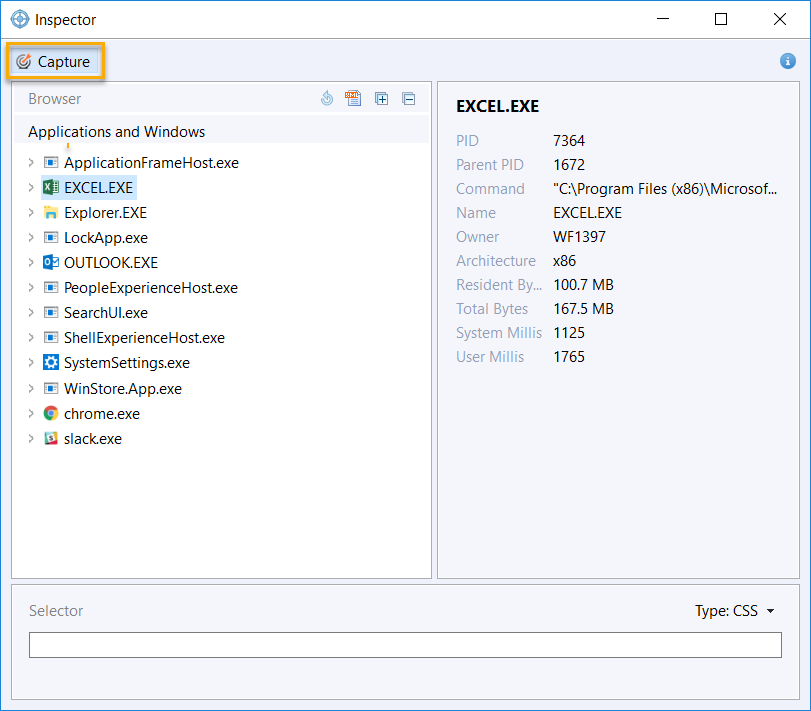
- Click Capture.
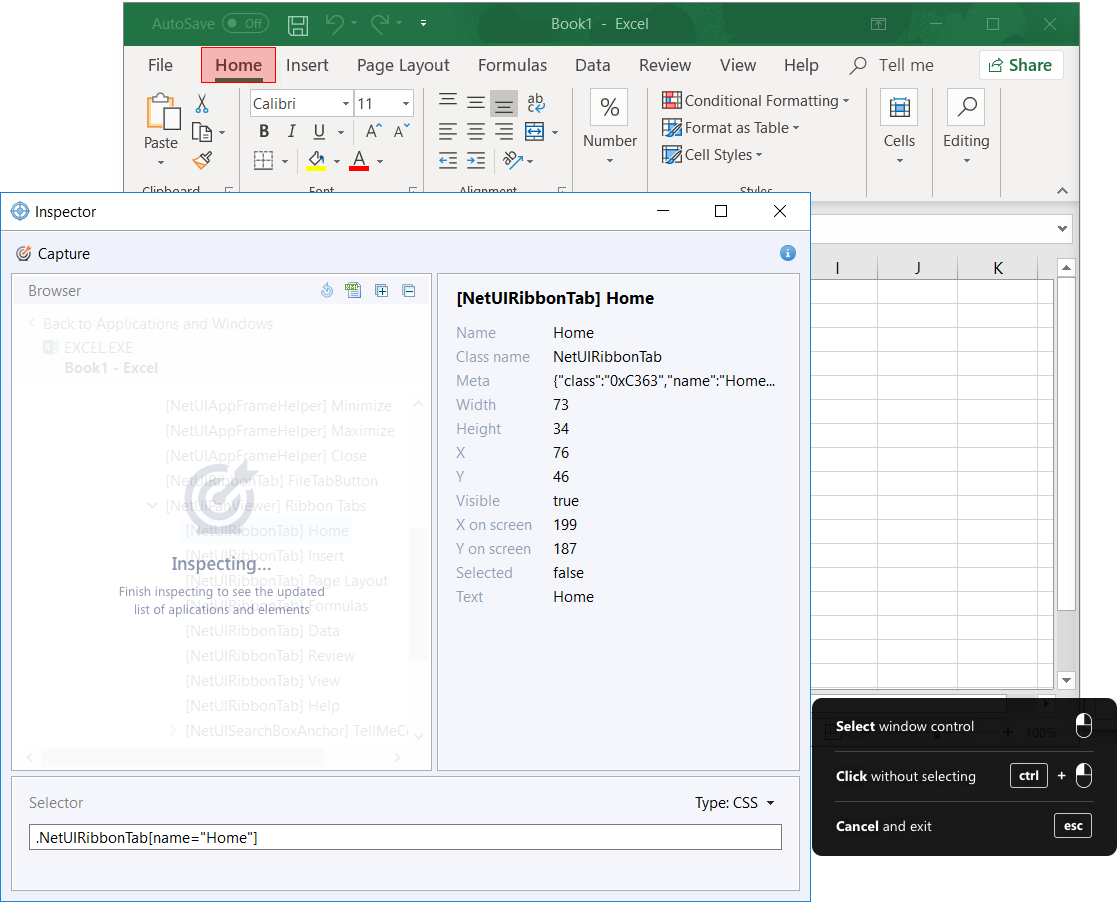
- Hover the cursor over a window control. It gets highlighted directly in the application.
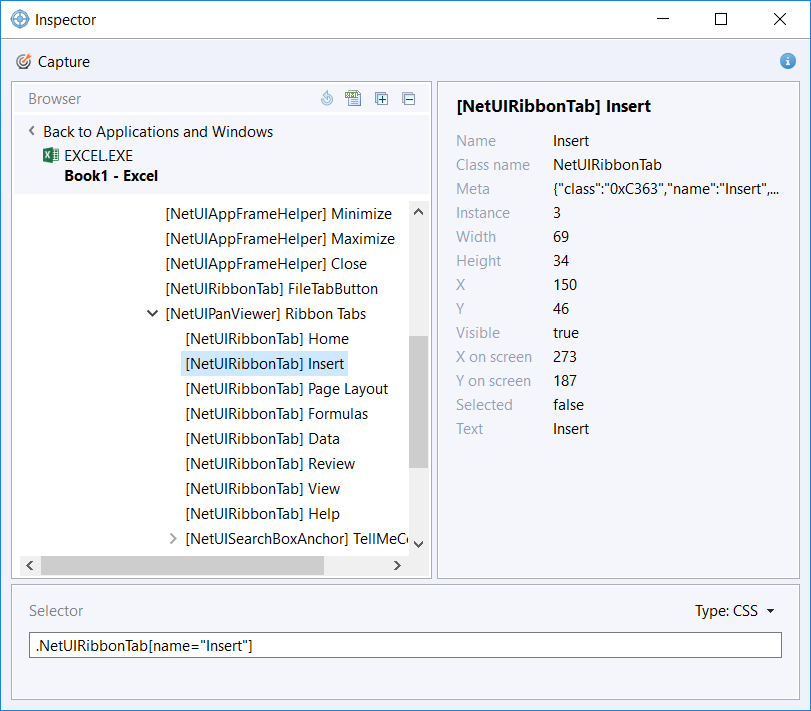
- Click the desired window control to select it. The target control opens in the Inspector window automatically, with its properties displayed in Result List and a selector value available in the Selector field.
There are cases when you need to click a control without selecting it, e.g., to explore other application options or switch to another application. Use the black menu as a prompt.
- To click the control without selecting, use the left mouse click + Ctrl.
- To cancel capturing and exit the inspection mode, press Esc.
Explore in Browser
In case it is challenging to get the right selector by capturing, e.g. it is hidden in the application UI, or you do not want to click through the application, you can switch between controls directly in the Browser area.
- Double-click the application or process in Browser, or click Show UI Components in Result List.
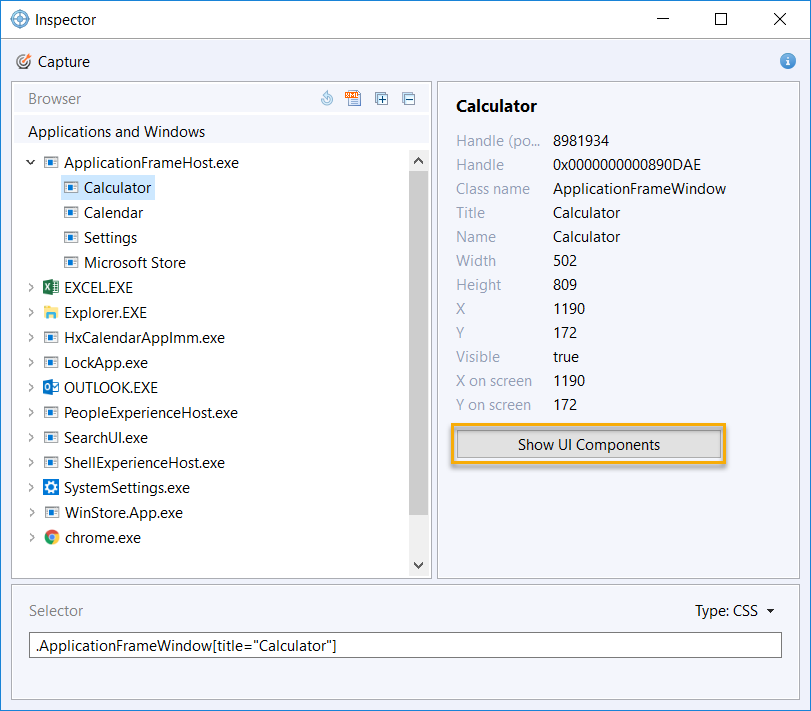
- Navigate in Browser using the mouse or keyboard arrows.
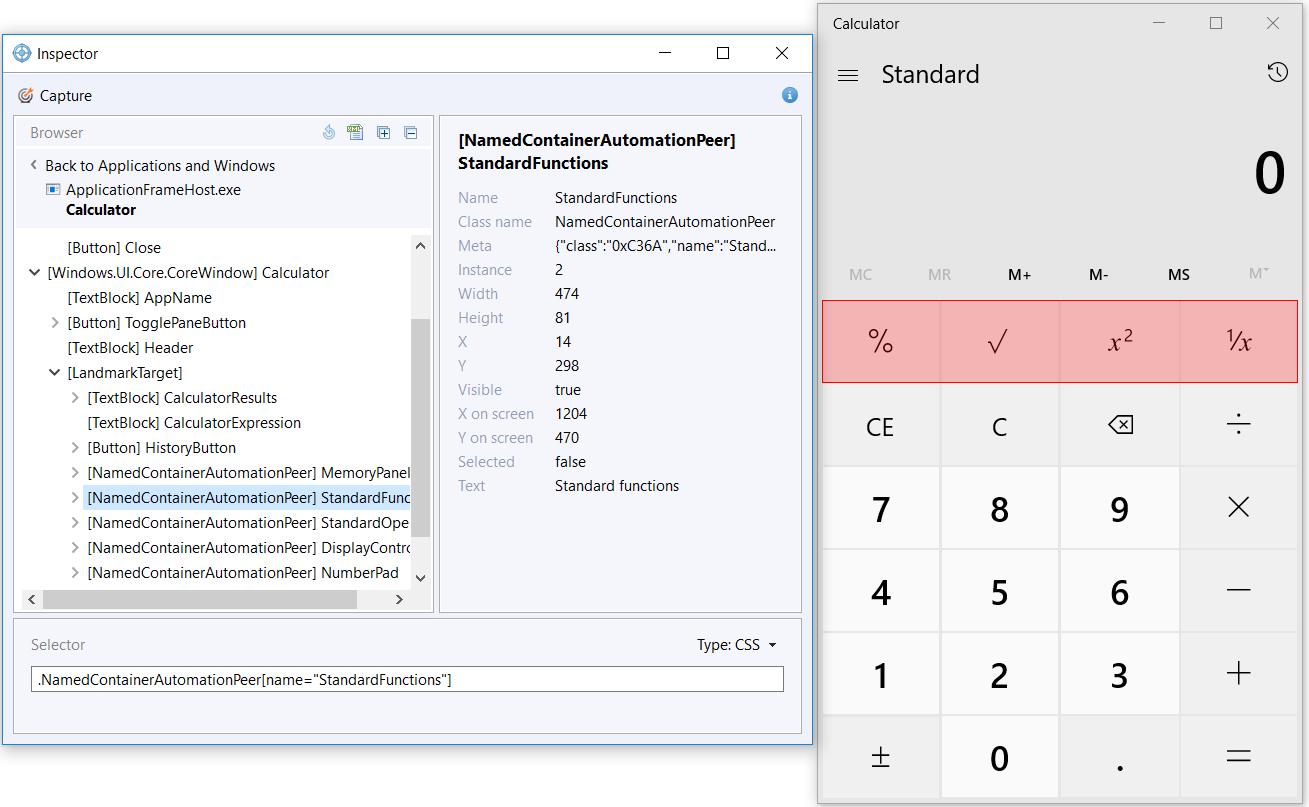
The selected component gets highlighted in the application window. Its properties are available in Result List together with the corresponding selector in the Selector field. - To exit the inspection mode, click Back to Applications and Windows in Browser.
Test windows and UI controls
Apart from highlighting, you can send different actions to any desired application in order to emulate bot's behavior and make sure it functions as expected.
To check that the bot is able to actually interact with the application and its components (e.g., Notepad), do as follows.
- To test interaction with the application, select the application in Browser, right-click, and select one of the commands, e.g., Type ("hello"). The command is performed in the application window.
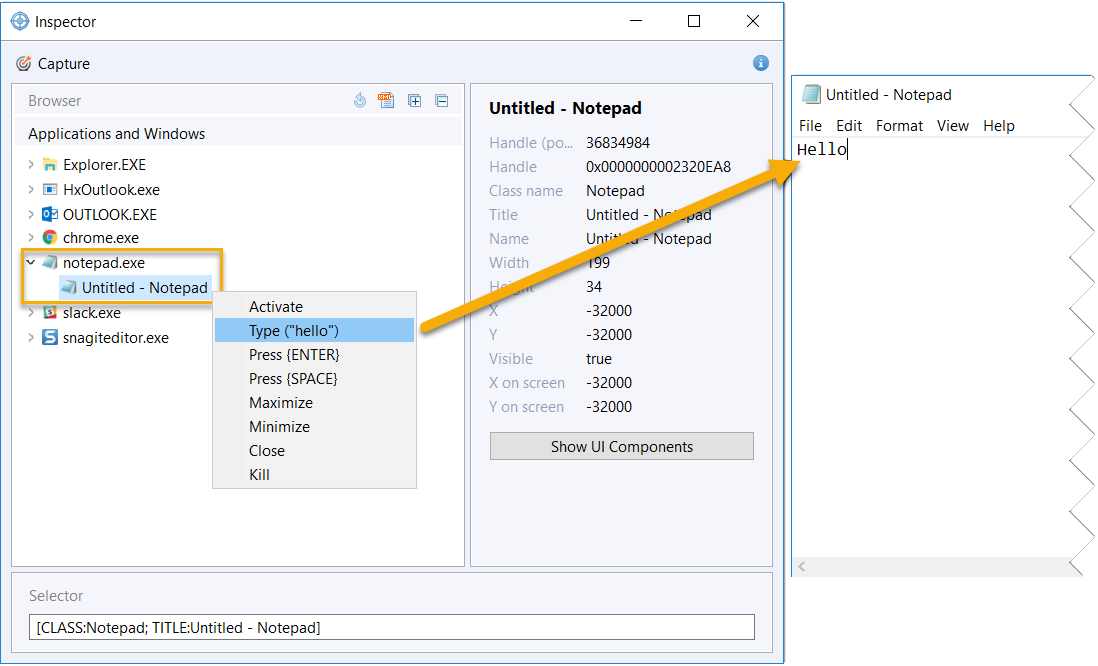
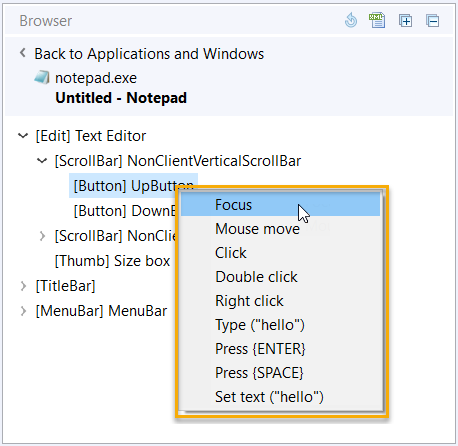
- To test if the application components respond, double-click the application in Browser, or press Show UI Components in Result List. Select any of the components in Browser, right-click, and select one of the commands, e.g., Click. The command is performed for the selected component.
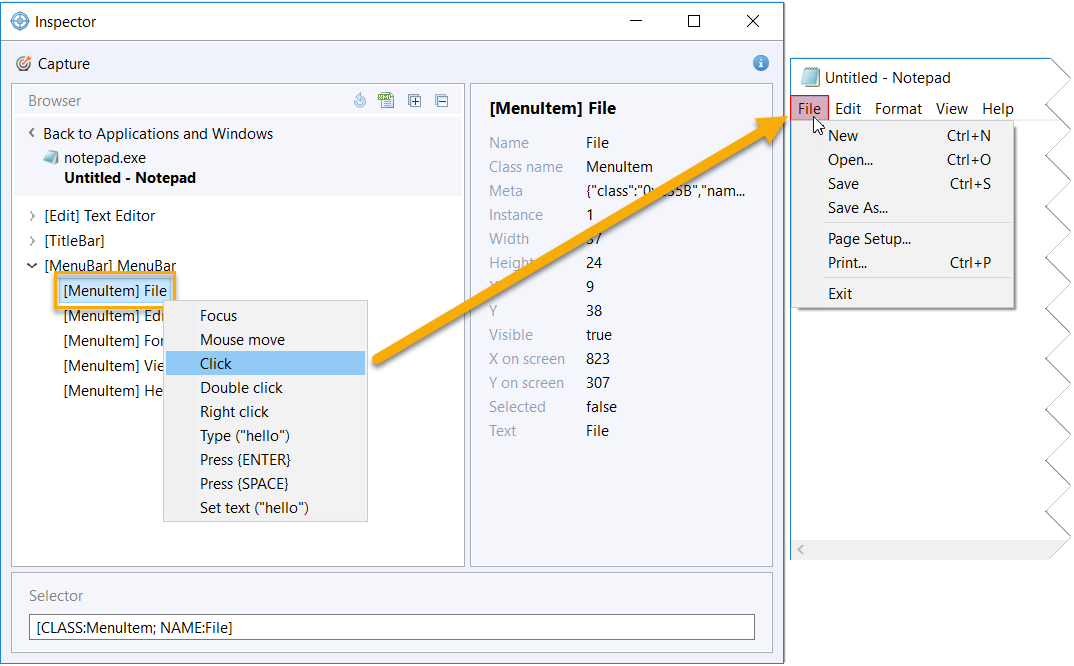
tip
To view/hide applications and elements within them, press Expand/Collapse in front of the application or process you are interested in. You can also click Expand All and Collapse All in the Browser options.
The set of actions applied to applications is different from those applied to UI controls.
Window commands are as follows:
- Activate
- Type
- Press keys
- Maximize/minimize
- Close/kill
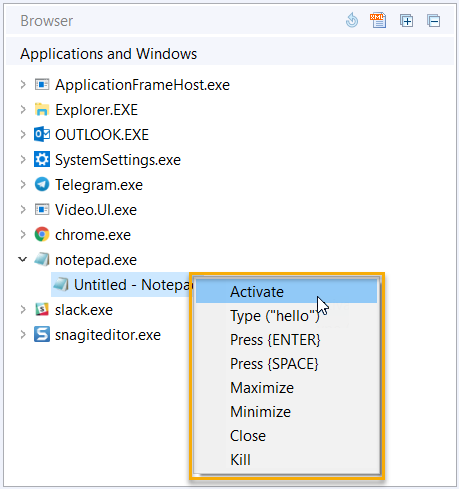
UI control commmands are as follows:
- Focus
- Move mouse
- Click/double-click/right-click
- Type/set text
- Press keys
Inspect Windows
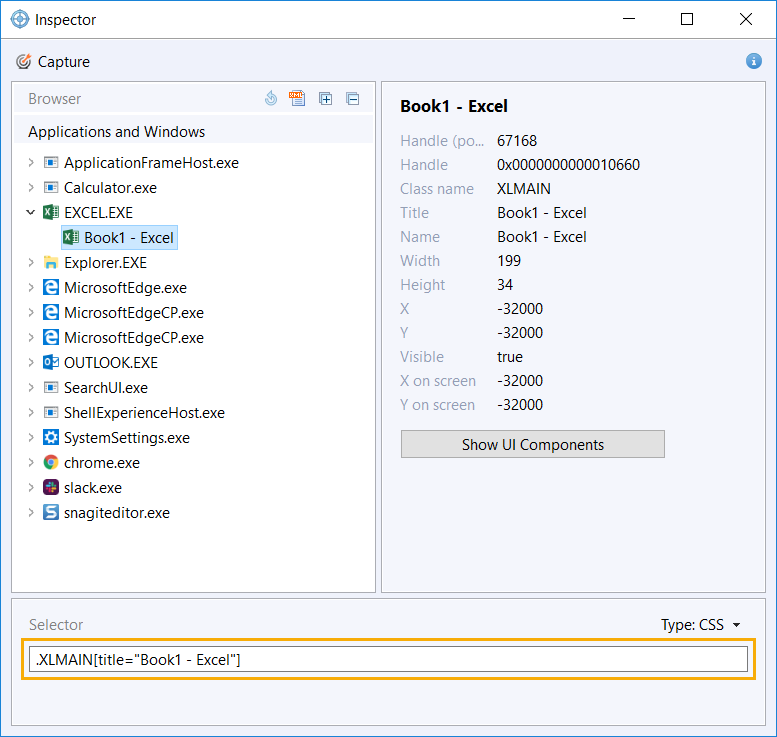
You can also create custom window selectors and assess them against all open windows. On the Applications and Windows screen, click on a needed window to get its selector. Mind that the inspecting procedure is the same as for UI controls.
Test selectors
Before putting a selector to bot task configuration, it is recommended to test if it works correctly. To do that, search for the UI control matching the given selector.
Copy your selector into the Selector field and press Enter.
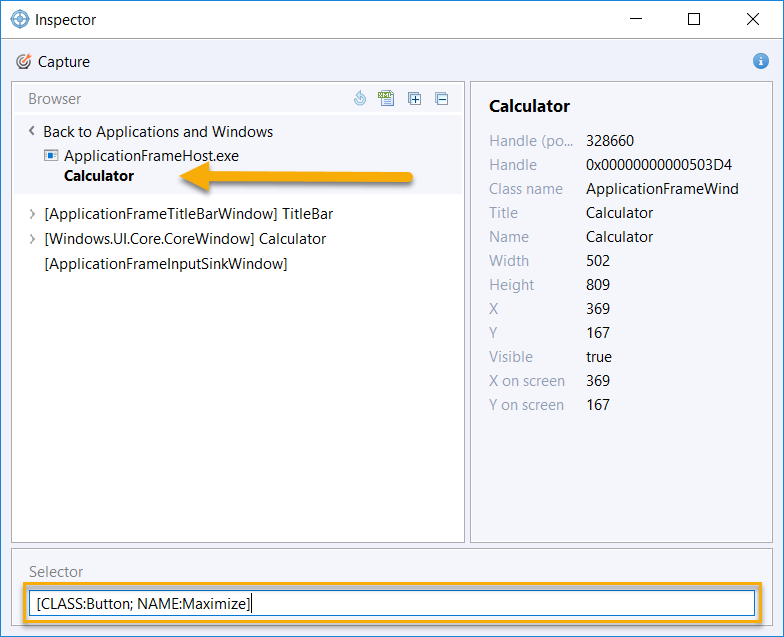
If the selector exists, Inspector finds the corresponding window control and selects it in Browser with detailed information in Result List. The target control is highlighted in the application.
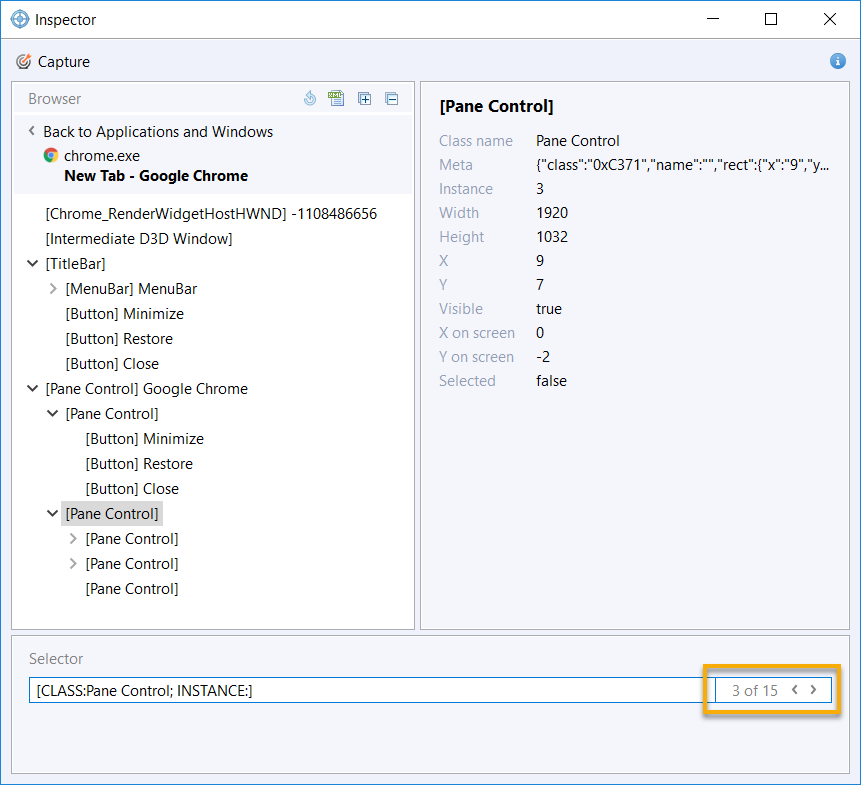
Inspector performs a check for selector uniqueness and supports collections of selectors corresponding to the search criteria. If there is more than one selector with the same attributes in the search results, switch between selectors by clicking the Back and Forward arrows until you find the needed selector.
tip
Mind to open the application the selector belongs to, as the search is performed among UI controls of the selected application. Otherwise, the selector will not match any components.
If you still cannot find your selector, make sure you copied it correctly. Also, the Instance and Text attributes may facilitate the search.
Apply selectors
As soon as the target component is found and tested, you can copy it to WorkFusion Studio for further usage either in the Record or Code perspectives.
Copy to Record perspective (UI Control)
Press Ctrl + A to select your unique object selector.
Press Ctrl + C to copy.
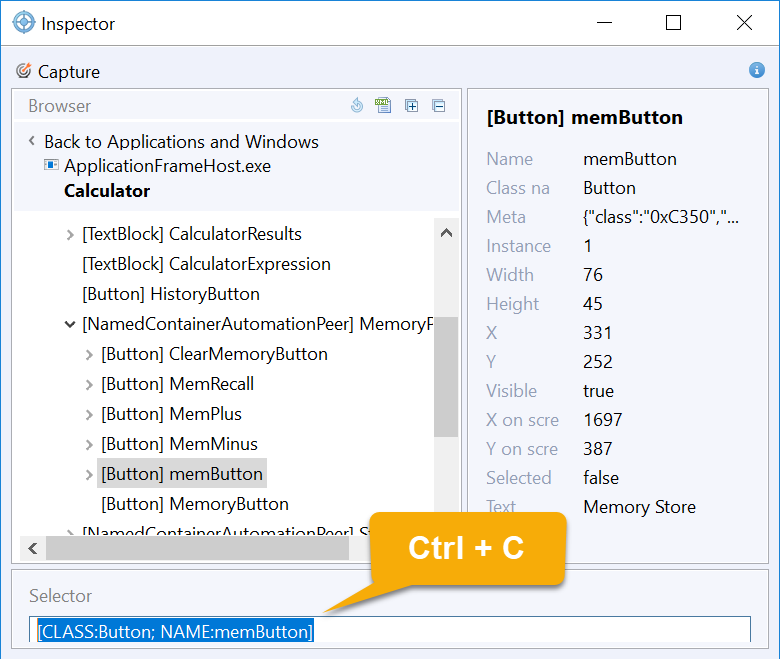
Open your recording in the Record perspective, select an action from Actions Library and add it to Actions Flow.
In the action properties window, select Target > Window control > Selector and press Ctrl + V.
tip
The unique object selector value can be used for Selector of the Click Mouse action.
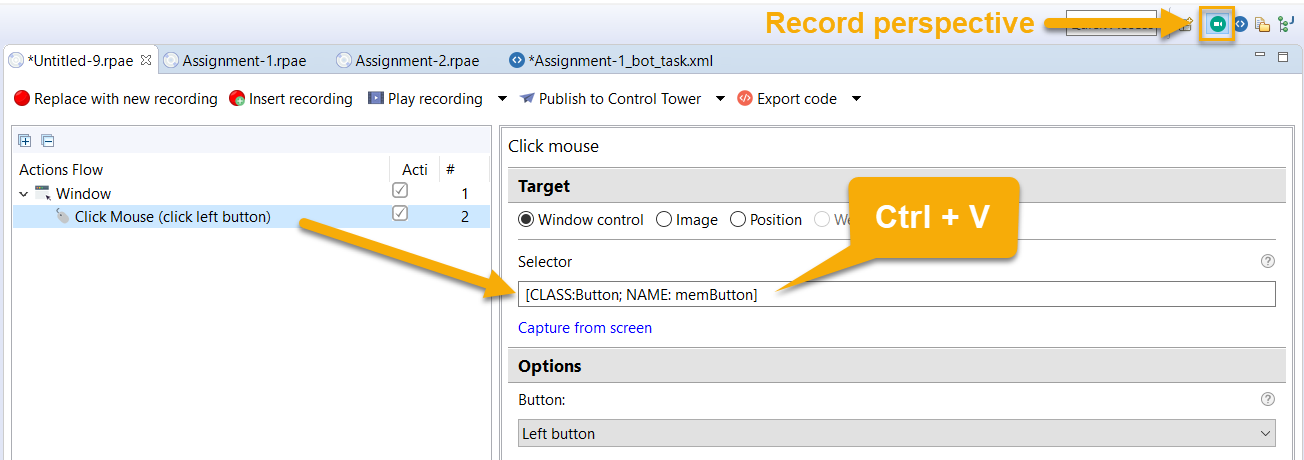
The action is assigned to a specific control in the application.
Copy to Record perspective (Window)
Press Ctrl + A to select your unique object selector.
Press Ctrl + C to copy.
To use the window selector, add the Window action to Actions flow.
Select Enter window selector (from Inspector) and paste (Ctrl + V) the copied selector into the field.
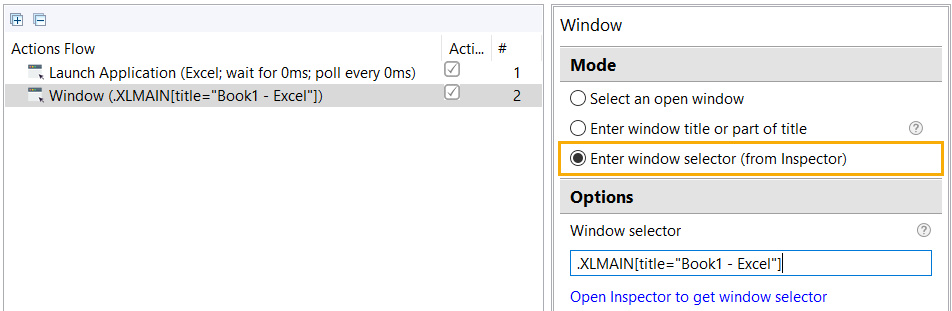
tip
Mind that you can access Inspector directly on the Window action screen by clicking Open Inspector to get window selector.
Copy to Code perspective
To copy a selector to bot task configuration, switch to Code perspective and paste your selector into the code.
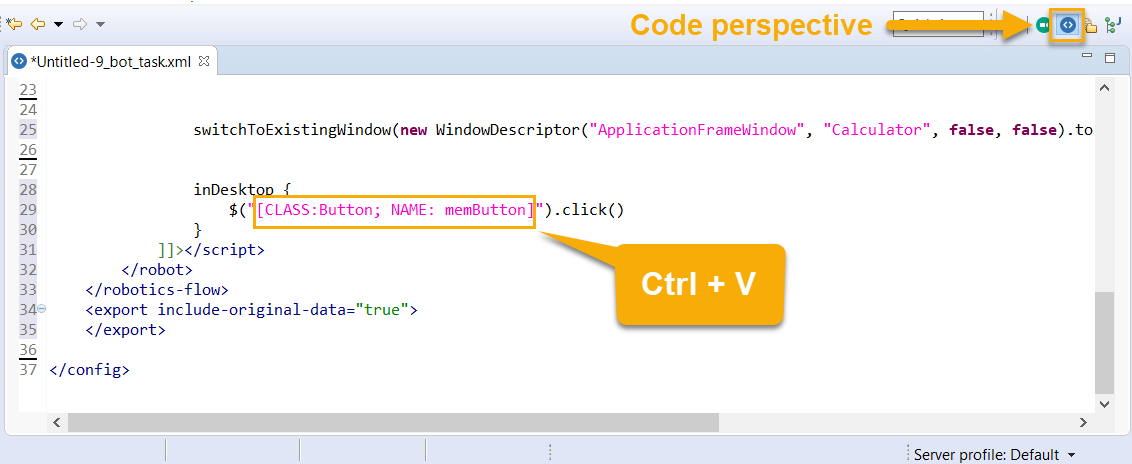
Get value from field in Windows application
There are two ways of getting a value from a window control.
caution
Before you start to use selectors in the recording, keep in mind to switch to the target application with the help of the Window action.
Way 1
- Create a recorder variable of type String.
- Open Inspector and find a selector of the necessary field in the application.
- Apply Click Mouse > Window control.

- Use the Enter Keystrokes (Ctrl + C) action to copy the value from the field (if needed, use Enter Keystrokes (Ctrl + A) before).
- Use the Clipboard action to set the copied value into your variable.
Way 2
- Create a recorder variable of type String.
- Open Inspector and find a selector of the necessary field in the application.
- To get the text from the field, use the Script action with the code as in the example below.
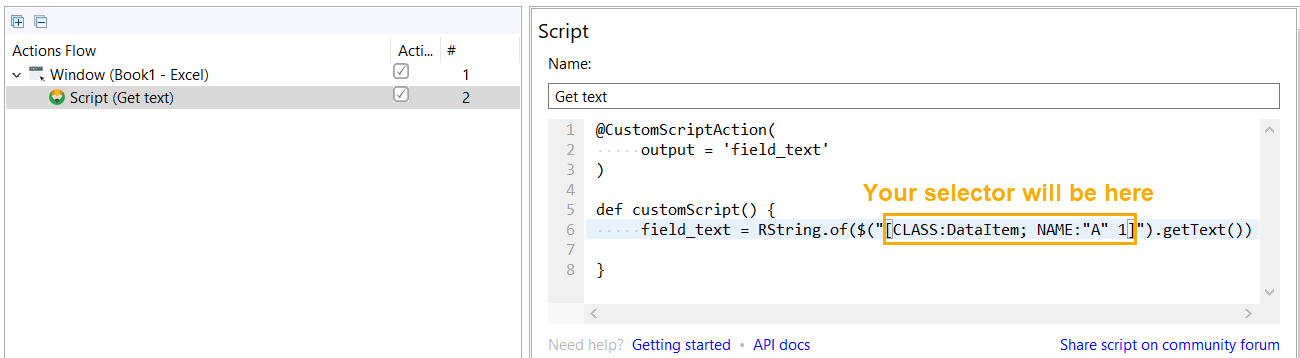
tip
See a custom script on how to get an object value in Code Samples.
Special cases
Inspect Office 365 applications
Special attention should be paid when retrieving selectors of UI controls related to Office 365 applications. After Microsoft software updates, attribute values may change, and selectors previously used in your scripts will not be unique or stop working at all.
Thus, Excel cell selectors differ in various versions of Microsoft Office 365.
- Previous version of Microsoft Excel:
[CLASS:DataItem; NAME:A1] - Newer version of Microsoft Excel:
[CLASS:DataItem; NAME:"A" 1]
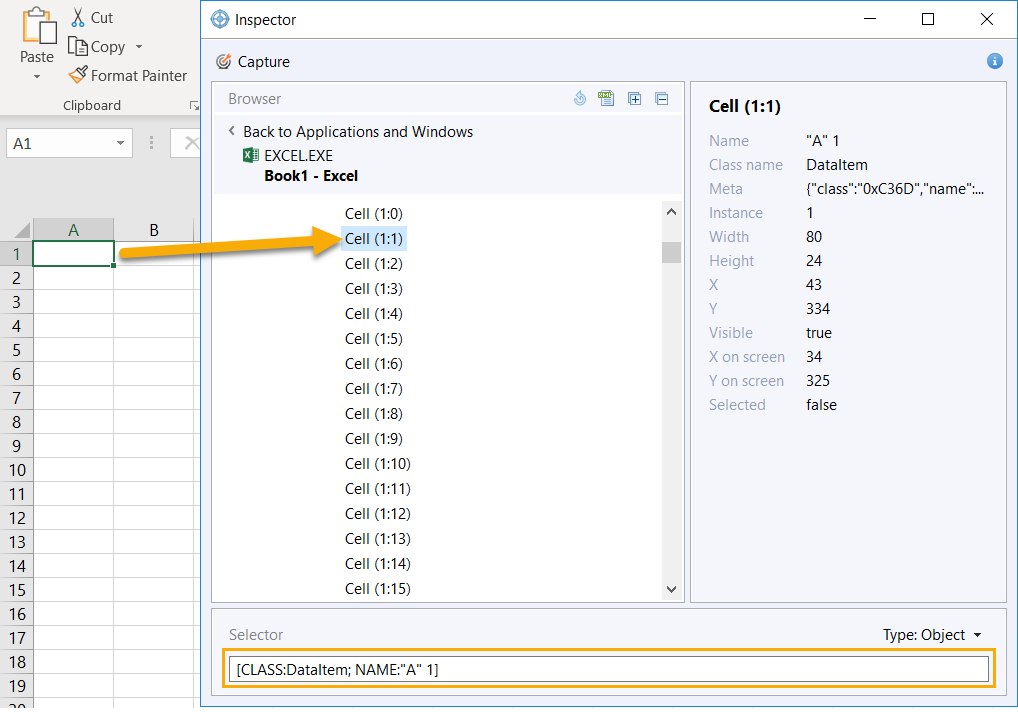
warning
Be careful with the selectors related to UI controls of Office 365 applications, as Microsoft software updates can change selector values. To be on the safe side, it is recommended either to reinspect UI controls, or to use RPA Recorder for Excel actions and other Office 365 related actions.
Focus on hidden elements
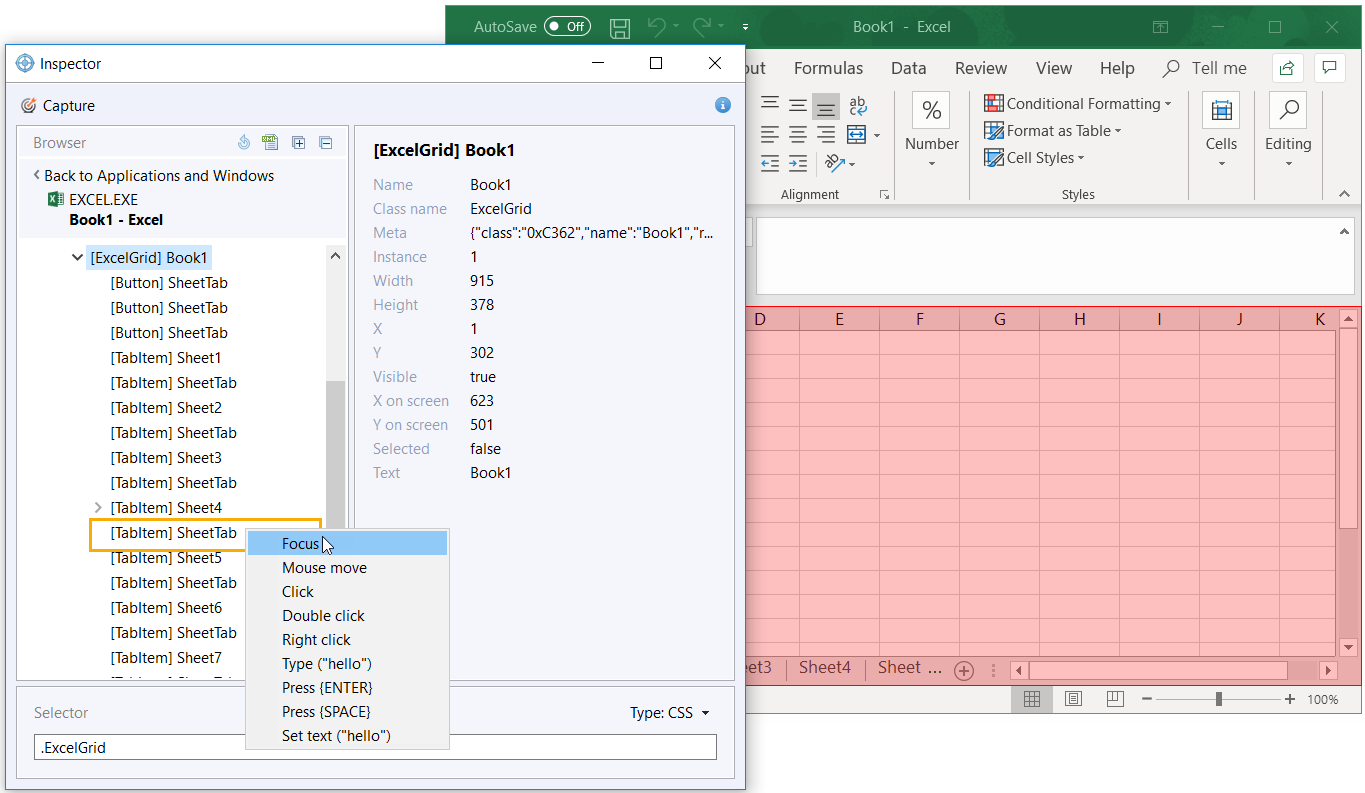
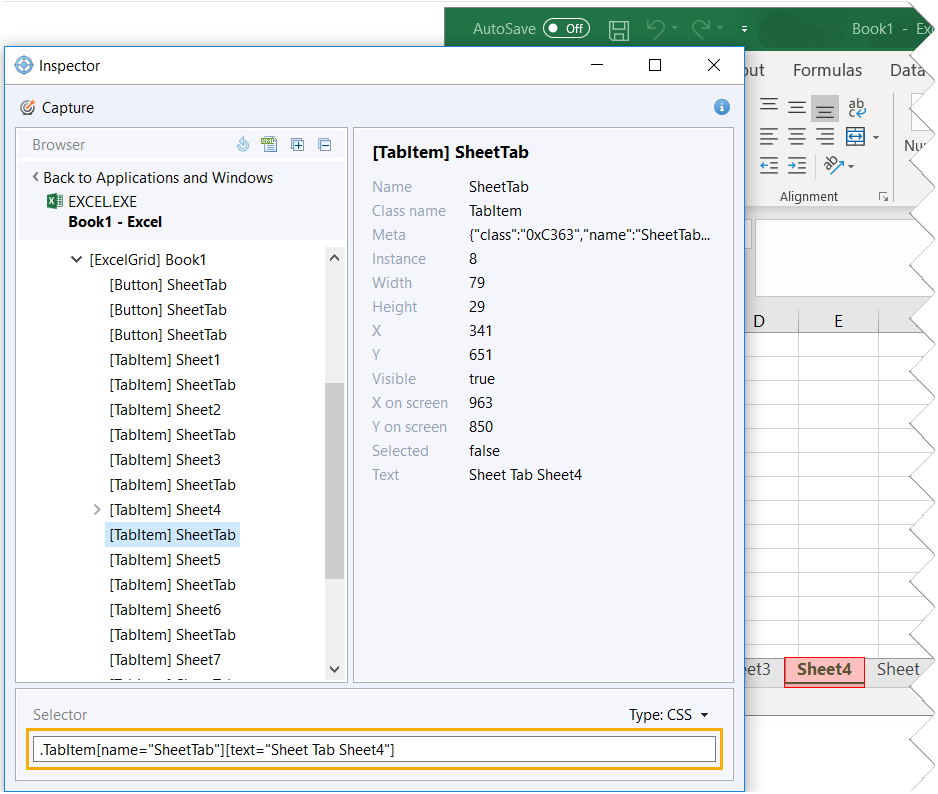
If a UI control is collapsed and cannot be visible on the application screen, you can easily expand it to get a selector. It is especially useful when inspecting complex trees or tabs. To open a collapsible UI control, do as follows.
- Right click on any hidden element within the tree and select Focus.
- On expanding the element, copy its selector to use in Actions flow.
note
You can also activate a hidden element using the focus() method in your script: $('tree_hidden_element_selector').focus().