
Upgrade from 8.4.x to 9.1.x
Do not change passwords when performing this upgrade. Use the same passwords from your SPA 8.4.x installation. The upgrade will fail if you attempt to change the passwords. Changing passwords will be supported in a future patch release of SPA 9.1
Overview
This is the guide to follow for upgrading WorkFusion SPA software from one release to another. This guide does not include the migration of business processes.
Prerequisites
- You have workfusion product 8.4.x installed on Redhat 7.x. You downloaded the 9.1.x installer to all servers that will be upgraded.
- This is a guide how to do an in-place upgrade from 8.4.x to 9.1.x.
- Collect required data from previous installation.
- SSH into APP server.
- Prepare Business Processes to upgrade BP migration notes.
Preparation
General steps
Stop all services.
This step prevents from changes in database during dumping.
Run as
wfuserphp-fpm-service stop nginx-service stop rpa_manager-service stop tomcat-service stop tomcat-nlp-service stop tabula-service stop wfagent-service stopStop RPA Manager.
RPA Manager need to be killed by this hack:
for i in `ps auxf | grep rpa_manager | awk '{ print $2}'`; do kill -9 $i; doneStop Tabula.
Run as root
/etc/init.d/tabula stopCollect data from Vault storage.
Download the 9.1.x installation package and use the recent
loader-security-properties.jarfrom it.Run as
wfuser.
cp workfusion-9.1.x/sources/loader-security-properties.jar /opt/workfusion/apps/webapps/wf_sec_storage/loader-security-properties.jar cd /opt/workfusion/apps/webapps/wf_sec_storage/ /opt/workfusion/apps/webapps/wf_sec_storage/loader.sh workfusion review > ~/security-all.properties- Copy the
security-all.propertiesfile to DB server using scp, ftp or wget. Rename directory with the 8.4.x installation.
Run as
root.mv /opt/workfusion /opt/workfusion_oldClear crontab jobs.
Remove all Workfusion related cron jobs.
Before deleting the jobs, make sure any non-Workfusion related cron jobs are backed up:
crontab -lRun as
rootto delete all cronjobs.crontab -eRemove old init scripts.
Run as
root.cd /etc/init.d rm -f rpa_manager tabula tomcat tomcat-nlp wfagent php-fpm nginx
PM Server
Create dump.
Run as
wfuser.mkdir /opt/workfusion/dumps /opt/workfusion/lib/mongodb/mongo --host 127.0.0.1 --port 27017 --username admin --password "myadminpass" admin mongo.shell> db.grantRolesToUser("admin",["backup"]) mongo.shell> quit() /opt/workfusion/lib/mongodb/mongodump --host 127.0.0.1 --port 27017 --username admin --password "myadminpass" --archive=/opt/workfusion/dumps/mongo-dump.tarStop all old services.
Run as
wfuser.mongod-service stop wfagent-service stopRun as
root.mv /opt/workfusion /opt/workfusion_oldClean up init services.
Run as
rootcd /etc/init.d rm -f mongod wfagent
OCR Server
Stop all old services.
Run as
root./etc/init.d/abbyy-fre11-licensing-service stop /etc/init.d/wfagent stop /etc/init.d/ocr2 stopDelete all old services.
Run as
root./etc/init.d/abbyy-fre11-licensing-service stop /etc/init.d/wfagent stop /etc/init.d/ocr2 stop ...Delete old ABBYY.
Run as
root.cd /usr/local/bin rm -rf ABBY cd /usr/local/lib rm -rf ABBYClear crontab jobs.
Remove all Workfusion related cron jobs.
Before deleting the jobs, make sure any non-Workfusion related cron jobs are backed up:
crontab -lRun as
rootto delete all cronjobs.crontab -eRename the directory with the 8.4.x installation.
Run as
root.mv /opt/workfusion /opt/workfusion_old
VDS Master Server
Stop all old services.
Run as
wfuser.wfmanager stop allRun as
root.service supervisord stopCopy old models.
Copy the old models file from
s3://vds-models/models.prodto a temporary directory.Run as
wfuser.s3cmd -c /opt/workfusion/s3cmd_conf/vds_s3cfg --signature-v2 sync s3://vds-models/models.flat-prod /tmp/models.prod-8.4.xClear crontab jobs.
Run as
wfuserto delete all cronjobs.crontab -eRename the directory with the 8.4.x installation.
Run as
root.mv /opt/workfusion /opt/workfusion_old
VDS Slave Server
Stop all old services.
Run as
wfuser.wfmanager stop allRun as
root.service supervisord stopRename the directory with the 8.4.x installation.
Run as
rootmv /opt/workfusion /opt/workfusion_old
DB Server
Connect to DB server via SSH and find the
environment.conffile used for the 8.4.x installation.Convert usernames and secrets to the YAML format.
Convert usernames and secrets from
environment.confto the YAML format used in the 9.1.x installation.Run as
wfuser.cd /opt/workfusion/app-all/source ./environment.conf cat << EOF > secrets_override.yml workfusion_db_user: $WORKFUSION_MYSQL_USER workfusion_db_pass: $WORKFUSION_MYSQL_PASS postgresql_admin_pass: $POSTGRES_PASS workfusion_datastore_user: $WORKFUSION_PSQL_USER workfusion_datastore_pass: $WORKFUSION_PSQL_PASS rpa_manager_db_admin_user: $MONGO_ADMIN_NAME rpa_manager_db_admin_pass: $MONGO_ADMIN_PASS wfagent_master_db_user: $MONGO_ADMIN_NAME # ?? wfagent_master_db_pass: $MONGO_ADMIN_PASS # ?? wfagent_mongodb_ro_user: $MONGO_ADMIN_RO_NAME wfagent_mongodb_ro_pass: $MONGO_ADMIN_RO_PASS wfagent_username: $WFAGENT_AUTH_USER wfagent_password: $WFAGENT_AUTH_PASSWORD ocr_passwd: $OCR_PASSWD s3_access_key: $ACCESS_KEY s3_secret_key: $SECRET_KEY wfbi_db_user: $WFBI_USER wfbi_db_pass: $WFBI_PASSWORD apm_hostname: $APMHOSTNAME db_hostname: $DBHOSTNAME app_hostname: $WFHOSTNAME ocr_hostname: $OCRHOSTNAME vds_master_hostname: $MLHOSTNAME EOFCopy the resulting
secrets_override.ymlfile to the directory with the 9.1.x installer.
Data Backup
Dumps Directory
Create a directory where you store the dumps, for example, /opt/workfusion/dumps.
Run as wfuser.
mkdir /opt/workfusion/dumps
MySQL
sudo -u wfuser -i
/opt/workfusion/lib/mysql/bin/mysqldump --max_allowed_packet=1024M --add-drop-database --routines -S /opt/workfusion/apps/mysql/mysql.sock -u root -p -B sqc -B wfdb  >> /opt/workfusion/dumps/mysql-sqc_wfdb.sql
PostgreSQL
export LD_LIBRARY_PATH=$LD_LIBRARY_PATH:/opt/workfusion/lib/pgsql-9.4.7/lib
/opt/workfusion/lib/pgsql-client-9.4.7/bin/pg_dumpall -U postgres -h 127.0.0.1 -p 5432 > /opt/workfusion/dumps/postgres-all.sql
MongoDB
/opt/workfusion/lib/mongodb/mongo --host 127.0.0.1 --port 27017 --username admin --password "myadminpass" admin
mongo.shell> db.grantRolesToUser("admin",["backup"])
mongo.shell> quit()
/opt/workfusion/lib/mongodb/mongodump --host 127.0.0.1 --port 27017 --username admin --password "myadminpass" --archive=/opt/workfusion/dumps/mongo-dump.tar
S3Emu
s3emu-service stop
tar -czvf /opt/workfusion/dumps/riak.tar.gz /opt/workfusion/apps/s3emu/riak
Nexus
nexus stop
tar -czvf /opt/workfusion/dumps/nexus.tar.gz /opt/workfusion/apps/nexus/sonatype-work/nexus
Running services
Stop remaining running services.
Run as wfuser.
mongod-service stop
mysql-service stop
postgresql-9.4-service stop
vault-service stop
wfagent-service stop
Make sure there are no running processes launched from wfuser.
Old installation renaming
Rename the old installation directory.
Run as root.
mv /opt/workfusion /opt/workfusion_old
Installation and data restoring
DB Server
DB Server installation
Follow the installation procedure for DB server.
Do not forget to apply secrets_override.yml with the -e @secrets_override.yml parameter.
./install.sh precheck db
./install.sh preinstall db
./install.sh install db -e @secrets_override.yml
./install.sh check db
cd /opt/workfusion_old/dumps/
S3Emu
Replace s3emu data.
wfmanager stop riak riak-cs riak-stanchion
tar -xzvf riak.tar.gz
mv /opt/workfusion/riak/data/ /opt/workfusion/riak/data-bak
mkdir /opt/workfusion/riak/data
cp -r /opt/workfusion_old/dumps/opt/workfusion/apps/s3emu/riak/* /opt/workfusion/riak/data/
The extracted riak directory should contain two subfolders only: leveldb and bitcask.
MySQL
important
Perform the steps only if a new installation URL differs from the previous one.
For example, if the port changes, or URL is switched from HTTP to HTTPS.
In case your new environment runs on a port that differs from the one previously set, you should use the sed command in accordance with the new enviroment URL.
Example 1
The old environment uses the port 80 non-TLS while the new one works on the port 8443 with TLS.
The sed command to replace the URL is as follows:
sed -i "s/http\:\/\/old-wf\.workfusion\.com/https\:\/\/new-wf\.workfusion\.com\:8443/g" mysql-dump.sql
Example 2
The old environment uses the port 443 TLS while the new one should work on the port 8443 with TLS.
sed -i "s/https\:\/\/old-wf\.workfusion\.com\:443/https\:\/\/new-wf\.workfusion\.com\:8443/g" mysql-dump.sql
or
sed -i "s/https\:\/\/old-wf\.workfusion\.com/https\:\/\/new-wf\.workfusion\.com\:8443/g" mysql-dump.sql
Upload the dump to MySQL.
mysql -u mysql -h 127.0.0.1 -p < mysql-sqc_wfdb.sql
PostgreSQL
Connect to the PostgreSQL database.
psql -U postgres -h 127.0.0.1
Run the next queries in the PostgreSQL shell to remove connections that may prevent dropping of databases (you can copy and paste all of them to the PSQL shell and press Enter):
SELECT pg_terminate_backend(pg_stat_activity.pid)
FROM pg_stat_activity
WHERE pg_stat_activity.datname = 'virtualizer_sandbox'
  AND pid <> pg_backend_pid();
SELECT pg_terminate_backend(pg_stat_activity.pid)
FROM pg_stat_activity
WHERE pg_stat_activity.datname = 'virtualizer'
  AND pid <> pg_backend_pid();
SELECT pg_terminate_backend(pg_stat_activity.pid)
FROM pg_stat_activity
WHERE pg_stat_activity.datname = 'wf_datastore'
  AND pid <> pg_backend_pid();
SELECT pg_terminate_backend(pg_stat_activity.pid)
FROM pg_stat_activity
WHERE pg_stat_activity.datname = 'wfml_automation'
  AND pid <> pg_backend_pid();

drop database virtualizer_sandbox;
drop database virtualizer;
drop database wf_datastore;
drop database wfml_automation;
important
Perform the steps only if a new installation URL differs from the previous one.
For example, if the port changes, or URL is switched from HTTP to HTTPS.
In case your new environment runs on a port that differs from the one previously set, you should use the sed command in accordance with the new enviroment URL.
Example 1
The old environment uses the port 80 non-TLS while the new one works on the port 8443 with TLS.
The sed command to replace the URL is as follows:
sed -i "s/http\:\/\/old-wf\.workfusion\.com/https\:\/\/new-wf\.workfusion\.com\:8443/g" postgres-all.sql
Example 2
The old environment uses the port 443 TLS while the new one should work on the port 8443 with TLS.
sed -i "s/https\:\/\/old-wf\.workfusion\.com\:443/https\:\/\/new-wf\.workfusion\.com\:8443/g" postgres-all.sql
or
sed -i "s/https\:\/\/old-wf\.workfusion\.com/https\:\/\/new-wf\.workfusion\.com\:8443/g" postgres-all.sql
Restore data from the PostgreSQL 8.4.x dump:
psql -U postgres -h 127.0.0.1 -f postgres-all.sql
MongoDB
Restore the database from backup.
mongo --host 127.0.0.1 --port 27016 --username admin --password "myadminpass" admin
mongo.shell> db.grantRolesToUser("admin",["root"])
mongorestore --host 127.0.0.1 --port 27016 --username admin --password "myadminpass" --archive=mongo-dump.tar
Nexus
tar -xvzf nexus.tar.gz
cd opt/workfusion/apps/nexus/
wfmanager stop nexus
cp -r sonatype-work/* /opt/workfusion/nexus/sonatype-work/
DB Migrations
Apply DB migrations.
cd /opt/workfusion/_migrations/workfusion
migrate pending --env=development
migrate up --env=development
cd /opt/workfusion/_migrations/workspace
migrate pending --env=development
migrate up --env=development
cd /opt/workfusion/_migrations/sandbox
migrate pending --env=development
migrate up --env=development
cd /opt/workfusion/_migrations/sqc
migrate pending --env=development
migrate up --env=development
Vault
Upload the user secrets from 8.4.x Business Process to Vault.
cp ~/security-all.properties /opt/workfusion/wf-sec-storage
cd /opt/workfusion/wf-sec-storage
cat security-all.properties | grep -v 'This property is not configured.' |grep -v "It's all" | grep -v 'Key : Value' | grep -v 'You are working with safe' | grep -v 'Properties from secure storage' |sed s%\\[INFO\ \\]\ %%g | sed s/\ :\ /=/ > security-filtered-all.properties
./loader.sh workfusion security-filtered-all.properties
Final migrations
To apply final migrations, go to the directory with the ansible 9.1.x installer.
Run as wfuser.
./install.sh install db -e @secrets_override.yml
./install.sh check db -e @secrets_override.yml
APP Server
Go to the directory with the ansible 9.1.x installer.
# please don't use dots "." in the path
cd <directory_with_installer_9.1.x>
cp /opt/workfusion_old/apps/webapps/apache-tomcat-8.5.20/conf/license.properties .
Follow the installation procedure for APP server.
Do not forget to apply
secrets_override.ymlwith the-e @secrets_override.ymlparameter.- Run as
root.
./install.sh precheck app ./install.sh preinstall app- Run as
wfuser.
./install.sh install app -e @secrets_override.yml ./install.sh check app -e @secrets_override.yml- Run as
Copy RPA Manager quota to the new installation.
cp /opt/workfusion_old/apps/rpa_manager/grid-router/quota/user.xml /opt/workfusion/rpa-manager/grid-router/quota/user.xmlRe-log in as
wfuser. Otherwise, thewfmanagerexecutable will not be found.wfmanager restart all
PM Server
Go to the directory with the ansible 9.1.x installer.
cd <directory_with_installer_9.1.x>Follow the installation procedure for PM server.
Do not forget to apply
secrets_override.ymlwith the-e @secrets_override.ymlparameter.- Run as
root.
./install.sh precheck apm ./install.sh preinstall apm- Run as
wfuser.
./install.sh install apm -e @secrets_override.yml ./install.sh check apm -e @secrets_override.yml- Run as
Re-log in as
wfuser. Otherwise, thewfmanagerexecutable will not be found.mongorestore --host 127.0.0.1 --port 13017 --username mongodb --password "mongodb" --archive=/opt/workfusion_old/dumps/mongo-dump.tar
If you have any custom APM configuration like checks, don't forget to transfer them to new APM server.
OCR Server
Installation
Go to the directory with the ansible 9.1.x installer.
cd <directory_with_installer_9.1.x>Follow the installation procedure for OCR server.
Do not forget to apply
secrets_override.ymlwith the-e @secrets_override.ymlparameter.- Run as
root.
./install.sh precheck ocr ./install.sh preinstall ocr- Run as
wfuser.
./install.sh install ocr -e @secrets_override.yml ./install.sh check ocr -e @secrets_override.yml- Run as
License
note
Repeat the actions below for all activated licenses for all OCR servers.
Run License Manager using any user.
export LD_LIBRARY_PATH=$LD_LIBRARY_PATH:<INSTALL_DIR>/apps/ABBYY/FREngine11/Bin
<INSTALL_DIR>/apps/ABBYY/FREngine11/Bin/LicenseManager.Console
The license serial number and other license parameters can differ from samples. Select the activated license:
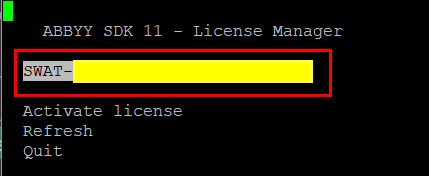
Open license parameters:
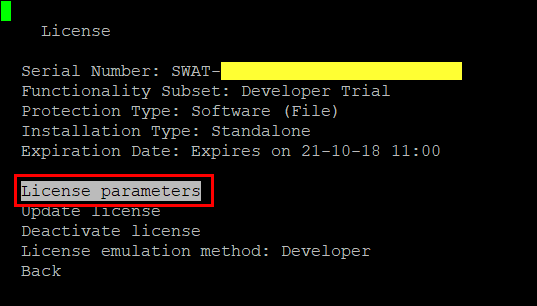
Make a screenshot of the first page. Ensure that the line with Volume > Regular Text > Remains is visible.
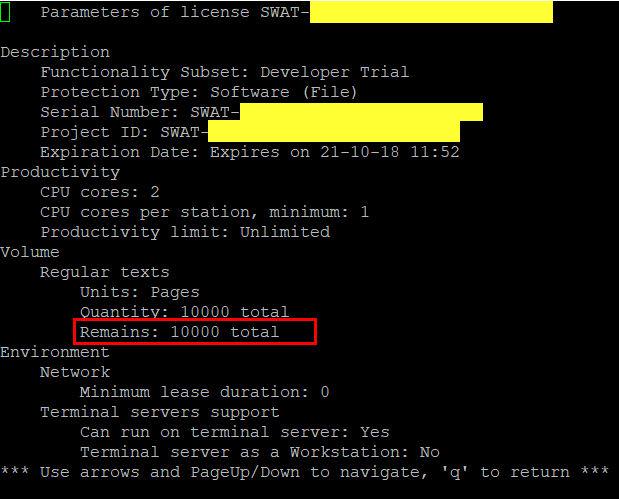
Request and activate license. Attach all license screenshots if remaining is greater than 0.
API
Pattern usage
Changes below are required in case custom pattern is used in BP.
Replace the patternName parameter with the pattern parameter that is passed by content, not filename.
Affected endpoints:
/processImage/submitPatternadded/trainPatternrenamed tomergePatternthat is combined with a new one/processDocumentuses pattern submitted with/submitPattern
Use
useDefaultPattern=trueinstead ofpatternName=default.Affected endpoints:
/processImage/processDocument
OCR parameters
Collect all changed parameters of OCR service in YML files (the /etc directory) comparing with standard listed in blocks below:
ocr-rest.yml
Standard OCR rest properties:
db.cleanup.abbyy:
 input: 2000
 output: 2000
 record: 600

spring.profiles.active: disabled-auth,mongoDbQueue,gridfs-storage,mongo-task

ocr.rest.timeout: 5
ocr.rest.retries: 2
ocr-worker.yml
Standard OCR worker properties:
worker.executor.abbyy.pool.size:

spring.profiles.active: abbyy,mongoDbQueue,gridfs-storage
Update configuration YML files with collected parameter values on the previous step.
Files to review in case any customization exists:
ocr-rest.ymlocr-worker.yml
OCR GhostScript
A new version of GhostScript is available since 8.5.x SPA version.
A newer version of GhostScript has impact on document convertion to TIFF and may change quality of OCR.
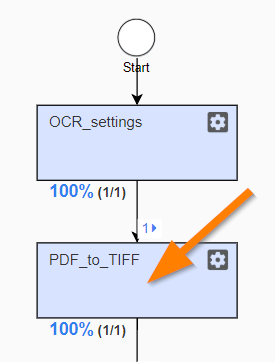
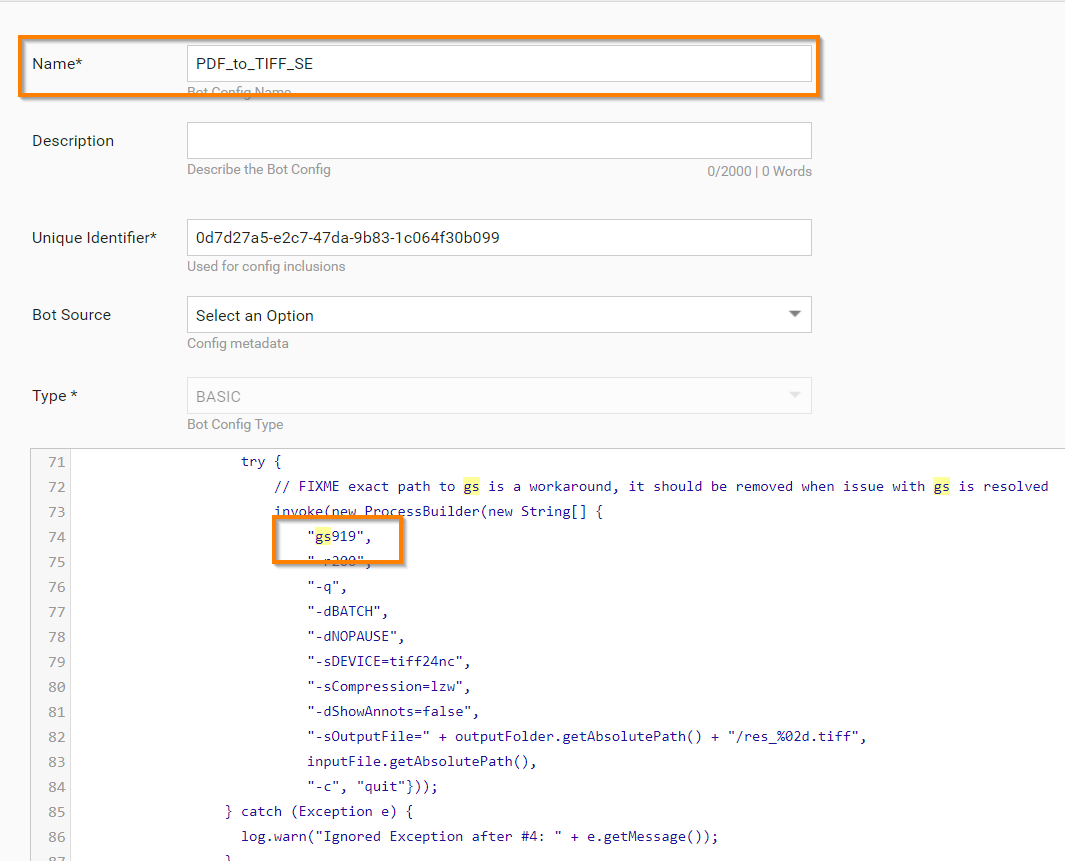
If one of pre-processing steps uses GhostScript before OCR and the quality is worse, there's need to downgrade version of GhostScript in a Bot Task (PDF to Tiff convert) of a Business Process:
gs is a new version, gs919 is an old version.
VDS Master
Connect to the VDS Master Server.
Go to the directory with the ansible 9.1.x installer
cd <directory_with_installer_9.1.x>Follow the installation procedure for VDS Master.
Do not forget to apply
secrets_override.ymlwith the-e @secrets_override.ymlparameter.- Run as
root.
./install.sh precheck vds-master -e @secrets_override.yml ./install.sh preinstall vds-master -e @secrets_override.yml- Run as
wfuser.
./install.sh install vds-master -e @secrets_override.yml ./install.sh check vds-master -e @secrets_override.yml- Run as
Copy the new models file from
s3://vds-models/models.flat-prodto a temporary directory:s3cmd -c /opt/workfusion/s3cmd_conf/vds_s3cfg --signature-v2 sync s3://vds-models/models.flat-prod /tmp/Merge these files to a new one:
cat /tmp/models.prod-8.4.x >> /tmp/models.flat-prodUpload the merged file to
s3://vds-models/models.flat-prod.s3cmd -c /opt/workfusion/s3cmd_conf/vds_s3cfg --signature-v2 sync /tmp/models.flat-prod s3://vds-models/models.flat-prodRestart
wfmanager.wfmanager restart all
VDS Slave
Go to the directory with the ansible 9.1.x installer.
cd <directory_with_installer_9.1.x>Follow the installation procedure for VDS Slave.
Do not forget to apply
secrets_override.ymlwith the-e @secrets_override.ymlparameter.- Run as
root.
./install.sh precheck vds-slave ./install.sh preinstall vds-slave- Run as
wfuser.
./install.sh install vds-slave -e @secrets_override.yml ./install.sh check vds-slave -e @secrets_override.yml- Run as
Post-installation steps
Perform post-installation procedures as described in Post Installation.