
Robotics plugins
Robotics plugins provide possibilities to click through desktop or web applications using commands in Web-Harvest scripts. Configuration of where the script is executed is done on the server side.
Robotics plugins structure is as follows:
<robotics-flow>
<capability name="country" value="India"/>
<!-- Internet explorer driver -->
<robot name="roboticsDriver" driver="internet explorer" close-on-completion="false" start-in-private="true">
<capability name="javascriptEnabled" value="true"/>
<script></script>
</robot>
<!-- desktop driver -->
<robot name="roboticsDriver2" driver="desktop" close-on-completion="true">
<capability name="platform" value="WINDOWS"/>
<script></script>
</robot>
<!-- universal driver -->
<robot name="universalDriver" driver="universal" close-on-completion="true">
<capability name="SEARCH_ALL_WINDOWS" value="true" />
<script></script>
</robot>
<!-- Internet explorer driver -->
<robot name="roboticsDriver" driver="internet explorer" close-on-completion="true" start-in-private="true">
<script></script>
</robot>
</robotics-flow>
robotics-flow
The robotics-flow tag can contain robot tags as well as script
ones. For each robot* tag, new roboticsDriver is created.
The attributes are as follows:
| Name | Required | Default | Description |
|---|---|---|---|
| exclusive | no | true | If enabled, it guarantees that no other processes can launch browsers and desktop apps on the same RPA Node while robotics-flow is running – they will wait till current robotics-flow releases the RPA Node. 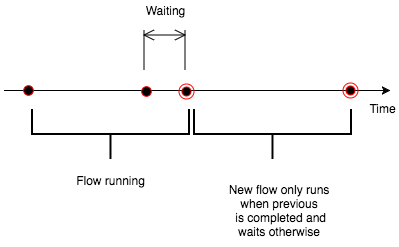 |
| username | no | Credentials to Bot Manager. | |
| Password | no | Credentials to Bot Manager. |
robot
By default, the plugin executes roboticsDirver on a local machine (for example, Windows OS). In case when remote setup is needed, additional Control Tower and Bot Manager configuration is required.
This plugin should have a script child section containing a code, which manipulates with the roboticsDriver object defined in the name attribute.
note
All the robot sections inside one robotics-flow are executed on the same RPA Node one after another.
The attributes are as follows:
| Name | Required | Default | Description |
|---|---|---|---|
| driver | yes | Defines the driver that will be used for executing robotics instructions: | |
| name | no | Driver name. Can be any string, driver is accessible in the script section by this name. | |
| close-on-completion | no | true | This attribute specifies whether to close the driver window on plugin completion. If you set this attribute to false, robot session is not closed and RPA Node remains occupied. |
| start-in-private | no | false | If true, browser will start in private mode. |
| block-images | no | false | Block images to speed-up the page load. |
| maximize-on-startup | no | true | Maximize browser window on startup. |
Examples
Robotics object creation
sDriver = roboticsDriver.getWrappedObject(); // this object is provided in the context of robot plugin - defined in the "name" attribute
You can include one or several script sections (Groovy language) inside the robot plugin and manipulate with the roboticsDriver object.
Robot plugin
<?xml version="1.0" encoding="UTF-8"?>
<config xmlns="http://web-harvest.sourceforge.net/schema/1.0/config" scriptlang="groovy">
    <robotics-flow>
        <robot name="roboticsDriver" driver="firefox" close-on-completion="true" start-in-private="true">
            <script><![CDATA[

                timeouts(40 * 1000);
                open("https://mail.google.com");

                $("#identifierId").val("tuk.tuk.rpa@gmail.com").pressEnter();
                $(byXpath("//*[@name='password']")).val("work4WorkFusion");
                $("#passwordNext").click();

                $(byText("COMPOSE")).click();

                $(By.name("to")).val("tuk.tuk.rpa@gmail.com").pressTab();
                $(by("placeholder", "Subject")).val("Robotics API demo").pressTab();

                $(".editable").val("We are not afraid of ajax anymore.").pressEnter();
                $(byText("Send")).click();

                $(withText("Your message has been sent.")).shouldBe(VISIBLE);

            ]]></script>
        </robot>
    </robotics-flow>

    <export include-original-data="false"/>
</config>
capability
With the help of the capability plugin, you can define requirements or
parameters for the machine where your bot task is executed. For
example, you have defined <capability name="browserName" value="firefox">. When the config is grabbed from a pool by RPA Grid
Router, the following actions are performed:
- Bot Manager tries to find all available RPA Hubs that support the
"browserName"capability. - If RPA Hub(s) found, Bot Manager tries to find all available RPA Nodes that have the
"browserName":"firefox"capability in the configuration JSON. - If RPA Node(s) found, Bot Manager routes your config to be executed on this particular Node supporting the
"browserName":"firefox"capability. - If RPA Hub or Node not found, the config execution fails with an exception.
capability is a child plugin of robotics-flow or robot plugins. You can create several capabilities.
The attributes are as follows:
| Name | Required | Default | Description |
|---|---|---|---|
| name | yes | Capability name | |
| value | no | Capability value |
tip
To learn more, see the capability reference.
capability inside the robot plugin overrides the capability inside robotics-flow plugin. See a code example below:
<robotics-flow username="" password="">
    <capability name="cleanSession" value="true">

     <robot browser="chrome" ...>
          <capability name="javascriptEnabled" value="true"/>

          <!-- This capability overrides the robotics-flow child capability-->
          <capability name="cleanSession" value="false"/>

          <script>...</script>
     </robot>

</robotics-flow>
Desktop driver specific capabilities
SEARCH_ALL_WINDOWS
The default value is false.
By default desktop driver can only switch to windows opened in driver
session. To be able to switch to any existing window or window launched
outside driver session the SEARCH_ALL_WINDOWS capability must be set
to true.
CLOSE_ALL_WINDOWS
The default value is false.
By default desktop driver closes all the windows to which it switched (including external windows that were opened outside the driver session). To close external windows, the CLOSE_ALL_WINDOWS must be set to true.
imageSimilarityThreshold
The default value is 0.7. Can take double values from 0.0 to 1.0.
For surface-based automation, it is possible to set the image similarity threshold capability, which can help solve complicated cases where images should strictly match. See more details here.
Custom capabilities
Custom Capabilities are not recommended for production usage. Use the quota files in Bot Manager instead.
By default, you can use capability attributes from the "capabilityMatcher": "org.openqa.grid.internal.utils.DefaultCapabilityMatcher"
In some cases, it is needed to route to specific RPA Node types (for example, when some RPA nodes need to be assigned only to a specific country). This can be done by adding a capability with custom attributes to the RPA script:
<capability name="country" value="India"/>
To make this capability work properly, you need to configure RPA Hub and Node(s).
Configure RPA Hub
important
- Before configuring, stop RPA Nodes and Hubs. Restart all updated RPA Nodes and Hubs after configuring.
- Capability name and value are case sensitive.
- Custom capability should be added to ALL Hubs.
Open
C:/RPA/rpa-grid/hub.json.Change the
capabilityMatchervalue toorg.openqa.grid.internal.utils.ConfigurableCapabilityMatcher.Add a new
capabilityMatcherConfigkey with values. You can define any custom capability, for example, country, and set the exact type of matching:{ "host": null, "port": 4444, "newSessionWaitTimeout": 300000, "servlets": ["com.workfusion.grid.web.WFServlet"], "prioritizer": null, "capabilityMatcher": "org.openqa.grid.internal.utils.ConfigurableCapabilityMatcher", "capabilityMatcherConfig" : [{"platform":"platform"},{"browserName":"exact"},{"version":"rvm"},{"country":"exact"}], "throwOnCapabilityNotPresent": true, ... }
Configure RPA Nodes
Open
C:/RPA/rpa-grid/node0.json.Add a custom capability and value for each available capability, for example, "country":"India").
node0.json:{ "capabilities":[ { "platform": "WINDOWS", "browserName": "internet explorer", "version": "11", "maxInstances": 1, "seleniumProtocol": "WebDriver", "country": "India" }, { "platform": "WINDOWS", "browserName": "chrome", "maxInstances": 1, "seleniumProtocol": "WebDriver", "country": "India" },Open
C:/RPA/rpa-grid/node1.json.Add a custom capability and value for each available capability, for example, "country":"China":
node1.json:{ "capabilities":[ { "platform": "WINDOWS", "browserName": "internet explorer", "version": "11", "maxInstances": 1, "seleniumProtocol": "WebDriver", "country": "China" }, { "platform": "WINDOWS", "browserName": "chrome", "maxInstances": 1, "seleniumProtocol": "WebDriver", "country": "China" },Repeat steps 1-2 for other RPA Nodes if needed:
node3.json,node4.json, and so on.
- Restart all updated RPA Nodes and Hubs.
- You can insert more than one cutom capability for a Node. For example, one Node can have the following capabilities: country, region, city.
Use custom capabilities in Bot Configs
When creating Bot configs in WorkFusion, add a capability tag with appropriate name and value attributes.
Bot config that will be executed only on Node #0 (India):
...
<robotics-flow>
        <capability name="country" value="India"/>

        <robot name="roboticsDriver" driver="internet explorer" close-on-completion="false" start-in-private="true"> ... </robot>

</robotics-flow>
...
Bot config that will be executed only on Node #1 (China):
...
<robotics-flow>
        <capability name="country" value="China"/>

        <robot name="roboticsDriver" driver="internet explorer" close-on-completion="false" start-in-private="true"> ... </robot>

</robotics-flow>
...
Capabilities for proxy usage
If your IE browser is configured to use proxy, add the following code into your Bot Tasks.
<capability name="ie.usePerProcessProxy" value="true"/>
<!-- Choose one of the following proxy options depending on its type -->
<capability name="proxy">
<script return="proxyValue"></script>
</capability>
<capability name="proxy">
<script return="proxyValue"></script>
</capability>
<capability name="proxy">
<script return="proxyValue"></script>
</capability>
<capability name="proxy">
<script return="proxyValue"></script>
</capability>
You can add only one of the <capability name="proxy"> blocks from the code block above.
See more details here.