
Recognize Windows checkmarks
note
The checkmark recognition feature is available for IA Cloud Enterprise up to v10.1.6 and IA Cloud Developer (all versions).
Perform checkmark recognition
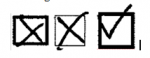
A checkmark field is an element on a machine-readable form (usually rectangular and often called a checkbox) where a mark should be made, for example, a check, a tick, an X, a large dot, and so on.
- OCR can read and process checkmarks. The technical term for this is Optical Mark Recognition (OMR).
- The OMR technology recognizes:
- Simple checkmarks
- Grouped checkmarks
- OMR delivers an accuracу rate of up to 99.995%.
Checkmark examples are as follows:

tip
For a Business Process sample, refer to Design Business Process for checkmark recognition.
Explore OMR technical implementation
Layout analysis and the underlying recognition technology work with Checkmark Block (Single Checkmark) and a Checkmark Group (Group of checkmarks or radio-buttons) objects.
A checkmark block or group corresponds to an image zone recognized as a checkmark.

The state of a checkmark can be:
- Selected:
state="CMCS_Checked" - Not selected:
state="CMCS_NotChecked"
Supported checkmark types are as follows:
Square:
CMT_Square
Circle:
CMT_CircleNOT SUPPORTED FOR NOW
Empty:
CMT_Empty
Detect checkmarks on page
Checkmark areas cannot be detected automatically by the document analyzer. Thus, define the checkmark area before the recognition.
Perform checkmark recognition using OCR API
Checkmark recognition is based on a document template with defined checkmark areas.
You should format a document template as a JSON string and passed as the customRegion parameter that describes to the engine where a specific block is located, for example, a checkmark.
Custom region types for OMR support extra configuration include:
BT_CheckmarkBT_CheckmarkGroup
caution
- EXPORT: Only XML export supports checkmark recognition results.
- INPUT: The image file format is formatted, for example, PNG, JPEG, TIFF.
Do not use PDF as input. Text inside a checkmark area is not recognized.
View customRegions JSON structure
A custom region is a JSON variable that defines the area of a particular type.
type: One of the allowed region type[BT_Table, BT_Text, BT_Barcode, BT_VectorPicture, BT_Checkmark, BT_CheckmarkGroup].page: Number of a page of a custom region to be placed. Default:0.left: Left border of the area.top: Top border of the area.right: Right border of the area.bottom: Bottom border of the area.name: Name of the region. Default:''.checkmarkConfiguration: Extra configuration for checkmarks.maximumCheckedInGroup: Maximum count of items allowed for checking.minimumCheckedInGroup: Minimum count of items allowed for checking.type: Type of checkmark[CMT_Square, CMT_Circle(not supported), CMT_Empty]. Default:CMT_Square.
innerRegions: Inner custom regions inside the parent. A checkmark group must contain at least one inner checkmark definition.
The left, top, right, bottom variables are required.
Example of JSON structure
[
{
"type": "BT_Checkmark",
"page": 1,
"left": 20,
"top": 350,
"right": 70,
"bottom": 395,
"name": "Other Conditions and Document to be tendered to prove compliance",
"checkmarkConfiguration": {"type": "CMT_Square"}
}
]
Prepare document template
For a document template, see the examples below:
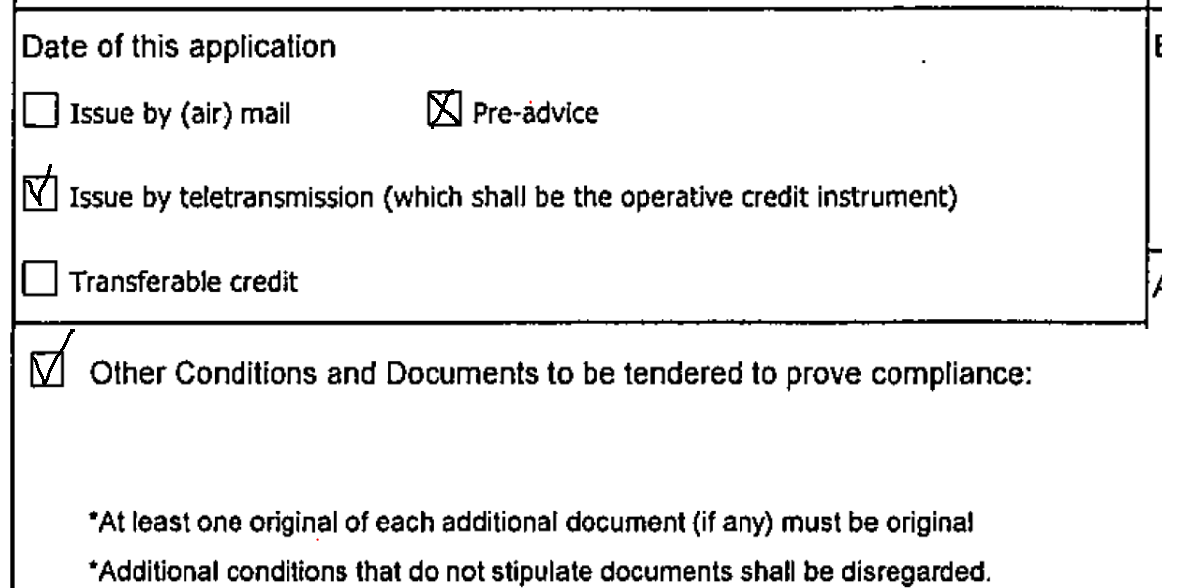
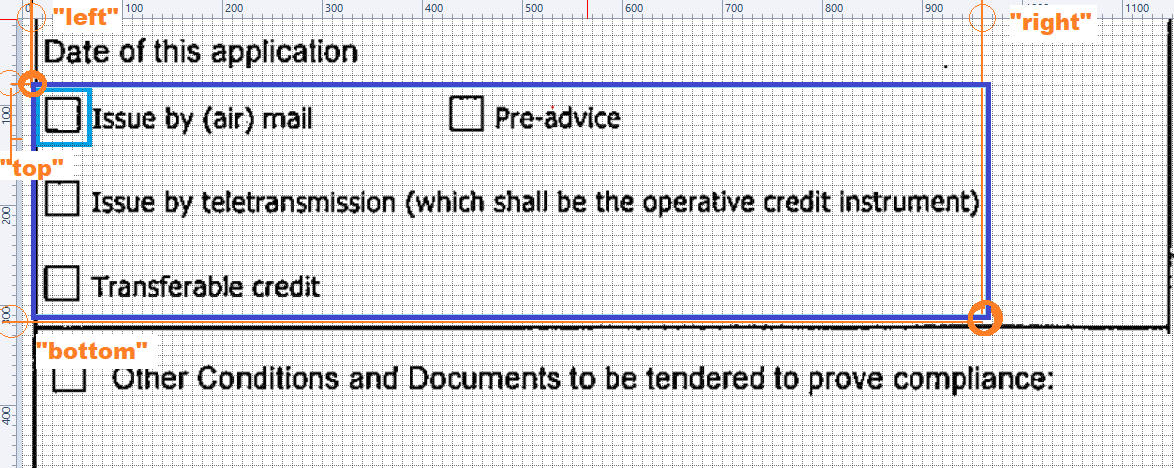
Detect checkmarks in group
Define the image zone recognized as a checkmark for a group of checkmarks. See the previous picture as an example.
- Open a simple picture editor, for example, Paint.
- Switch on the Rulers feature and define points (coordinates) of borders (px).
- Define the area for each checkmark in the block.
JSON for group of checkmarks
[
{
"type": "BT_CheckmarkGroup",
"page": 1,
"left": 10,
"top": 80,
"right": 950,
"bottom": 315,
"name": "Date Of Application",
"checkmarkConfiguration": {
"maximumCheckedInGroup": 4,
"minimumCheckedInGroup": 1,
"type": "CMT_Square"
},
"innerRegions": [
{
"type": "BT_Checkmark",
"page": 1,
"left": 15,
"top": 80,
"right": 70,
"bottom": 140,
"name": "Issue by email"
},
{
"type": "BT_Checkmark",
"page": 1,
"left": 420,
"top": 80,
"right": 470,
"bottom": 140,
"name": "Pre-advice"
},
{
"type": "BT_Checkmark",
"page": 1,
"left": 15,
"top": 170,
"right": 70,
"bottom": 220,
"name": "Issue by teletransmission"
},
{
"type": "BT_Checkmark",
"page": 1,
"left": 15,
"top": 250,
"right": 70,
"bottom": 305,
"name": "Transferable credit"
}
]
}
]
Detect single checkmark
For a single checkmark recognition, define the area for a single checkmark only.
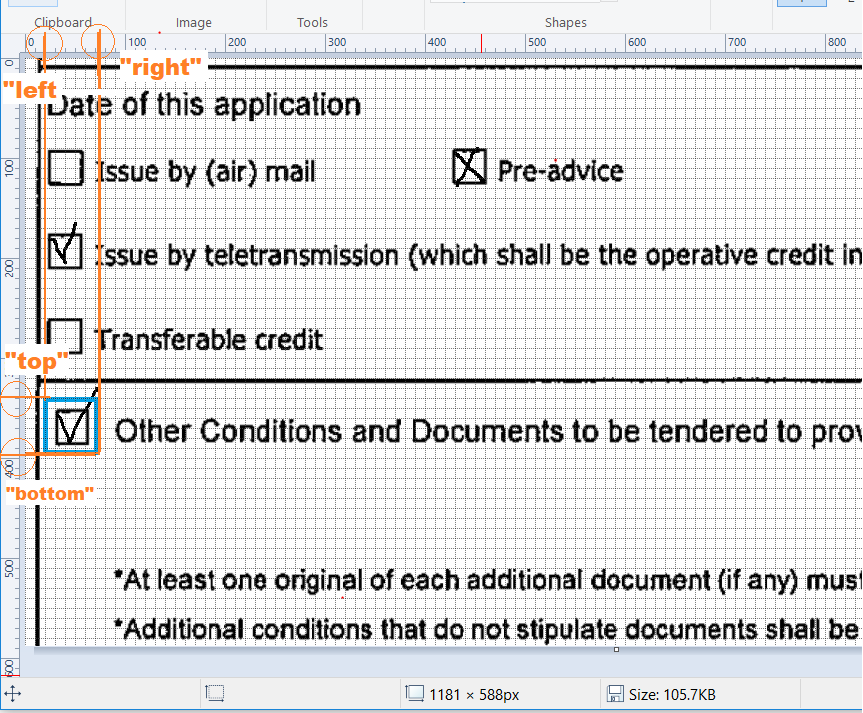
JSON for single checkmark
[
{
"type": "BT_Checkmark",
"page": 1,
"left": 20,
"top": 340,
"right": 70,
"bottom": 395,
"name": "Other Conditions and Document to be tendered to prove compliance",
"checkmarkConfiguration": {
"type": "CMT_Square"
}
}
]
Detect checkmarks in group and single checkmark
Template example for image above
[
{
"type": "BT_CheckmarkGroup",
"page": 1,
"left": 10,
"top": 80,
"right": 950,
"bottom": 315,
"name": "Date Of Application",
"checkmarkConfiguration": {
"maximumCheckedInGroup": 4,
"minimumCheckedInGroup": 1,
"type": "CMT_Square"
},
"innerRegions": [
{
"type": "BT_Checkmark",
"page": 1,
"left": 15,
"top": 80,
"right": 70,
"bottom": 140,
"name": "Issue by email"
},
{
"type": "BT_Checkmark",
"page": 1,
"left": 420,
"top": 80,
"right": 470,
"bottom": 140,
"name": "Pre-advice"
},
{
"type": "BT_Checkmark",
"page": 1,
"left": 15,
"top": 170,
"right": 70,
"bottom": 220,
"name": "Issue by teletransmission"
},
{
"type": "BT_Checkmark",
"page": 1,
"left": 15,
"top": 250,
"right": 70,
"bottom": 305,
"name": "Transferable credit"
}
]
},
{
"type": "BT_Checkmark",
"page": 1,
"left": 20,
"top": 340,
"right": 70,
"bottom": 395,
"name": "Other Conditions and Document to be tendered to prove compliance",
"checkmarkConfiguration": {
"type": "CMT_Square"
}
}
]
View checkmark recognition results
Recognition result: single checkmark
<block b="395" blockName="Other Conditions and Document to be tendered to prove compliance" blockType="Checkmark" l="20" r="70" t="340">
   <region>
       <rect b="395" l="20" r="70" t="340"/>
   </region>
   <checkmark b="395" l="20" name="Other Conditions and Document to be tendered to prove compliance" r="70" state="CMCS_Checked" t="350"/>
</block>
Recognition result: checkmark group
<block b="315" blockName="Date Of Application" blockType="GroupCheckmark" l="10" r="950" t="80">
   <region>
      <rect b="315" l="10" r="950" t="80"/>
   </region>
   <checkmark b="140" l="15" name="Issue by email" r="70" state="CMCS_NotChecked" t="80"/>
   <checkmark b="140" l="420" name="Pre-advice" r="470" state="CMCS_Checked" t="80"/>
   <checkmark b="220" l="15" name="Issue by teletransmission" r="70" state="CMCS_Checked" t="170"/>
   <checkmark b="305" l="15" name="Transferable credit" r="70" state="CMCS_NotChecked" t="250"/>
</block>
Configure CustomRegions for checkmark recognition
Recognition of checkmarks is performed using the OCR plugin in Control Tower's Bot Task. Results are XML or other export format data with checked or unchecked state of checkmarks. See View checkmark recognition results.
Configuration for checkmark recognition
<?xml version="1.0" encoding="UTF-8"?>
<config charset="UTF-8" scriptlang="Groovy">

   <var-def name="ocr">
    <ocr export-format="xml,txt" custom-regions="${custom_regions}">
       <ocr-image>
        <http url="${original_document_url}"/>
       </ocr-image>
    </ocr>
   </var-def>
   <export include-original-data="true">
      <single-column name="xml" value="${new String(ocr.get(0).wrappedObject.results['xml'])}" />
      <single-column name="txt" value="${new String(ocr.get(0).wrappedObject.results['txt'])}" />
      <single-column name="id" value="${new String(ocr.get(0).wrappedObject.id)}" />
      <single-column name="status" value="${new String(ocr.get(0).wrappedObject.status)}" />
      <single-column name="registrationTime" value="${new String(ocr.get(0).wrappedObject.registrationTime)}" />
      <single-column name="processStartTime" value="${new String(ocr.get(0).wrappedObject.processStartTime)}" />
      <single-column name="processEndTime" value="${new String(ocr.get(0).wrappedObject.processEndTime)}" />
      <single-column name="statusChangeTime" value="${new String(ocr.get(0).wrappedObject.statusChangeTime)}" />
      <single-column name="message" value="${new String(ocr.get(0).wrappedObject.message)}" />
   </export>
</config>
The custom_regions and original_document_url values are provided from the input file or the previous machine config data for the current example. You can also provide a value directly in the config.
recommendations
- Use
processImagein Bot Tasks (the same as in the example) instead ofprocessDocument. If you useprocessDocument, mind the character limits: ~2000 characters are available. - You can use OCR by direct URLs out of the plugin for better performance in production cases.
- If you use
customRegionsfor checkmark recognition in a table, the table can be broken, and the table's text can be recognized separately.