
Mixed approaches in desktop RPA
Goal
The goal of the guide is to demonstrate the development approach of how to bring together:
- An ODF 2-based project started from the standard ODF 2 Archetype.
- Desktop RPA using WorkFusion Simplified RPA API.
- The Recorder OCR and Mouse Click actions. One of the Recorder's strengths is a fast and convenient UX for cutting screenshots and specifying areas.
Sample automation overview
Install applications
For the sample automation, you need two Windows desktop applications:
- Notepad: a standard simple Windows text editor.
- The FAR file manager: a legacy console-based file manager. It is selected because it emulates work with legacy "blue" mainframe AS400-like applications.
View scenario
- Open Notepad and type "Now we will switch to FAR, navigate to
C:/Users, and use OCR to capture area with a list of users and to fetch text." - Open FAR and navigate to
C:/Users. - Use Recorder to cut an image with the area containing the list of users. For an anchor, use some FAR text shown on all cases. Generate the code using Recorder and modify it to work in the Java
TransactionSupplierclass. - Switch back to Notepad and type out the OCRed list of users.
- In Notepad, type "Now we will switch back to FAR and click All Users using the Image as Target for the click."
- Switch to FAR and click.
- Use the list of the parsed users to set them as names of Documents for one ODF Transaction.
Set up sample automation
- Download
example-rpa-notepad-far-automation.zip. - Unzip the archived sample.
- Launch RPA Recorder from IA Cloud Developer.
- Import a recorder script. In the Media Files panel, right-click and select Import > WorkFusion Recorder > Recorder Script and select the link to the attached example project to import.
- Open the example project in IDEA IDE.
- Install FAR Manager into the
C:/FARfolder as hardcoded in the project's script. You can download the Far Manager v3.0 build 5700 x64 MSI installer for free. Make sure you use MSI and install it intoC:/FAR. - Start OCR from IA Cloud Developer, as the sample uses OCR.
Explore sample
You get the Maven project with two Maven modules and the Recorder project (
recorder_project).To open the Recorder project to learn, explore, and execute script actions, double-click the
notepad-far-automation.rpaefile.In the rpa-notepad-far-automation-bcb module, review classes with the ODF and RPA Java code:
com.wf.mixedRpaExp.task.ExampleBotTaskExpand the class
    package com.wf.mixedRpaExp.task;

    import com.workfusion.odf2.compiler.BotTask;
    import com.workfusion.odf2.core.task.AdHocTask;
    import com.workfusion.odf2.core.task.TaskInput;
    import com.workfusion.odf2.core.task.output.TaskRunnerOutput;
    import com.workfusion.odf2.core.webharvest.BindingReader;
    import com.workfusion.odf2.core.webharvest.rpa.RpaDriver;
    import com.workfusion.odf2.core.webharvest.rpa.RpaFactory;
    import com.workfusion.odf2.core.webharvest.rpa.RpaRunner;
    import com.workfusion.rpa.helpers.RPA;

    import javax.inject.Inject;
    import java.util.List;

    @BotTask(requireRpa = true)
    public class ExampleBotTask implements AdHocTask {

    private static final String FIRST_NOTEPAD_MESSAGE = "Now we will switch to FAR, navigate to C:/Users and use OCR \nto capture area with list of users and fetch text\n\n";
    private static final String SECOND_NOTEPAD_MESSAGE = "\n\nNow we will switch back to FAR and click on All Users \nusing Image as Target for click";

    final RpaRunner rpaRunner;

    private final String ocrApiUrl;

    private final Logger logger;
    @Inject
    public ExampleBotTask(RpaFactory rpaFactory, BindingReader bindingReader){
         this.rpaRunner = rpaFactory
                 .builder(RpaDriver.UNIVERSAL)
                 .closeOnCompletion(true)
                 .build();
         this.ocrApiUrl = bindingReader.getVariable("ocrApiUrl").toString();
    }

    @Override
    public TaskRunnerOutput run(TaskInput taskInput) {

        rpaRunner.execute(d->{
        this.performJob();
        });

        return taskInput.asResult()
        .withColumn("example_bot_task_output", "completed_successfully");
    }

     public void performJob(){

        NotepadRobot notepadRobot = new NotepadRobot();
        notepadRobot.openNotepad();
        notepadRobot.printMessage(FIRST_NOTEPAD_MESSAGE);

        //Run FAR, navigate to C:/Users and use OCR to capture area with list of users
        FarRobot farbot = new FarRobot("C:\\FAR");
        farbot.openFar();

        final List<String> users = farbot.recognizeUsers(ocrApiUrl);

        //Print list of users and the second message to Notepad
        notepadRobot.printMessage(String.format("Users: %s", String.join(", ", users)));
        RPA.sleep(300);
        notepadRobot.printMessage(SECOND_NOTEPAD_MESSAGE);

        //Double click on All Users using Image as Target for click
        farbot.doubleClickAllUsersFolderByImage();

        RPA.sleep(3000);

        //Close FAR and Notepad
        farbot.close();
        notepadRobot.close();
     }

}
com.wf.mixedRpaExp.task.FarRobotExpand the class
  package org.example.rpa;

  import java.util.Arrays;
  import java.util.List;

  import org.openqa.selenium.Rectangle;

  import com.workfusion.rpa.helpers.Ocr;
  import com.workfusion.rpa.helpers.RPA;
  import com.workfusion.studio.rpa.recorder.api.StringTransformations;
  import com.workfusion.studio.rpa.recorder.api.WindowDescriptor;

  import static com.workfusion.rpa.helpers.RPA.$;
  import static com.workfusion.rpa.helpers.RPA.pressEnter;
  import static com.workfusion.rpa.helpers.RPA.sendKeys;
  import static com.workfusion.rpa.helpers.RPA.switchToExistingWindow;
  import static com.workfusion.rpa.helpers.RPA.title;
  import static com.workfusion.rpa.helpers.UiSelectors.byImage;

  public class FarRobot {

      // Modify those URLs to point to the APNG files you put into your file storage
      private final String FAR_IMAGE_OCR_LINK = "http://localhost:15110/doc-upload/1614612014683-anchor-1614612014912.apng";
      private final String FAR_IMAGE_CLICK_LINK = "http://localhost:15110/doc-upload/1614612014683-anchor-1614614100259.apng";

      private final String farPath;

      private String title;

      public FarRobot(String farPath) {
          this.farPath = farPath;
      }

      public void openFar() {
          sendKeys(StringTransformations.getHotKeyText(114, 4));
          switchToExistingWindow(new WindowDescriptor("#32770", "Run", false, false).toString(), 10000L);
          sendKeys("C:\\FAR\\Far.exe");
          pressEnter();

          switchToExistingWindow(new WindowDescriptor("ConsoleWindowClass", String.format("{%s} - Far 3.0.5700.0 x64", farPath.replaceAll(
                  "\\\\Far[.]exe", "")), false, false).toString(), 10000L);
          this.title = title();
      }

      public void changeDirectory(String path) {
          switchToFar();
          sendKeys(String.format("cd %s", path));
          pressEnter();

          this.title = title();
      }

      public List<String> recognizeUsers(String ocrApiUrl) {
          if (!title.contains("C:\\Users")) {
              changeDirectory("C:\\Users");
          }

          final Rectangle rectangle = $(byImage(FAR_IMAGE_OCR_LINK)).getRect();
          final String ocrResult = Ocr.proccessImage(ocrApiUrl, "English", rectangle.x + -120, rectangle.y + 60, 194, 172);

          return Arrays.asList(ocrResult.split(System.lineSeparator()));
      }

      public void doubleClickAllUsersFolderByImage() {
          switchToFar();
          if (!title.contains("C:\\Users")) {
              changeDirectory("C:\\Users");
          }

          $(byImage(FAR_IMAGE_CLICK_LINK, -189, 91)).doubleClick();
          RPA.sleep(3000);
          this.title = title();
      }

      public void close() {
          switchToFar();
          RPA.close();
      }

      private void switchToFar() {
          if (!title().equals(title)) {
              switchToExistingWindow(new WindowDescriptor("ConsoleWindowClass", title, false, false).toString(), 10000L);
          }
      }

  }
com.wf.mixedRpaExp.task.NotepadRobotExpand the class
     package org.example.rpa;

     import com.workfusion.rpa.helpers.RPA;
     import com.workfusion.studio.rpa.recorder.api.WindowDescriptor;

     import static com.workfusion.rpa.helpers.RPA.$;
     import static com.workfusion.rpa.helpers.RPA.open;
     import static com.workfusion.rpa.helpers.RPA.pressEnter;
     import static com.workfusion.rpa.helpers.RPA.sendKeys;
     import static com.workfusion.rpa.helpers.RPA.switchToExistingWindow;
     import static com.workfusion.rpa.helpers.RPA.title;

     public class NotepadRobot {

        private String title;

     public void openNotepad() {
        this.title = "Untitled - Notepad";

        open("notepad");
        switchToExistingWindow(new WindowDescriptor("Notepad", title, false, false).toString(), 10000L);
     }

    public void printMessage(String message) {
         switchToNotepad();
         $("[CLASS:Edit]").click();
         sendKeys(message);
         pressEnter();

         this.title = title();
    }

    public void close() {
         switchToNotepad();
         RPA.close();
         switchToExistingWindow(new WindowDescriptor("#32770", "Notepad", false, false).toString(), 10000L);
         $("[CLASS:Button; NAME:CommandButton_7]").click();
    }

    private void switchToNotepad() {
         if (!title().equals(title)) {
             switchToExistingWindow(new WindowDescriptor("Notepad", title, false, false).toString(), 10000L);
         }
    }

}
In IDEA IDE, find
ExampleBotTaskTestinmixedRpaExp\mixedRpaExp-bcb\src\test\java\com\wf\mixedRpaExp\taskto execute the example. Kindly remove@Disabledannotation for successful run. Refer this for writing test cases for bot tasks.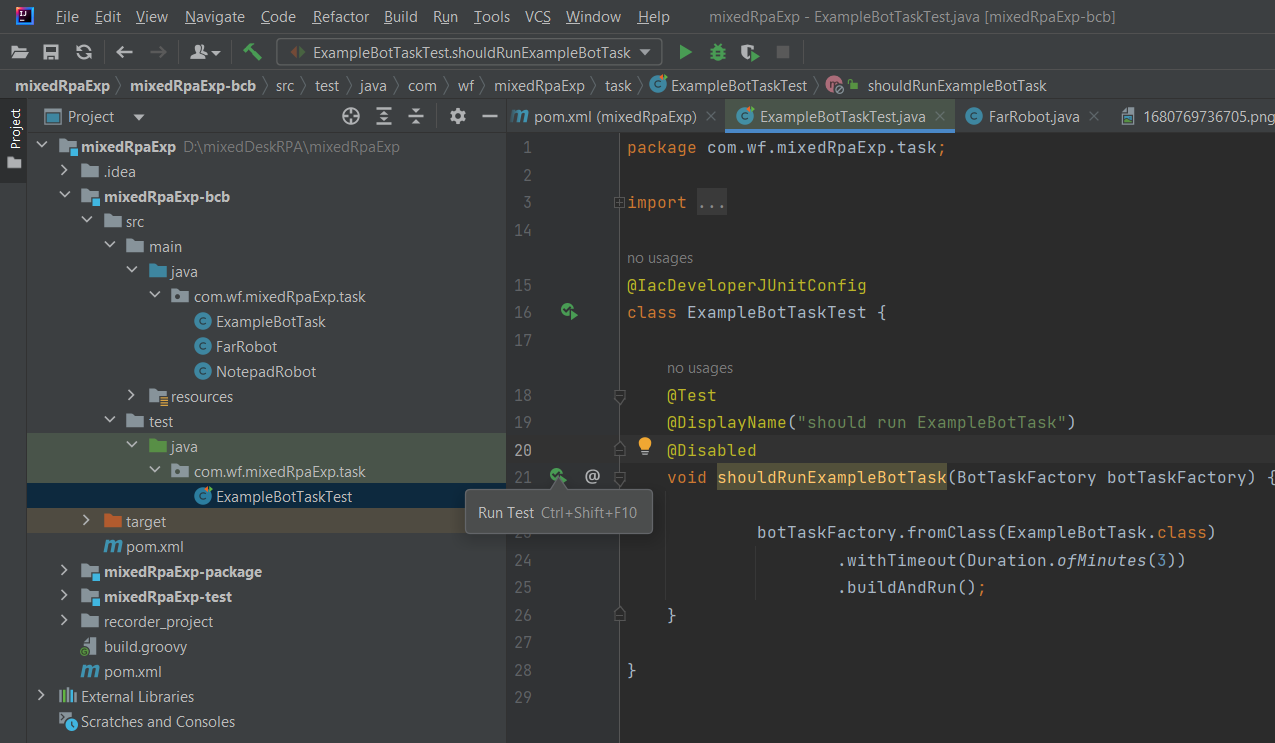
Reuse generated code in ODF 2
Prepare APNG files
You can get ANPNG files from the Recorder project or the image folder in the generated project. These files contain a screenshot and the position anchor region.
To access APNG files from Control Tower, upload them to S3 (Minio) and use the link as the file path.
The Minio file storage is a part of IA Cloud Developer installed on your workstation. To use it, perform the following steps:
- Open Launcher and start the Control Tower & WorkSpace group.
- Navigate to http://localhost:15110/minio/.To log in, use the credentials you have set during the IA Cloud Developer installation.
- Upload files and generate URLs for both.
- Type URLs into the
mixedRpaExp.task.FarRobotclass.
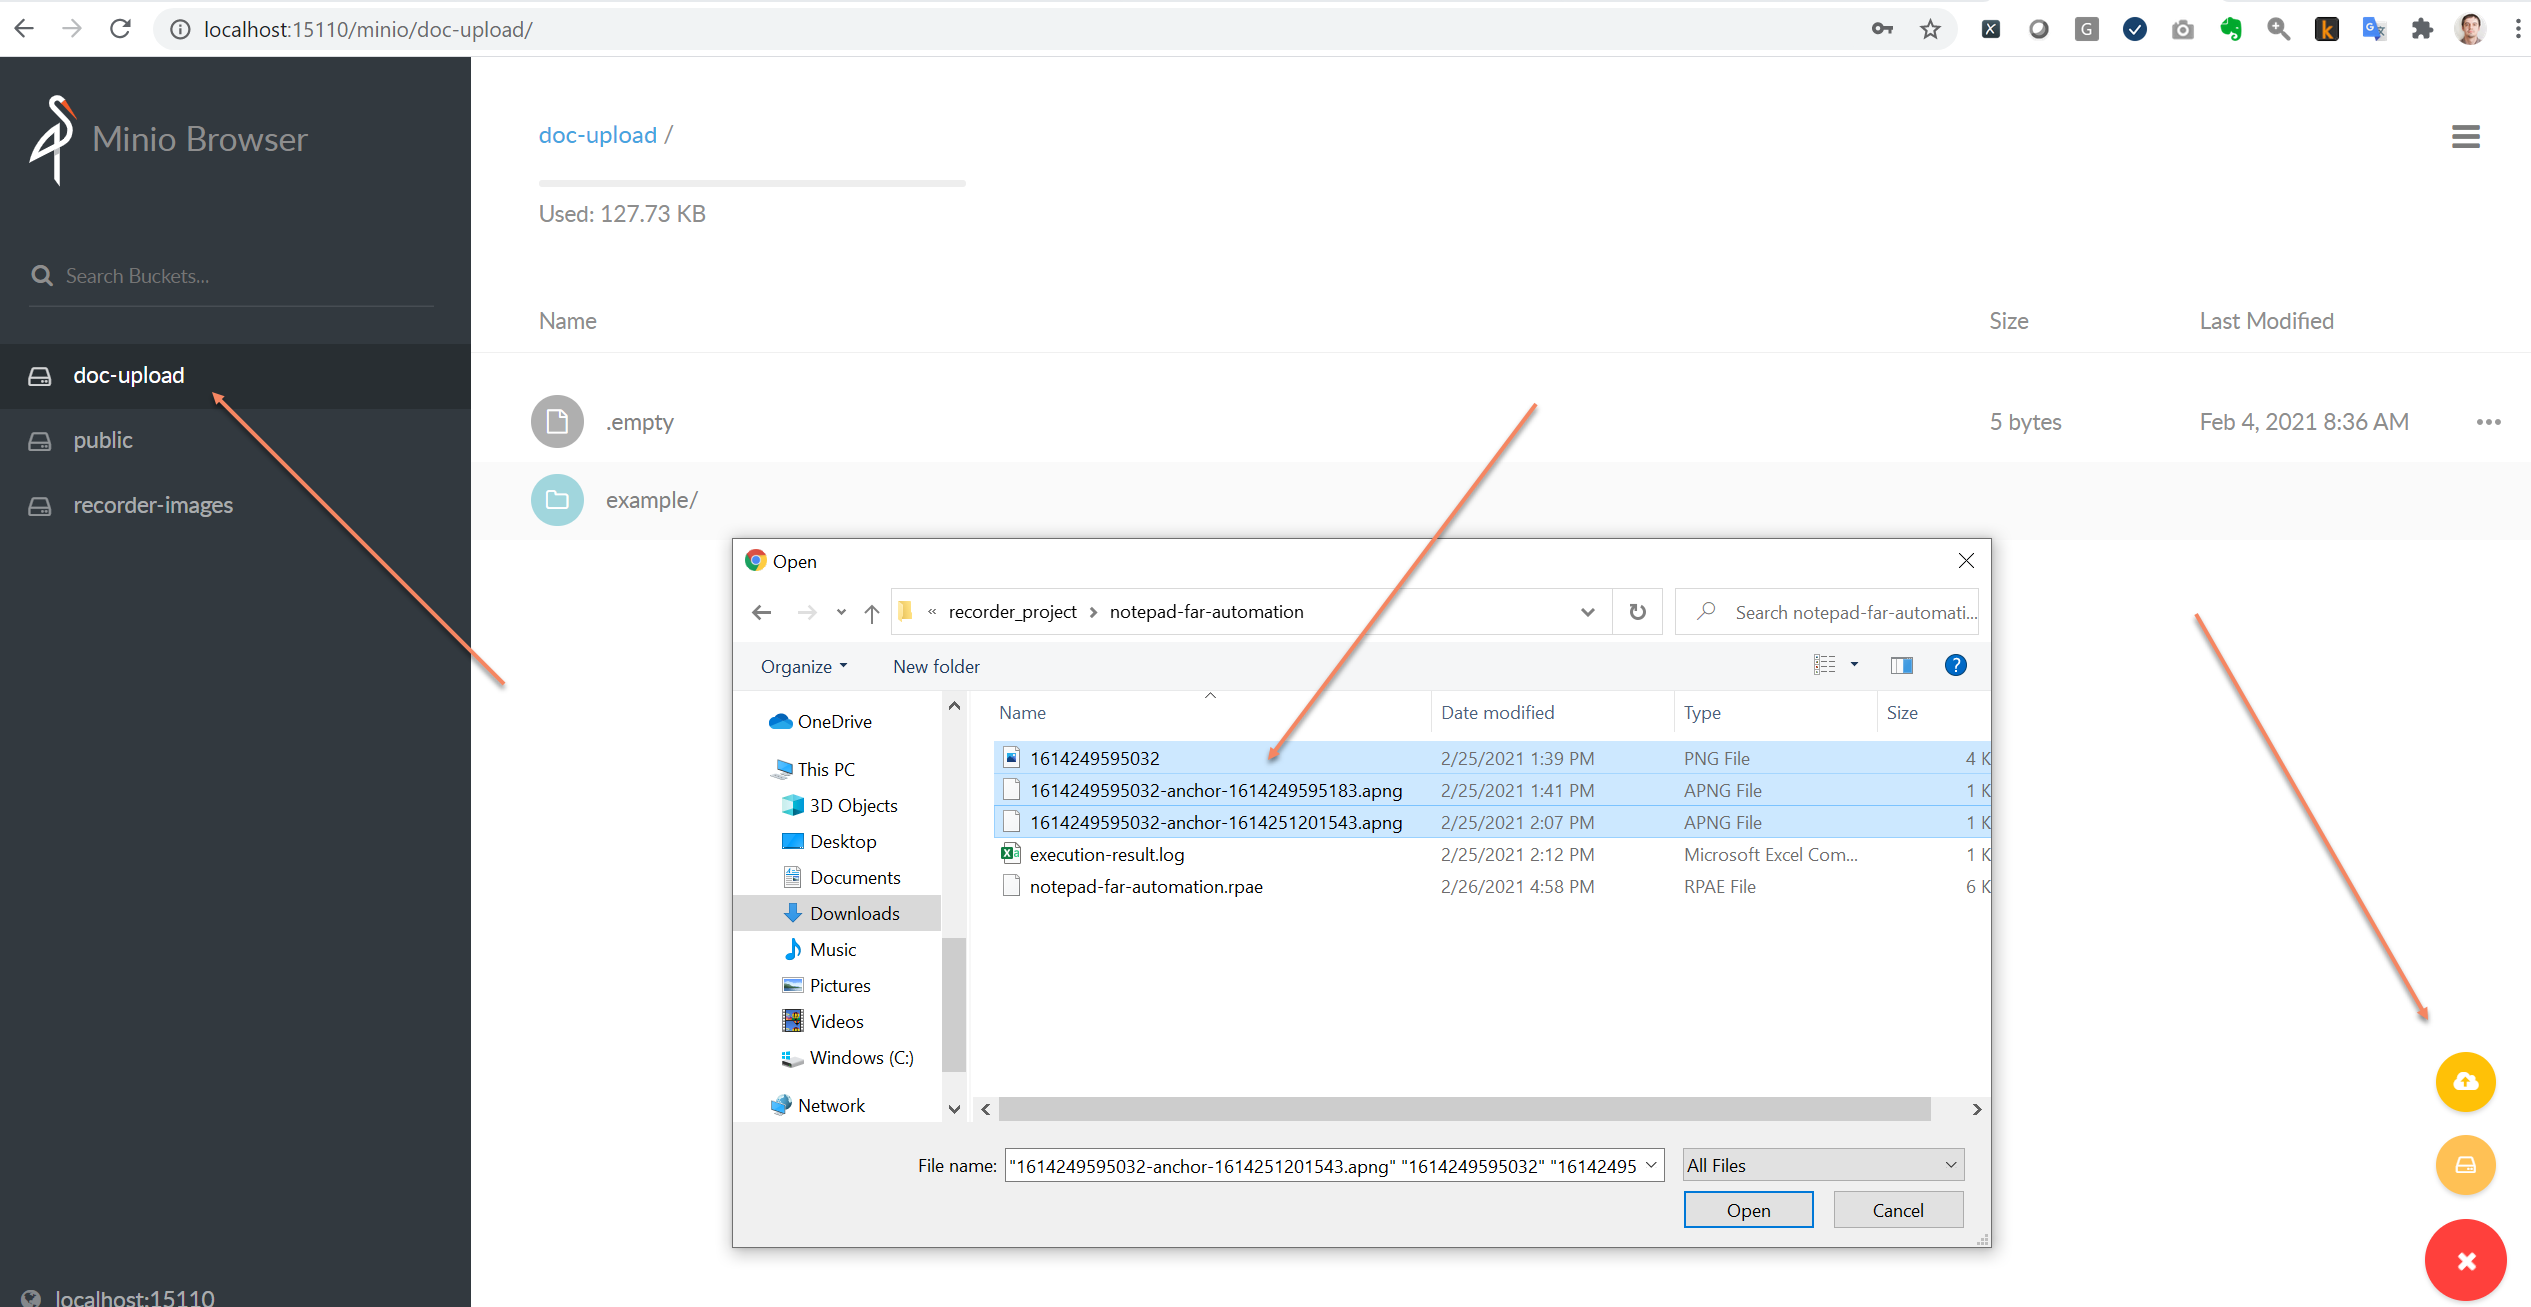
In the project, links to files are presented in the FarRobot class as the FAR_IMAGE_OCR_LINK and FAR_IMAGE_CLICK_LINK variables.
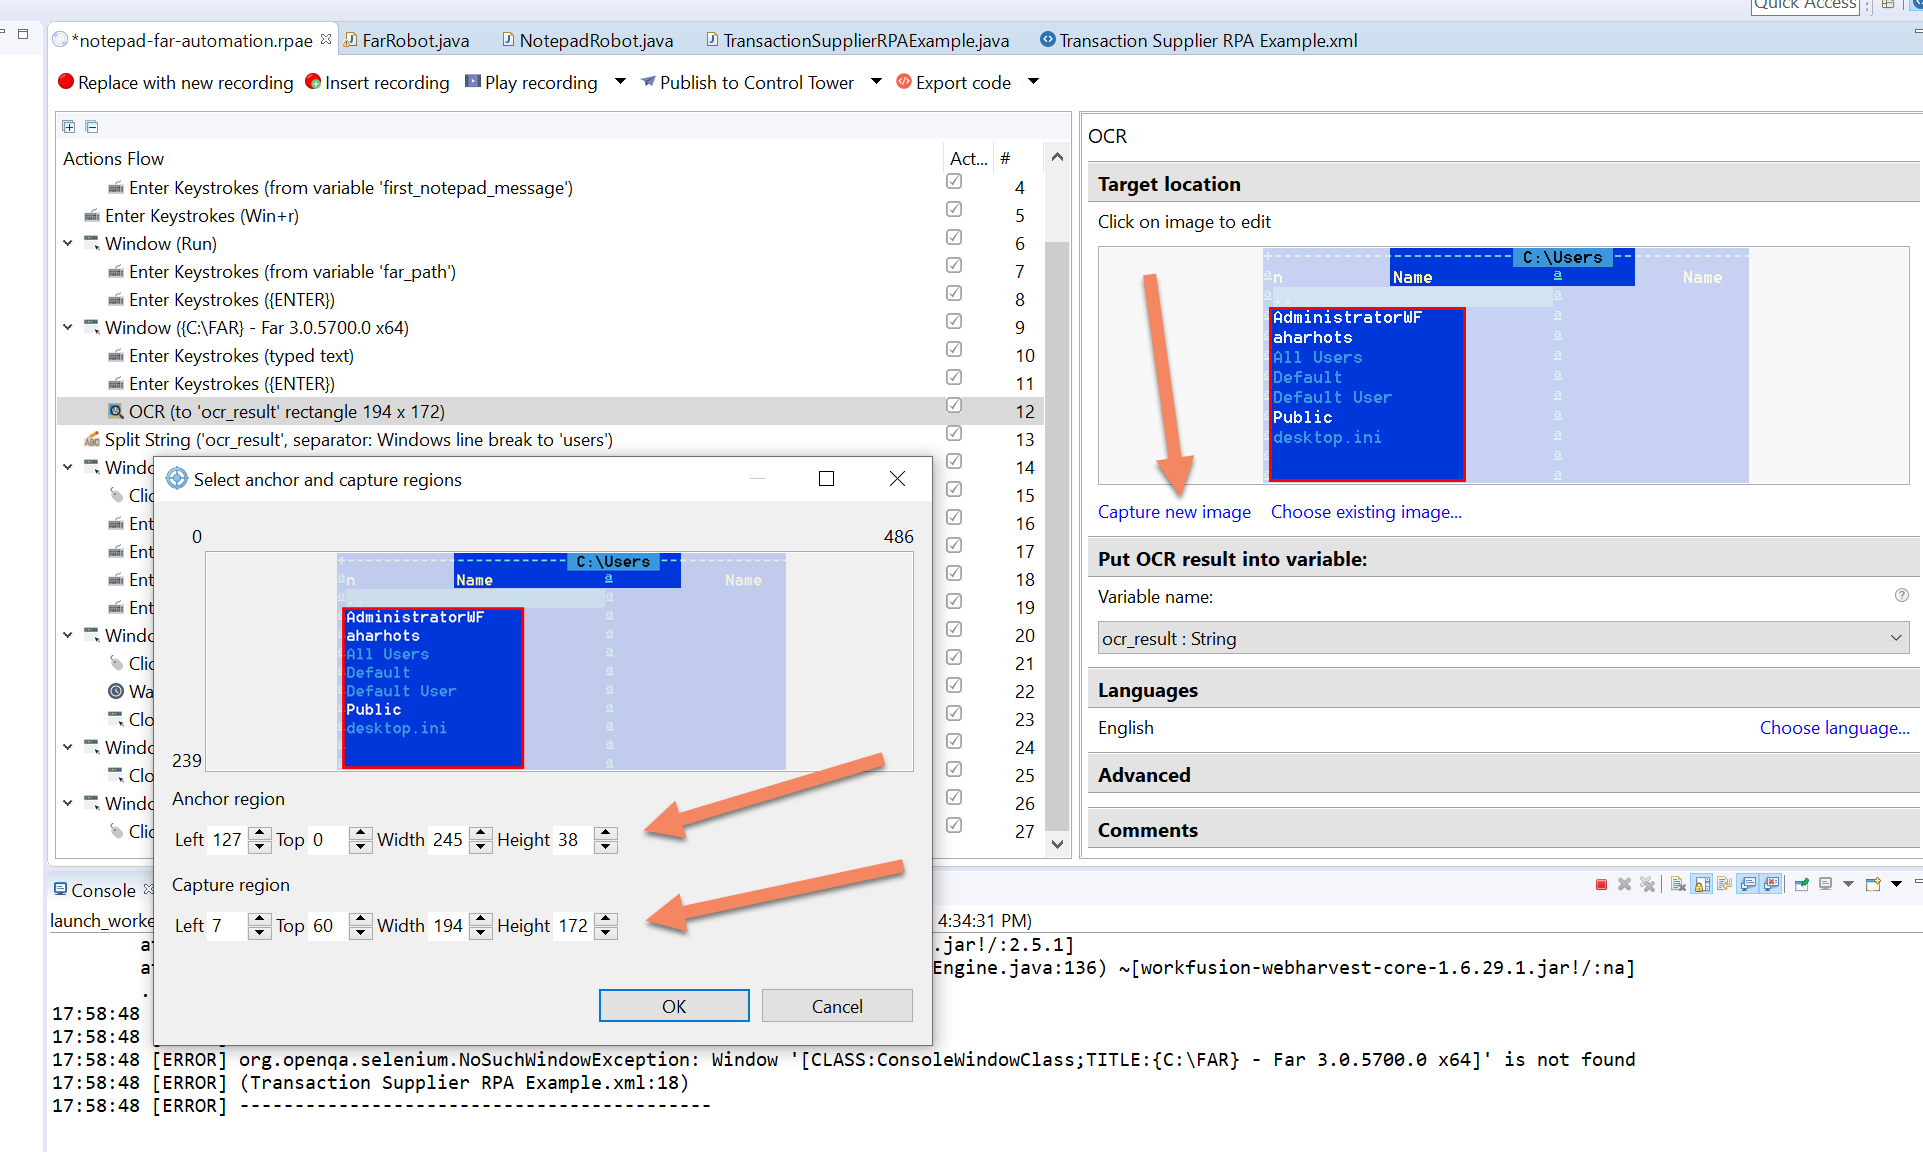
The FAR manager can look differently for different OS versions. To make the sample work, switch to the Recorder perspective, find the OCR action (line 12), and capture a new image of FAR in your system.
A similar issue can occur for the Mouse Click action (line 21). Add new APNG images to MinIO, generate their URLs, and use them in mixedRpaExp.task.FarRobot.
Perform OCR step
The generated OCR code looks like this:
org.openqa.selenium.Rectangle i0 = $(byImage("C:\\Users\\username\\workfusion-workspace\\rpa-notepad-far-automation\\images\\1614249595032-anchor-1614249595183.apng")).getRect()
ocr_result = RString.of(Ocr.proccessImage(sysOcrApiUrl.toString(), "English", i0.x + -92, i0.y + 32, 229, 272))
As you can see, to get the OCR result, you have to get the Rectangle object from the APNG file and call the OCR API with the OCR language and coordinates.
After you upload the required files to S3 and add a method to get the path to the resource file, you can create a Rectangle object using the following code:
final Rectangle rectangle = $(byImage(FAR_IMAGE_OCR_LINK)).getRect();
The second value you should get is ocrApiUrl. It is stored in the binding values. To access the binding, inject it into the supplier. The following code shows how to get ocrApiUrl:
@Inject
public TransactionSupplierRPAExample(Binding binding) {
    //Get "ocrApiUrl" from binding
    this.ocrApiUrl = binding.getVariable("ocrApiUrl").toString();
}
Now, you have all required variables to call OCR from ODF 2:
final String ocrResult = Ocr.proccessImage(ocrApiUrl, "English", rectangle.x + -92, rectangle.y + 32, 229, 272);
If you compare the generated code and the ODF 2 code, you can see that they are similar.
Let's go back to the sample ODF 2 project and look at the OCR step implementation. The recognizeUsers method in the FarRobot class recognizes the username in the C:/Users folder from the FAR screen and returns a list of usernames.
public List<String> recognizeUsers(String ocrApiUrl) {
    if (!title.contains("C:\\Users")) {
        changeDirectory("C:\\Users");
    }

    final Rectangle rectangle = $(byImage(FAR_IMAGE_OCR_LINK)).getRect();
    final String ocrResult = Ocr.proccessImage(ocrApiUrl, "English", rectangle.x + -92, rectangle.y + 32, 229, 272);

    return Arrays.asList(ocrResult.split(System.lineSeparator()));
}
Perform click-by-image step
The generated code for the click-by-image step looks like this:
$(byImage("C:\\Users\\username\\workfusion-workspace\\rpa-notepad-far-automation\\images\\1614249595032-anchor-1614251201543.apng", Integer.valueOf(-193), Integer.valueOf(41))).doubleClick()
As you can see, in the step, you use the byImage method, but in this case, the method receives two additional parameters: the coordinates for the click. To implement this step in an ODF project, use the following code:
$(byImage(FAR_IMAGE_CLICK_LINK, -193, 41)).doubleClick();
Find the implementation of this action in the doubleClickAllUsersFolderByImage method in the FarRobot class:
public void doubleClickAllUsersFolderByImage() {
    switchToFar();
    if (!title.contains("C:\\Users")) {
        changeDirectory("C:\\Users");
    }

    $(FAR_IMAGE_CLICK_LINK, -193, 41)).doubleClick();
    RPA.sleep(1000);
    this.title = title();
}