
Use File Storage as transactions source
Download sample project
Download project odf_file_storage_9.2.2.5.zip
Learn how to input to application from S3 file ODF
note
To make it easier to understand the essential classes and interfaces, we recommend to download and import this example project into your WorkFusion Studio and refer to it as you read this guide.
The downloaded project must have the file structure below.
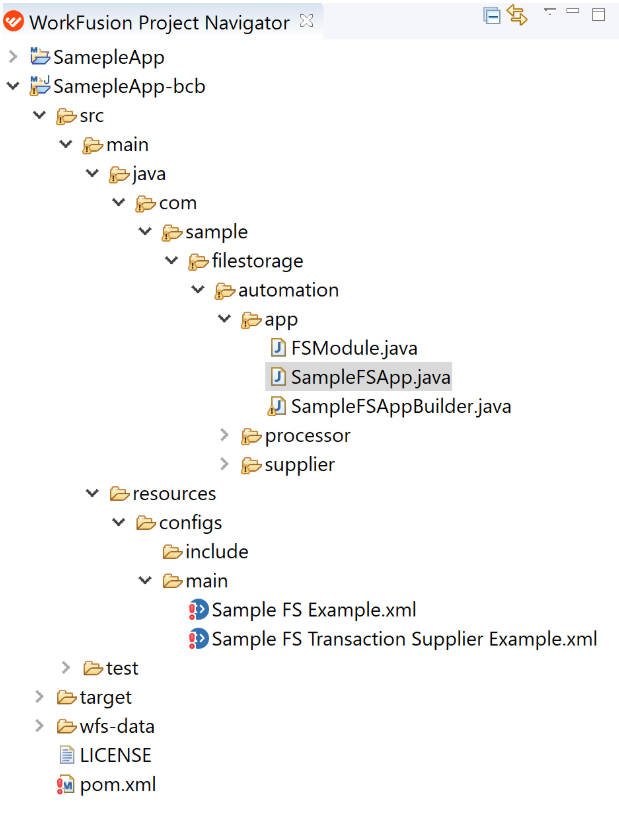
As soon as you have downloaded the project, perform the following actions.
Change the version number in process > pom.xml.
Run
mvn clean installandmvn deployon parent pom.xml. This deployment depends on your Nexus repository configuration.If you followed the standard guide, it would point to your local installation:
<bot.repository.url>https://repository.workfusion.com/service/local/repositories/wf-machine-config-bundle/content/</bot.repository.url>If you followed the guide for custom local Nexus installation, it would point to your local Nexus. You will need to add changes in your pom.xml and settings.xml files for this.
<bot.repository.url> (your custom url) </bot.repository.url>
Once the build is reflected in Nexus, upload the bots into the local Control Tower. Go to Bot Configurations > Import from repository. You can build your business process by selecting a bot task from the list.
Learn TransactionSupplier
In this case, TransactionSupplier is TransactionSupplierImpl.java.
Navigate to the following files:
src > main > java > com > sample > filestorage > automation > supplier > TransactionSupplierImpl.javasrc > main > resources > configs> main > Sample FS Transaction Supplier Example.xml
This is the bot task that triggers the execution of the TransactionSupplier class mentioned in [1].
The following code in the bot task initializes the task of creating transactions.
def app = SampleFSApp.init(binding).get();
def transactions = app.loadTransactions(TransactionSupplierImpl.class);
Transactions are created for each row present in the .csv file in the "fs-odf-demo" S3 bucket. In order to read the file, the S3Manager class is used. S3Manager is a utility in ODF to perform file-based operations in S3 and interact with your local file system.
Execution flow inside Collection<Transaction> get() method
The following steps describe the execution flow inside the Collection<Transaction> get() method. Refer to the code for TransactionSupplierImpl.java.
- Using the
s3Manager.getFile(url)method, the uploaded file in the S3 bucket is read andInputStreamof the file is returned. - The
BufferedReaderobject is created usingInputStream. - Each line of the file is read using the
readLine()method ofBufferedReaderwhile loop. - An ODF transaction is created for each line in the .csv file except for the header line ("first_name", "last_name", "email").
- The line is split by the delimiter "," and the values for the column names are extracted.
- The extracted values are inserted into transaction attributes using the
transaction.putAttribute()method.
Work with File Storage
Learn S3Manager
As mentioned earlier, S3Manager is a utility class provided by ODF to interact with S3 File Storage.
This class is deprecated from version 10 onwards. Use com.workfusion.rpa.core.plugin.s3.S3PluginAdapter for higher versions.
Basic file operations:
String uploadFileToS3(String bucket, byte[] data2Upload, String fileName, String contentType– uploads a file to the given S3 bucket using the given byte array,fileName, andcontentType. Another option is to use theputFile()method here.List<String> listFiles(String path, String filter)– lists allfileNamesin a given S3 bucket.String getS3FileUrl(String fileName)– obtains URL for the givenfileName.InputStream getFile(String url)– reads the file mentioned by the URL and returnsInputStream.deleteFile(String url)– deletes the file mentioned by the URL.byte[] getContent(String url)– gets the file content in the byte array format.