
Troubleshoot server ODF
The guide targets IT Operations Support Engineers who own the IA Cloud Enterprise environment. Those engineers are expected to be equipped with access permissions to configure servers for the Open Development Framework.
Patch Control Tower - 9.2.0 | 9.2.1
The patch is available for versions 9.2.0 and 9.2.1 only. For other versions, skip the Patch Control Tower step.
The patch doesn't bring any new libraries or modify existing API or interfaces, thus doesn't require security re-assessment. Internally, it changes the BCB import logic: Bot Tasks (as well as the Java code used) originally taken from BCB are updated in case of a new version of BCB pulled from Nexus.
- Stop Control Tower.
wfmanager stop workfusion - Go to /opt/workfusion/workfusion/webapps and back up the workfusion.war file.
- Replace workfusion-service-9.2.0.x.jar in /opt/workfusion/workfusion/webapps/workfusion.war (unpack the WAR archive, replace the JAR inside WEB-INF/lib, and pack it back to WAR).
- For v9.2.0, replace it with workfusion-service-9.2.0.3.jar
- For v9.2.1, replace it with workfusion-service-9.2.0.5.jar
- Remove the folder /opt/workfusion/workfusion/webapps/workfusion.
- Start Control Tower.
wfmanager start workfusion
As a result, workfusion.war will be unpacked with the required dependency.
Copy WorkFusion dependency JARs
This step is optional. If you can access (and this is allowed by your company policies) WorkFusion public Nexus https://repository.workfusion.com during the automation project, use it. By default, WorkFusion archetypes generate Maven projects pointed into WorkFusion public Nexus. So, if you need to switch into your company's Nexus:
- Complete 2-5 steps to get your company's Nexus prepared.
- After generating a project from the WorkFusion archetype, change Nexus URLs in the root
pom.xml.
tip
We recommend using Nexus Repository Manager OSS 2.14.12-01. The latest Nexus versions store files in the internal database instead of the file
system. Thus, it is not possible to manually put the number of dependencies using a simple copy.
Download archived WorkFusion dependencies:
Create the wf-dependencies repository in your on-premise Nexus server (similar to the public one we provide for the ODF enablement https://repository.workfusion.com/content/repositories/wf-dependencies/).
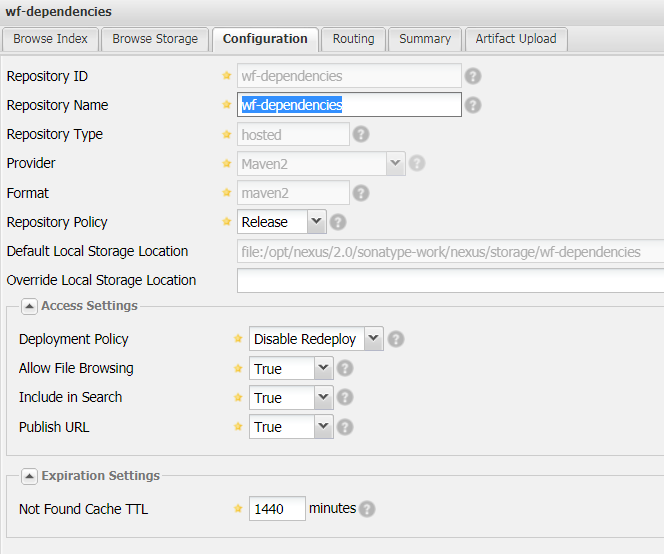 As a result, the following folder will be created on the server:
 /opt/nexus/2.0/sonatype-work/nexus/storage/wf-dependencies.Upload
wf-dependencies.odf-X.X.X.X.zipinto the server and unzip the archive into/opt/nexus/2.0/sonatype-work/nexus/storage/wf-dependencies.Nexus OSS 2 which installs with each IA Cloud Enterprise installation allows adding any number of JARs via direct copying on the server file system. You will need SSH access on the DB server and root permissions to put dependencies manually.
The commands which may help you are as follows
How to upload to Nexus server
scp -i id_rsa wf-dependencies-X.X.X.X.zip username@dbserver.company.com:/home/usernameid_rsais your public security key for SSH access. Ask your company IT for SSH access and proper command..zip will be in
/home/username/on the server.SSH connect to Nexus server
ssh -i id_rsa username@dbserver.company.comHow to decompress folder
unzip -r /home/username/dependencies-X.X.X.X.zip /opt/nexus/2.0/sonatype-work/nexus/storage/wf-dependenciesThe default server folder where Nexus stores JARs for repositories is
/opt/nexus/2.0/sonatype-work/nexus/storage. You may also need to confirm that with your company IT.Copy to repository folder
cp -a /home/username/wf-dependencies/. /opt/nexus/2.0/sonatype-work/nexus/storage/wf-dependenciesChange all dependencies permissions
In order for Nexus to have full control on JARs which you manually copied, you need to change the group and owner to
nexusfor all the copied files.cd /opt/nexus/2.0/sonatype-work/nexus/storage/wf-dependencies sudo chgrp -R nexus * sudo chown -R nexus *
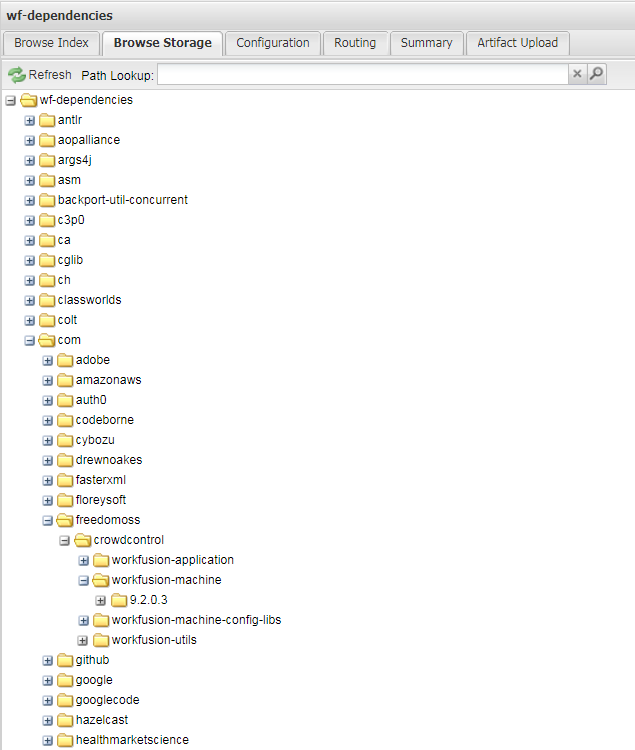
- Browse the wf-dependencies repository via Nexus UI to make sure it shows folders with JARs
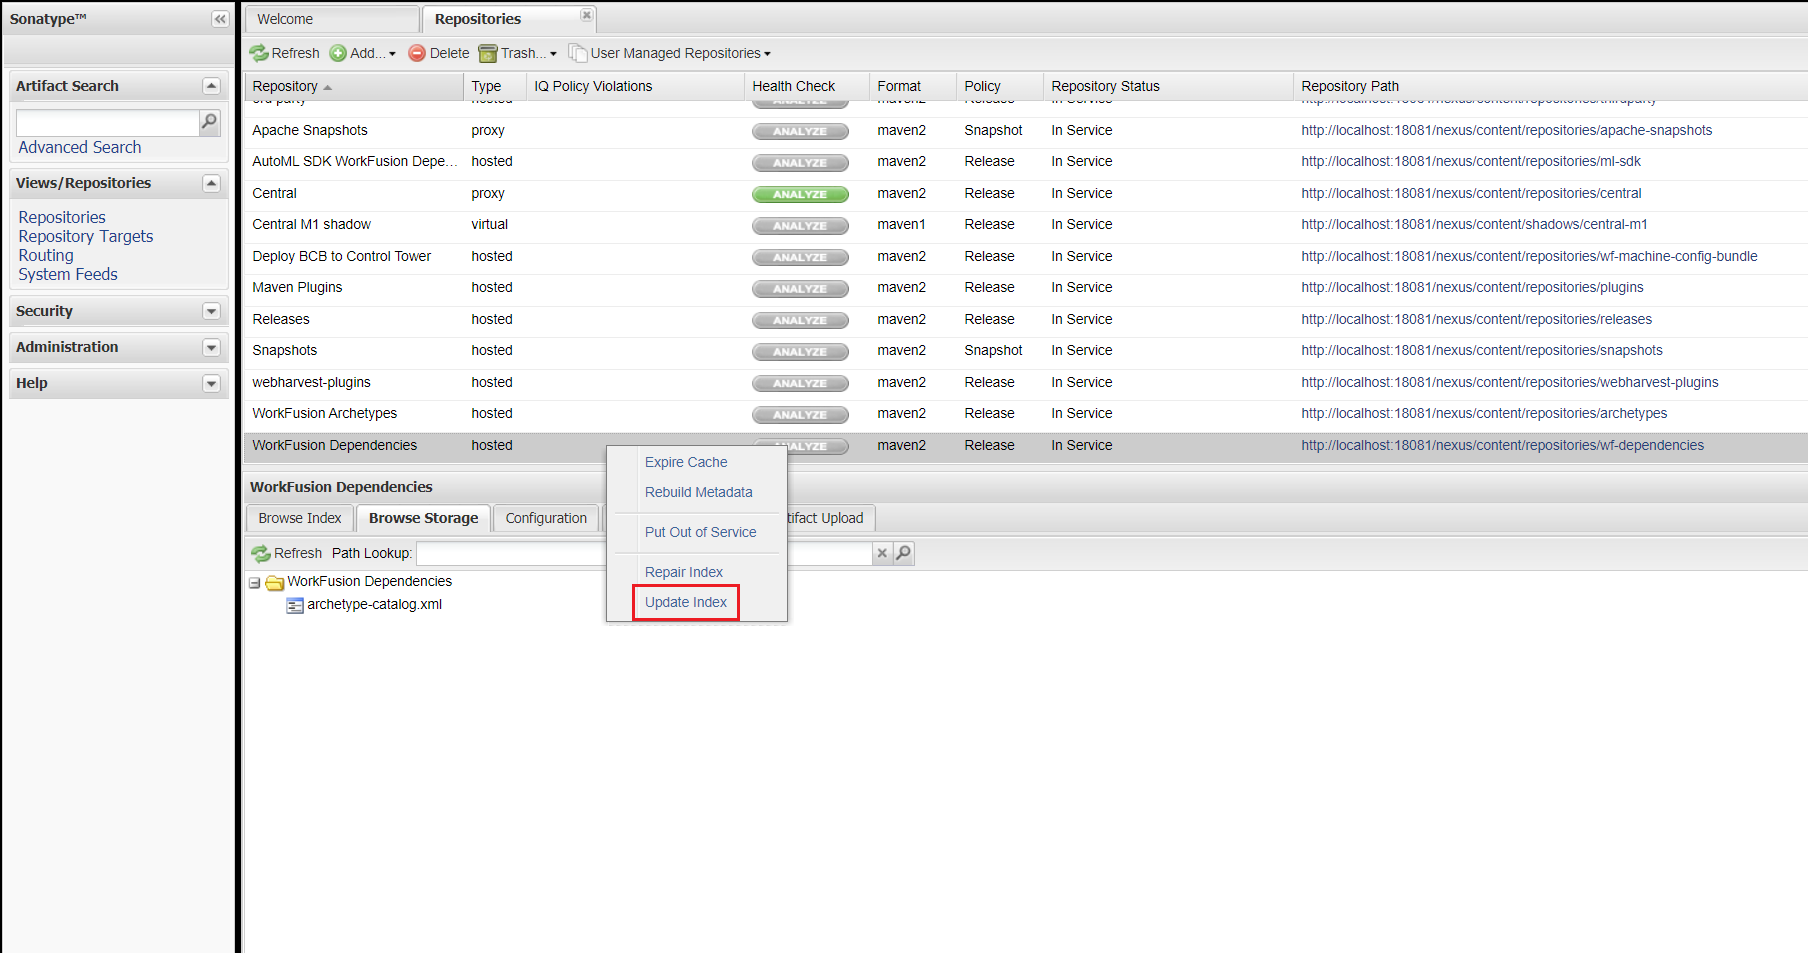
- Right-click on the wf-dependencies repository via Nexus UI. Click Update Index to make Nexus aware of file system changes. To do that, you need to have Administrator privileges on Nexus.
Control Tower sync repository configuration
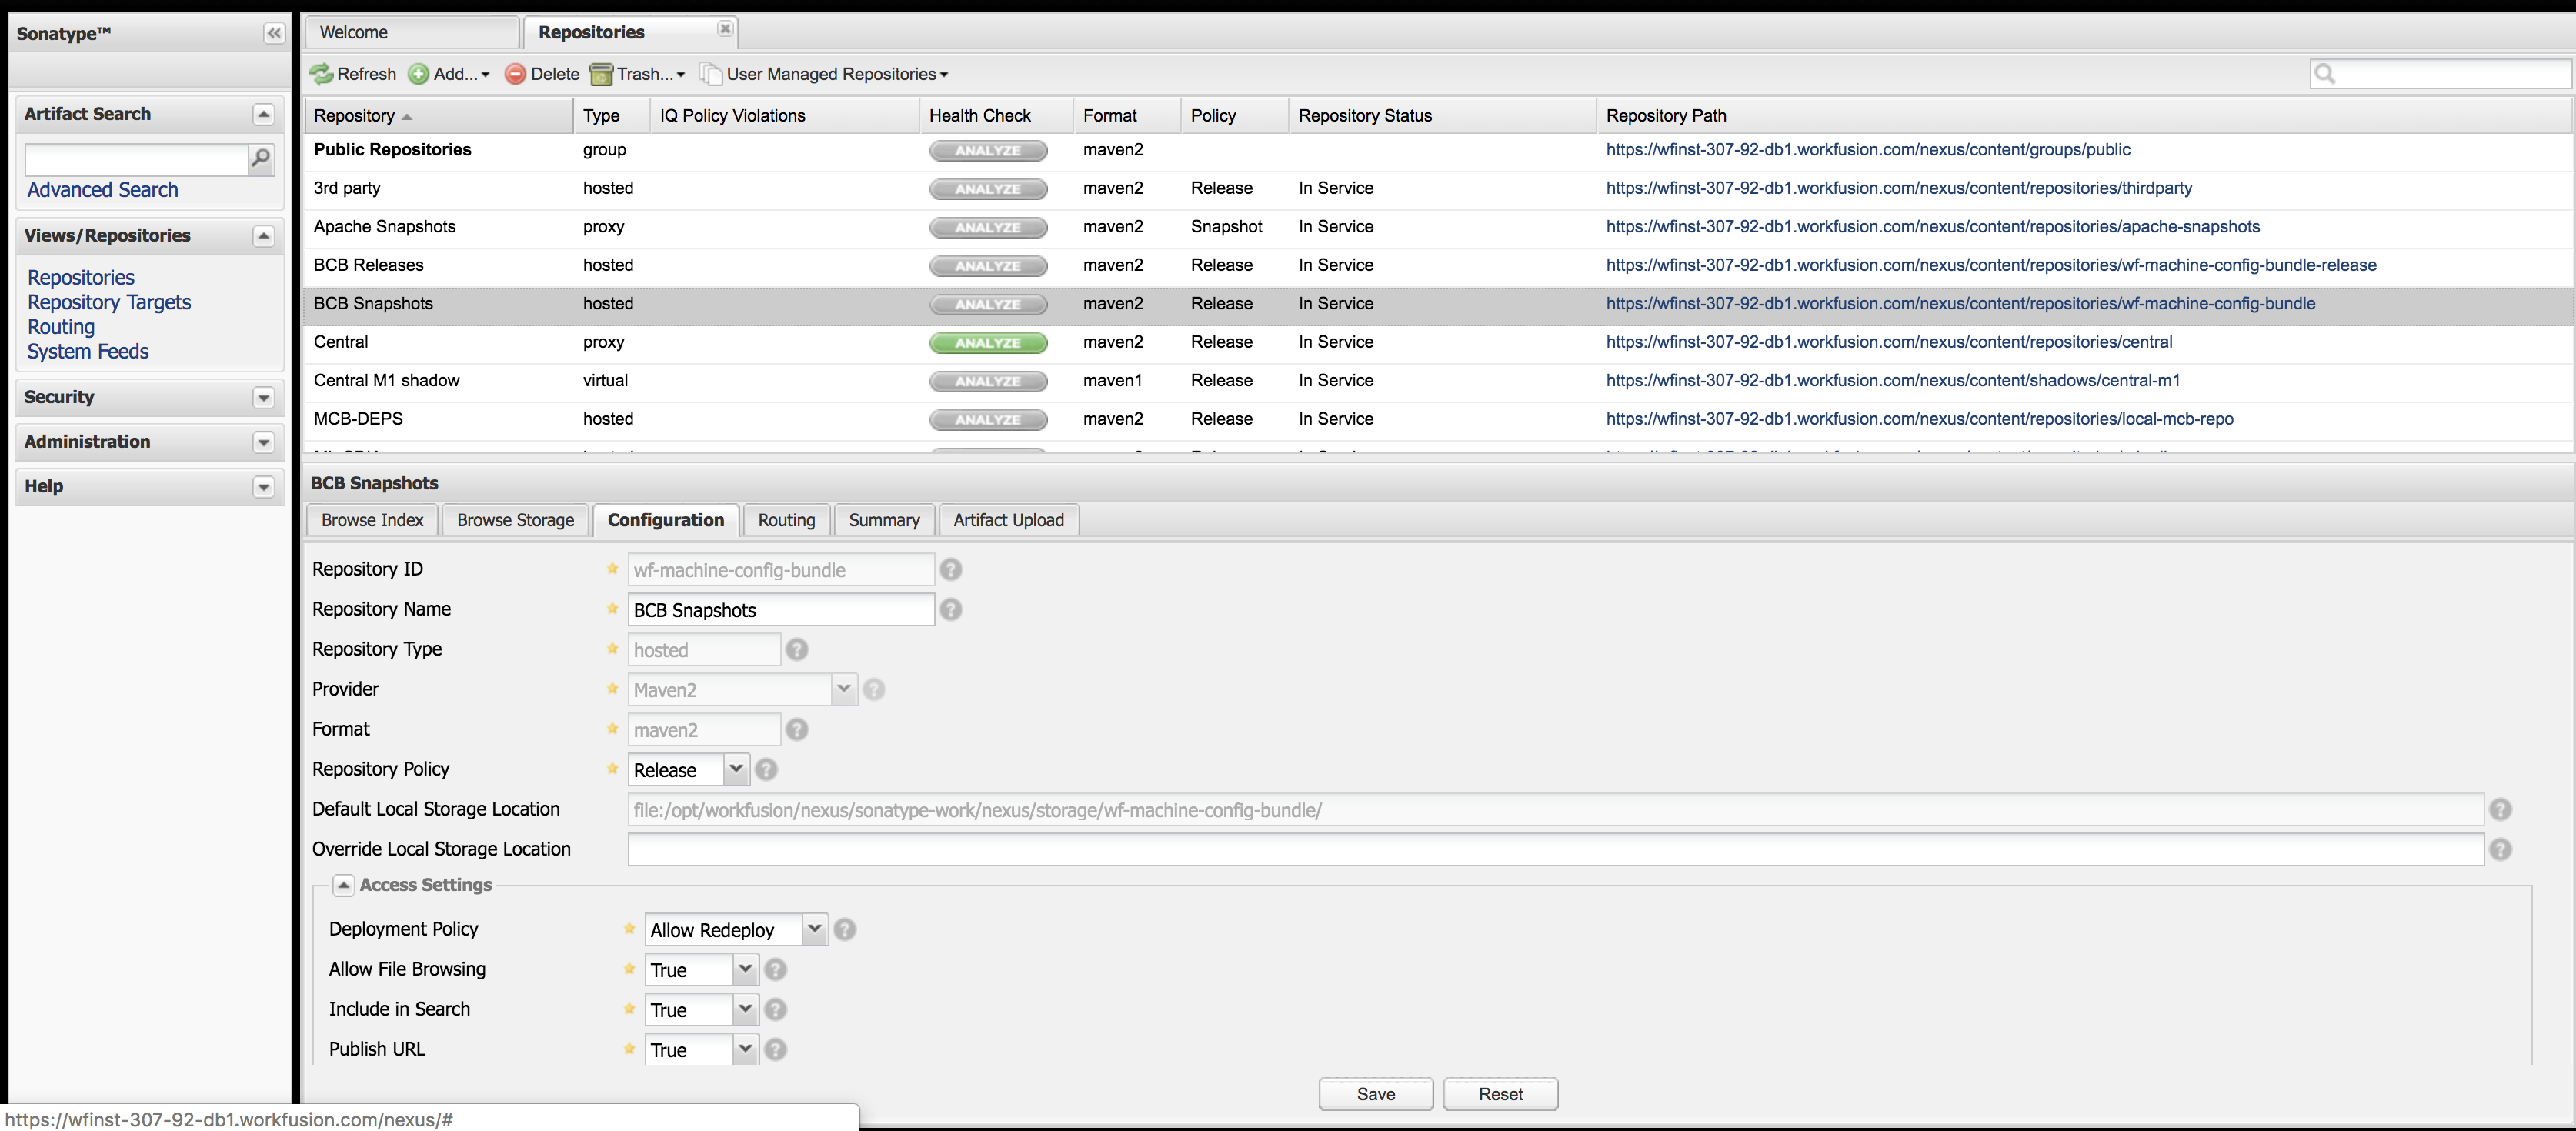
During standard IA Cloud Enterprise environment installation, Nexus is being installed with a pre-configured wf-machine-config-bundle repository. This repository is used for deployment of BCB JARs from WorkFusion Studio to Control Tower. Any BCB JAR existing in this repo will be fetched by Control Tower configured with this Nexus. After the JAR fetch, Control Tower parses each BCB. All BCB's Java classes are added to each BCB's Bot Task classpath. Thus, if you add a BCB-originated Bot Task into your Business Process, all the custom Java classes used in Bot Task will be working.
For proper work, make sure that:
- For the wf-machine-config-bundle repository, Repository Policy is
Release. - For the wf-machine-config-bundle repository, Deployment Policy is
Allow Redeploy.
Archetypes repository configuration
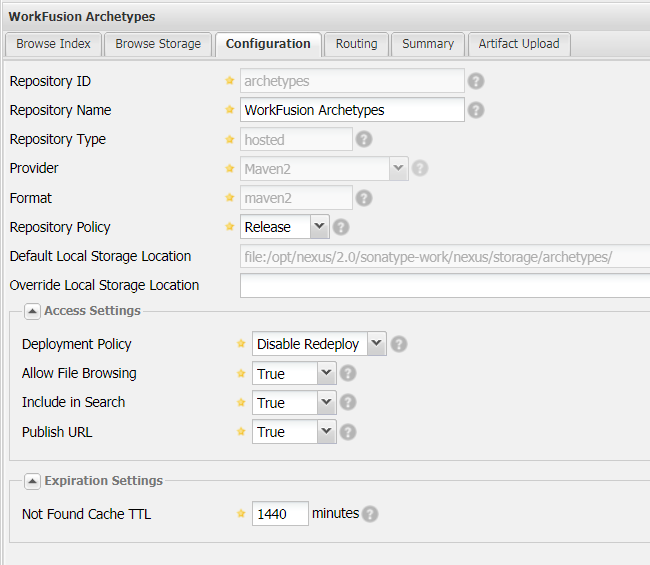
Create a Maven repository with the archetypes Repository ID. It will be used as the archetypes catalog for your developers.
Make sure the archetypes repository is accessible without authentication (by anonymous user).
To achieve access without authentication, you require to have the admin access on Nexus and perform some security configuration.
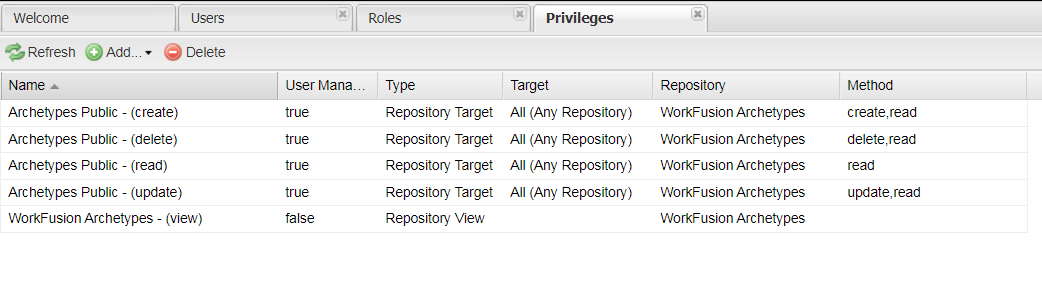
Create a new permission on the
archetypesrepository.
Create a new role and add the
viewpermission on thearchetypesrepository created on step #1.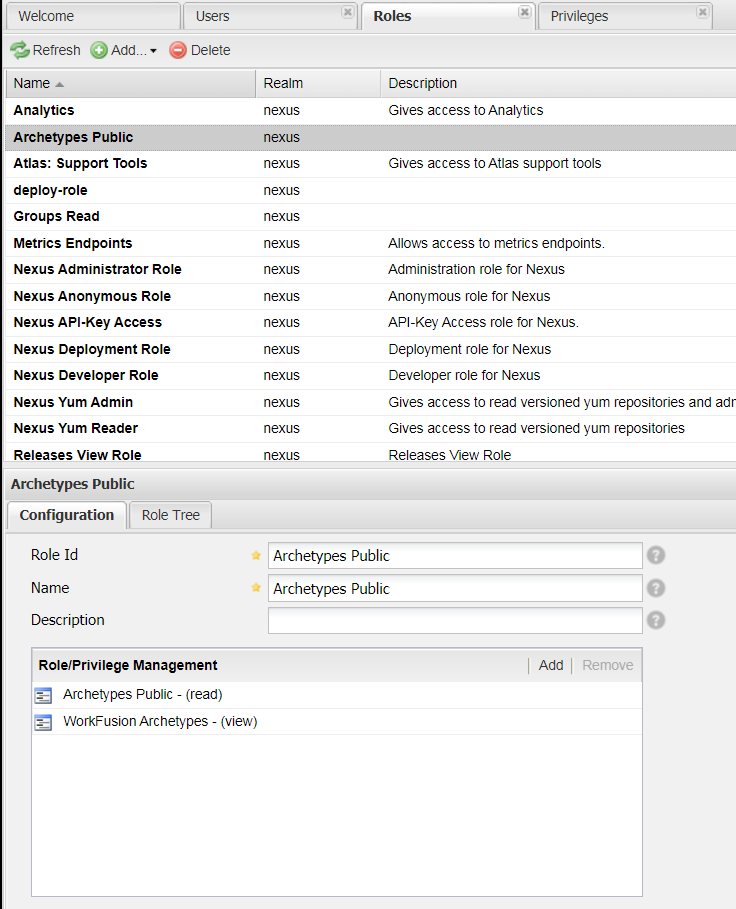
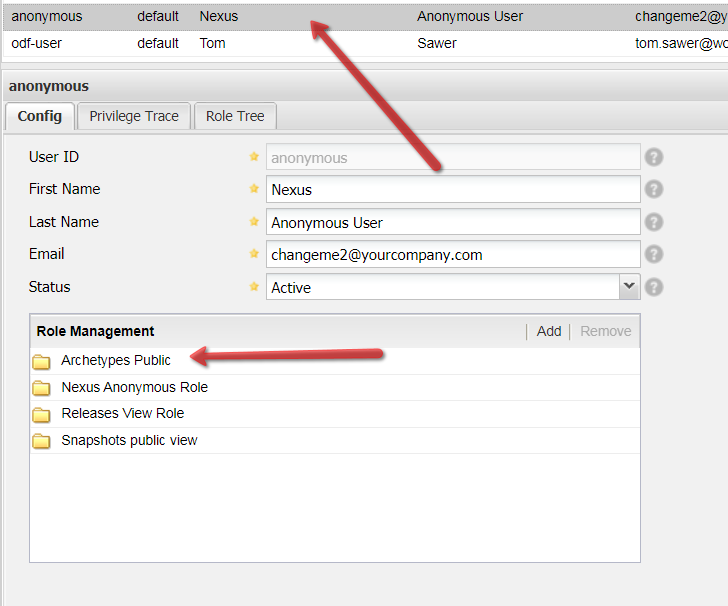
Add the role from step #2 to the
anonymoususer
Copy ODF artifacts to Nexus for later deployment
Put ODF BCB into Nexus Repository - 9.2.0-9.2.1 | 9.3.0-9.3.3 | 9.4.2-9.4.3
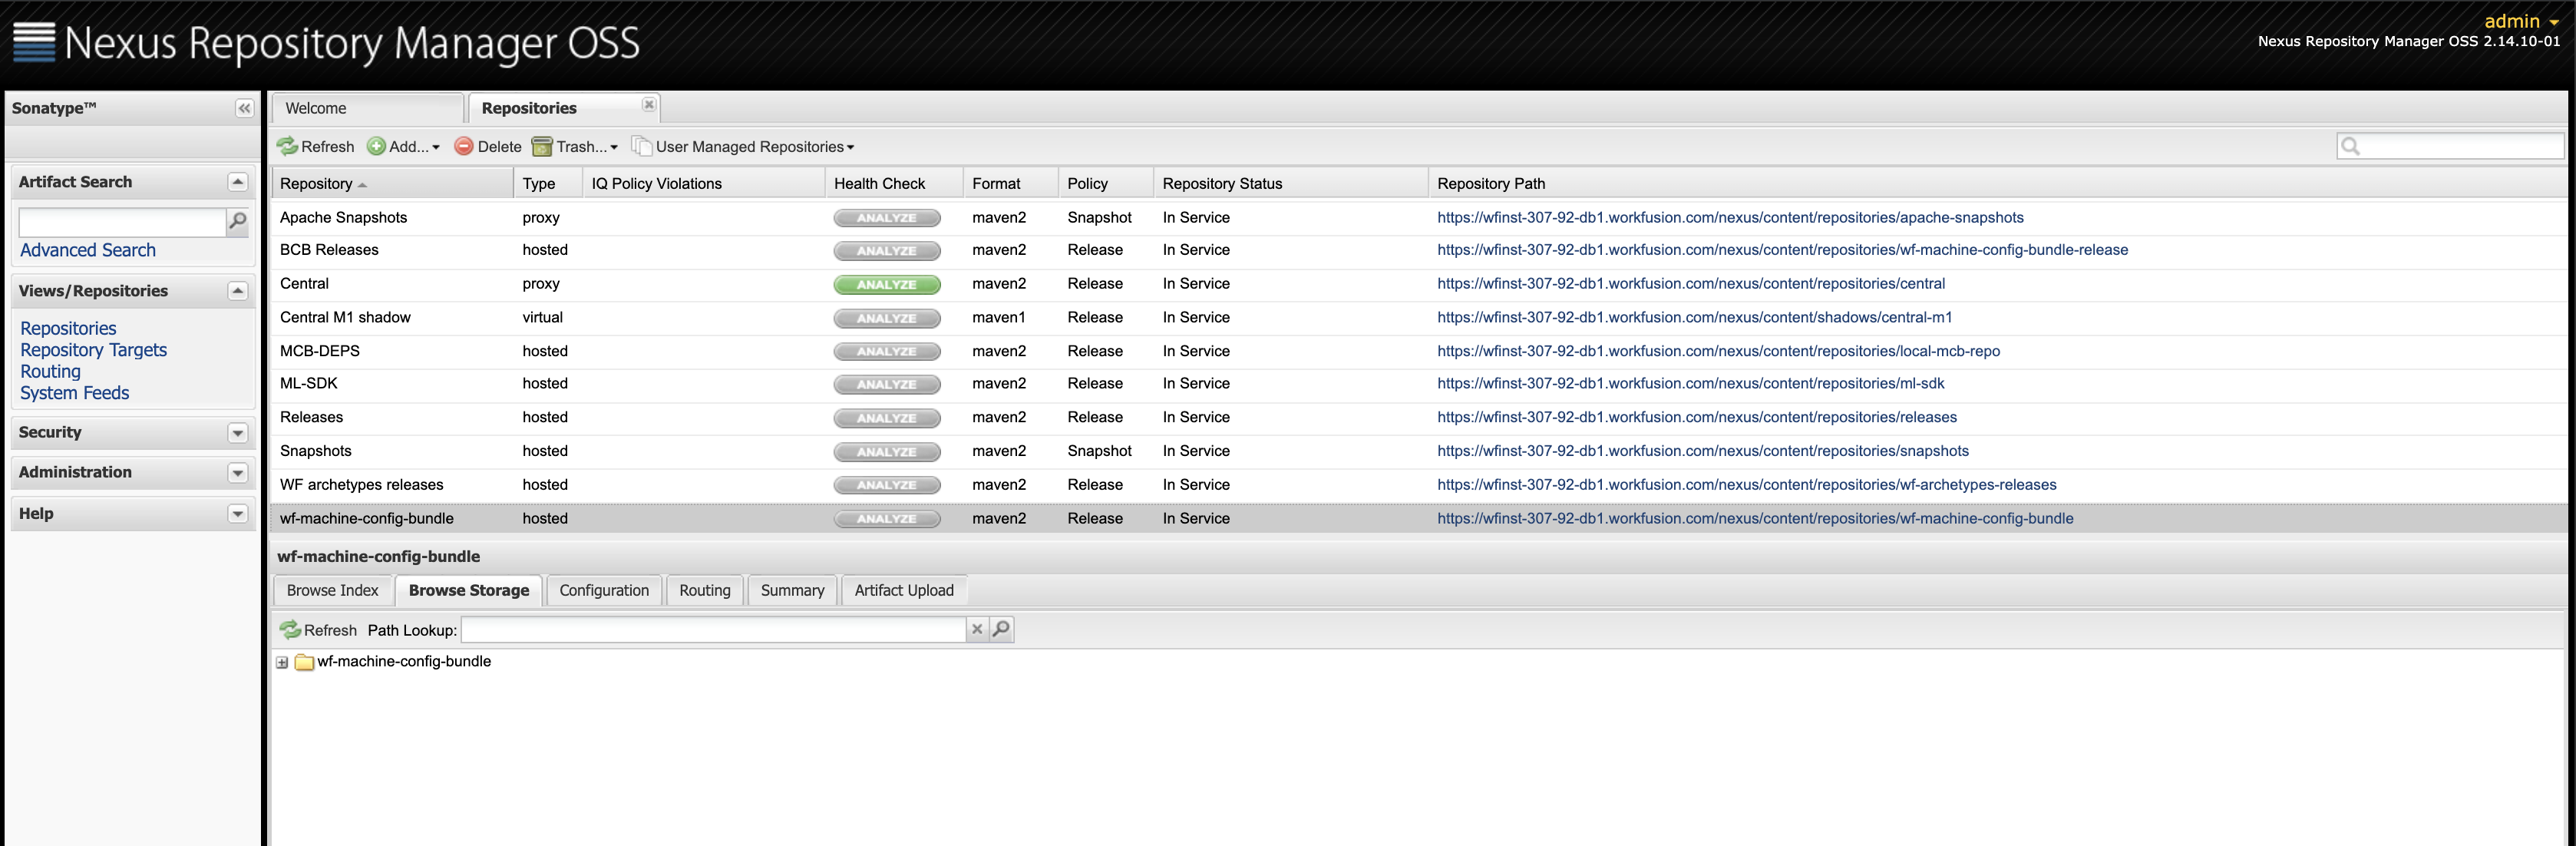
- Deploy odf-bcb-X.X.X.X.jar. Download a proper version from the WorkFusion public Nexus repository: https://repository.workfusion.com/content/repositories/releases/. You need to log in first as
odf-user/Workfusion!5inside wf-machine-config-bundle. - Select the wf-machine-config-bundle repository > Artifact Upload and set the following GAV:
- Group: com.workfusion.odf
- Artifact: odf-bcb
- Version: X.X.X.X
Put ODF BCB into Nexus repository 9.2.2 | 9.3.4
For v9.2.2 and v9.3.4, put ODF BCB using Bundle API later.
Put ODF archetypes into Nexus Repository
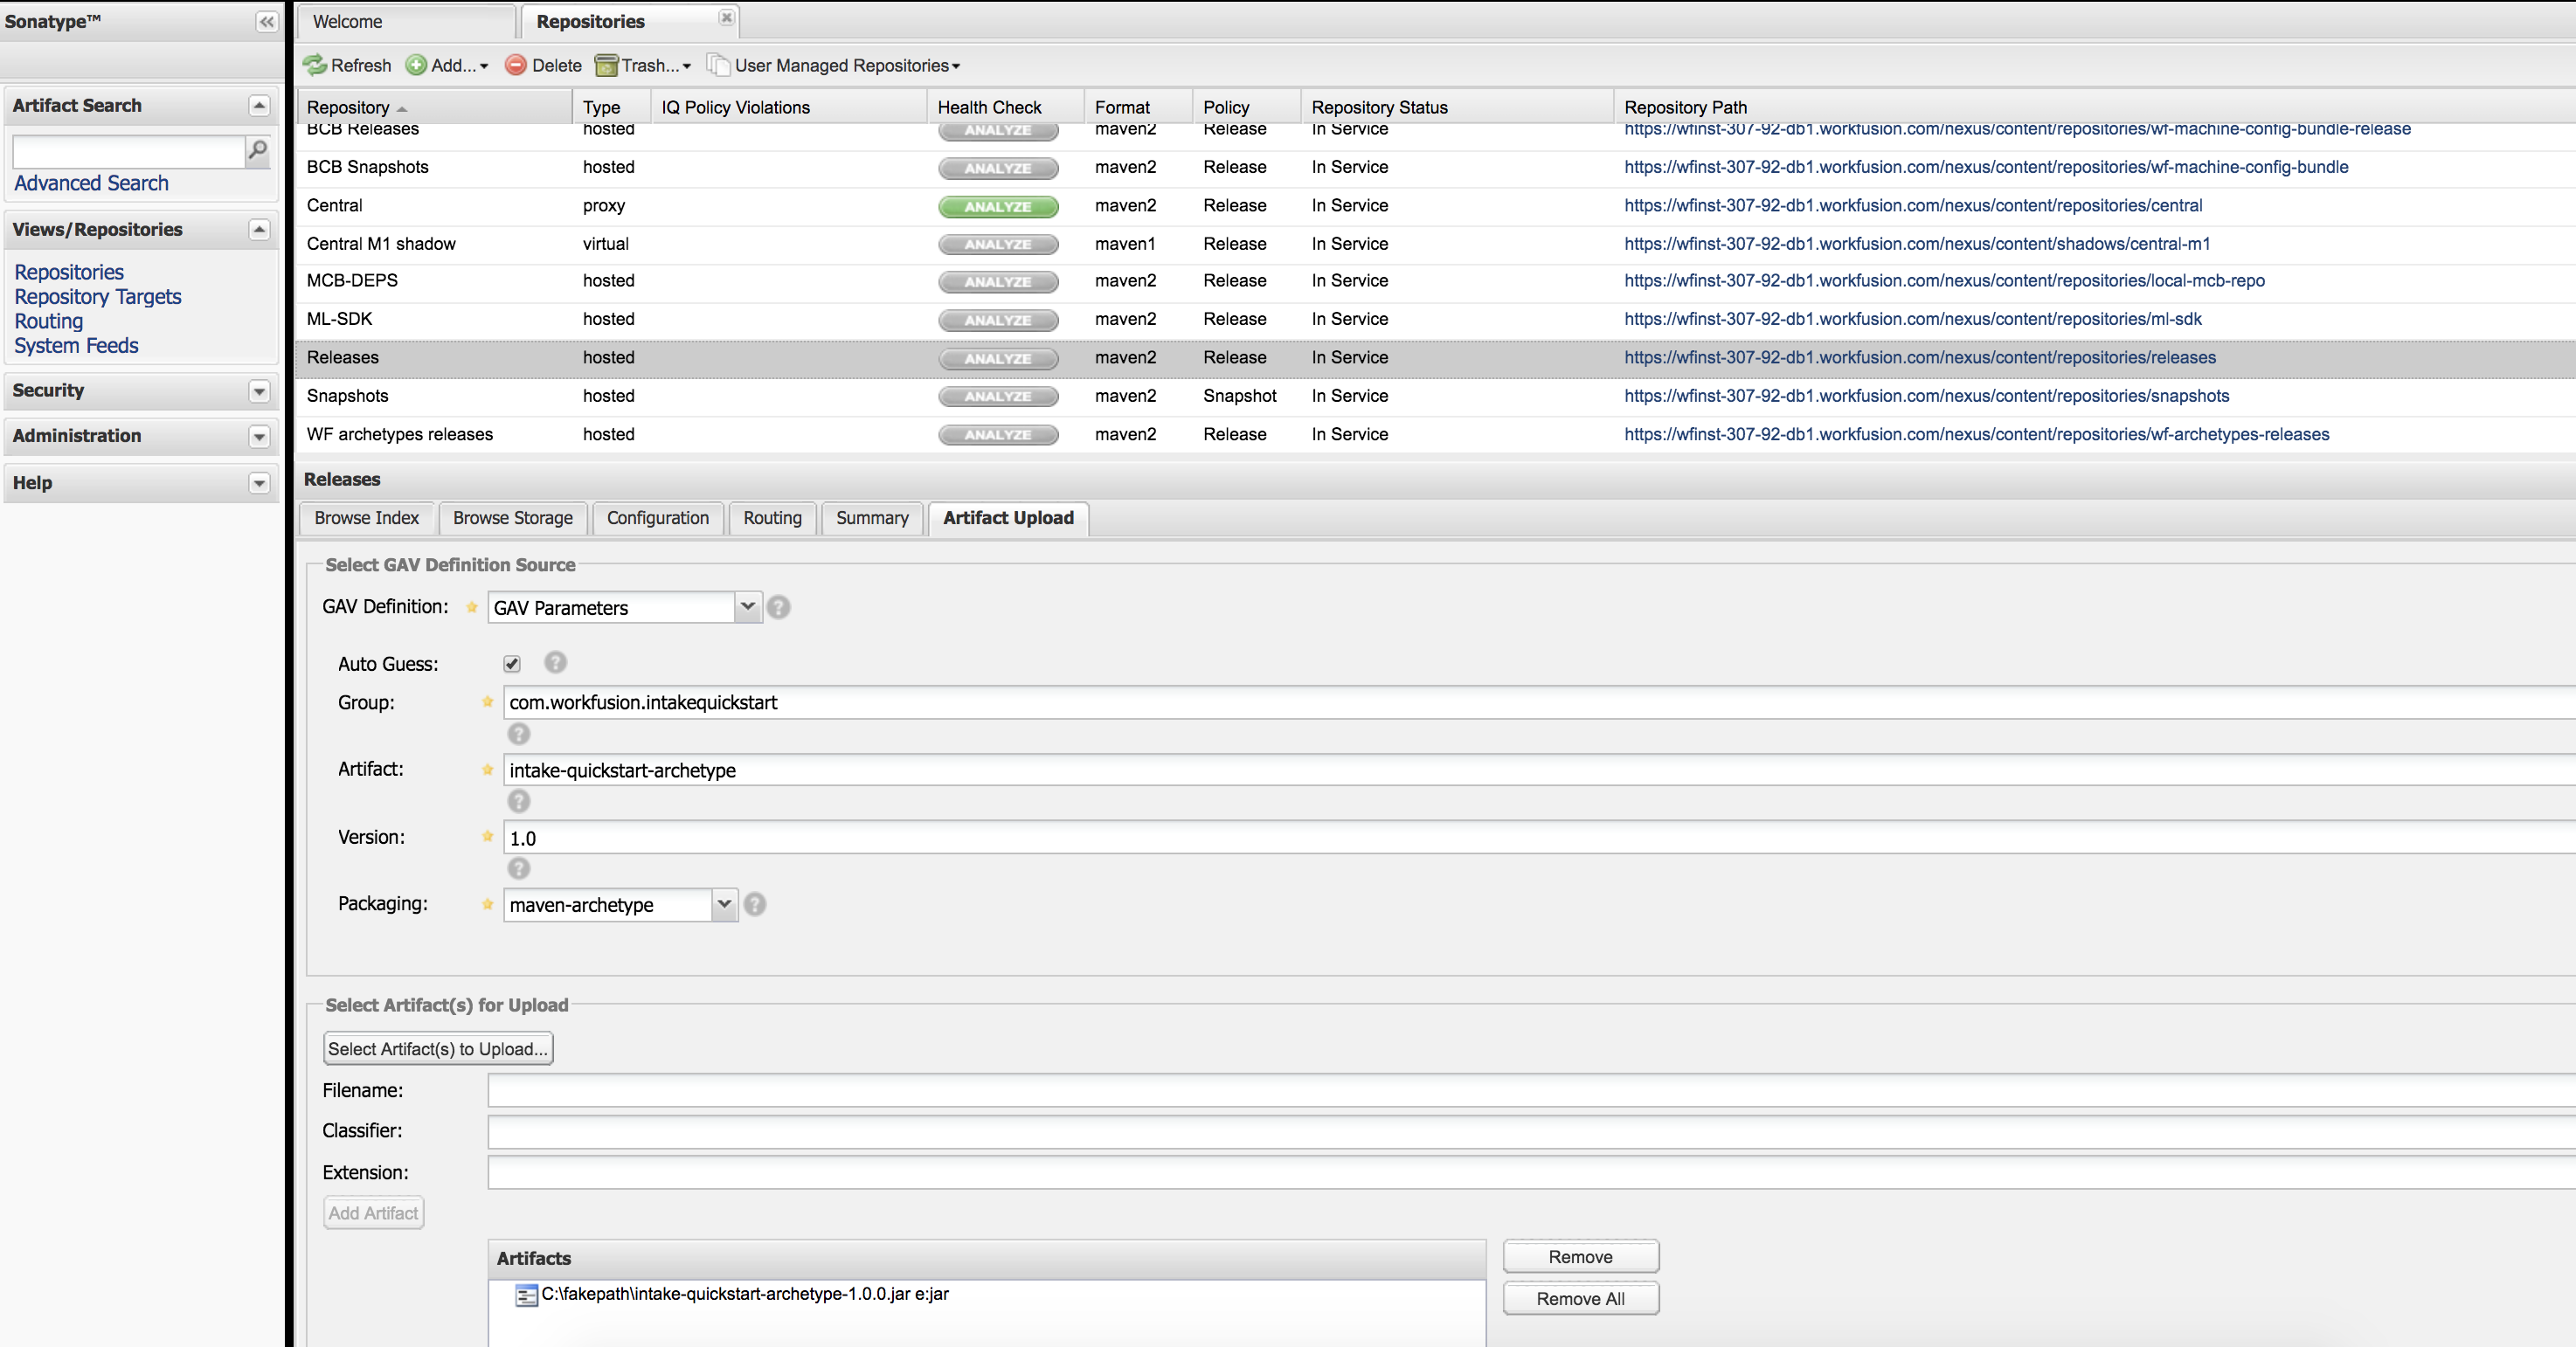
- Deploy all archetypes. Download a proper version from the WorkFusion public Nexus repository: https://repository.workfusion.com/content/repositories/archetypes/. You need to log in first as
odf-user/Workfusion!5into the archetypes repository. - Select the Archetypes repository > Artifact Upload and set the following GAV:
- Group: com.workfusion.odf
- Artifact: bcb-bundle-quickstart | rpa-bundle-quickstart | full-bundle-classification-quickstart | full-bundle-ie-quickstart | full-bundle-quickstart | minimal-bundle-quickstart
- Version: X.X.X.X (specify a proper version according to the releases compatibility matrix)
Configure Nexus user
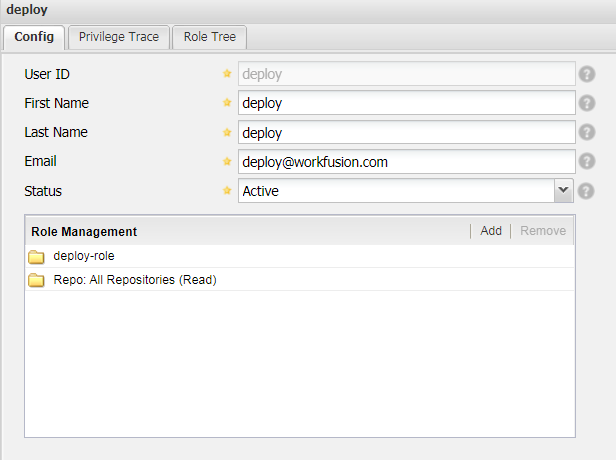
To deploy BCBs from WorkFusion Studio directly, provide the Nexus user credentials in your settings.xml.
<!-- Credentials to deploy BCB to Nexus > CT -->
<server>
    <id>bcb-repository</id>
    <username>deploy</username>
    <password>NEXUS_DEPLOY_PASSWORD</password>
</server>
First, make sure you have this user created in Nexus with the permissions to deploy and view the wf-machine-config-bundle repository.
To configure users and permissions, you need to have the Administrator privileges on Nexus.
- Go to Security > Users.
- First, create Privilege, then Role, and finally User.
Deploy ODF artifacts - 9.2.2 | 9.3.4
If you have used ODF in target Control Tower before, make sure to back up the _odf_transactions Data Store at this point (download .CSV with data to a local workstation).
As Import API will recreate _odf_transactions (provided inside the ODF bundle ZIP), you may loose transactions data if you skip this warning.
Import API is available in the following versions. Use it to install ODF.
- Download the ODF bundle ZIP from the Releases page.
- Deploy the bundle with a script:
- ODF 10.1 Bundle Import API
- ODF 9.2.2 Bundle Import API
Deploy ODF artifacts - 9.2.0-9.2.1 | 9.3.0-9.3.3 | 9.4.2-9.4.3
Create Data Stores
- Log in into server Control Tower with the Administrator role.
- Go to Advanced > Data Stores > Create Data Store
- For v9.2.0-9.2.1, 9.3.0-9.3.3, 9.4.2-9.4.3:
- Create _intake_transactions_v04.csv Data Store
- Create _intake_transactions_status.csv Data Store
Import required use cases
For v9.2.0-9.2.1:
- Go to Control Tower > Advanced > Rules and import JoinDocs_WaitForAllTransactions_rules.xml into Rules.
- Go to Control Tower > System Settings > Use Cases > Bot tab and import ShareF_IMAP_Exchange_Settings_v1.0.xml into Bots use cases.
- Go to Control Tower > System Settings > Use Cases > Business Process tab and import Intake OCR v1.0.xml into Business Process use cases.
For v9.3.0-9.3.3:
- Go to Control Tower > Advanced > Rules and import JoinDocs_WaitForAllTransactions_rules.xml into Rules.
- Go to Control Tower > System Settings > Use Cases > Bot tab and import ShareF_IMAP_Exchange_Settings.xml into Bots use cases.
- Go to Control Tower > System Settings > Use Cases > Business Process tab and import Intake OCR 9.3.xml into Business Process use cases.
For v9.4.2-9.4.3:
- Go to Control Tower > Advanced > Rules and import JoinDocs_WaitForAllTransactions_rules.xml into Rules.
- Go to Control Tower > System Settings > Use Cases > Bot tab and import ShareF_IMAP_Exchange_Settings.xml into Bots use cases.
- Go to Control Tower > System Settings > Use Cases > Business Process tab and import ODF v9.4.0.0 OCR.xml into Business Process use cases.
Trigger import from Nexus to Control Tower
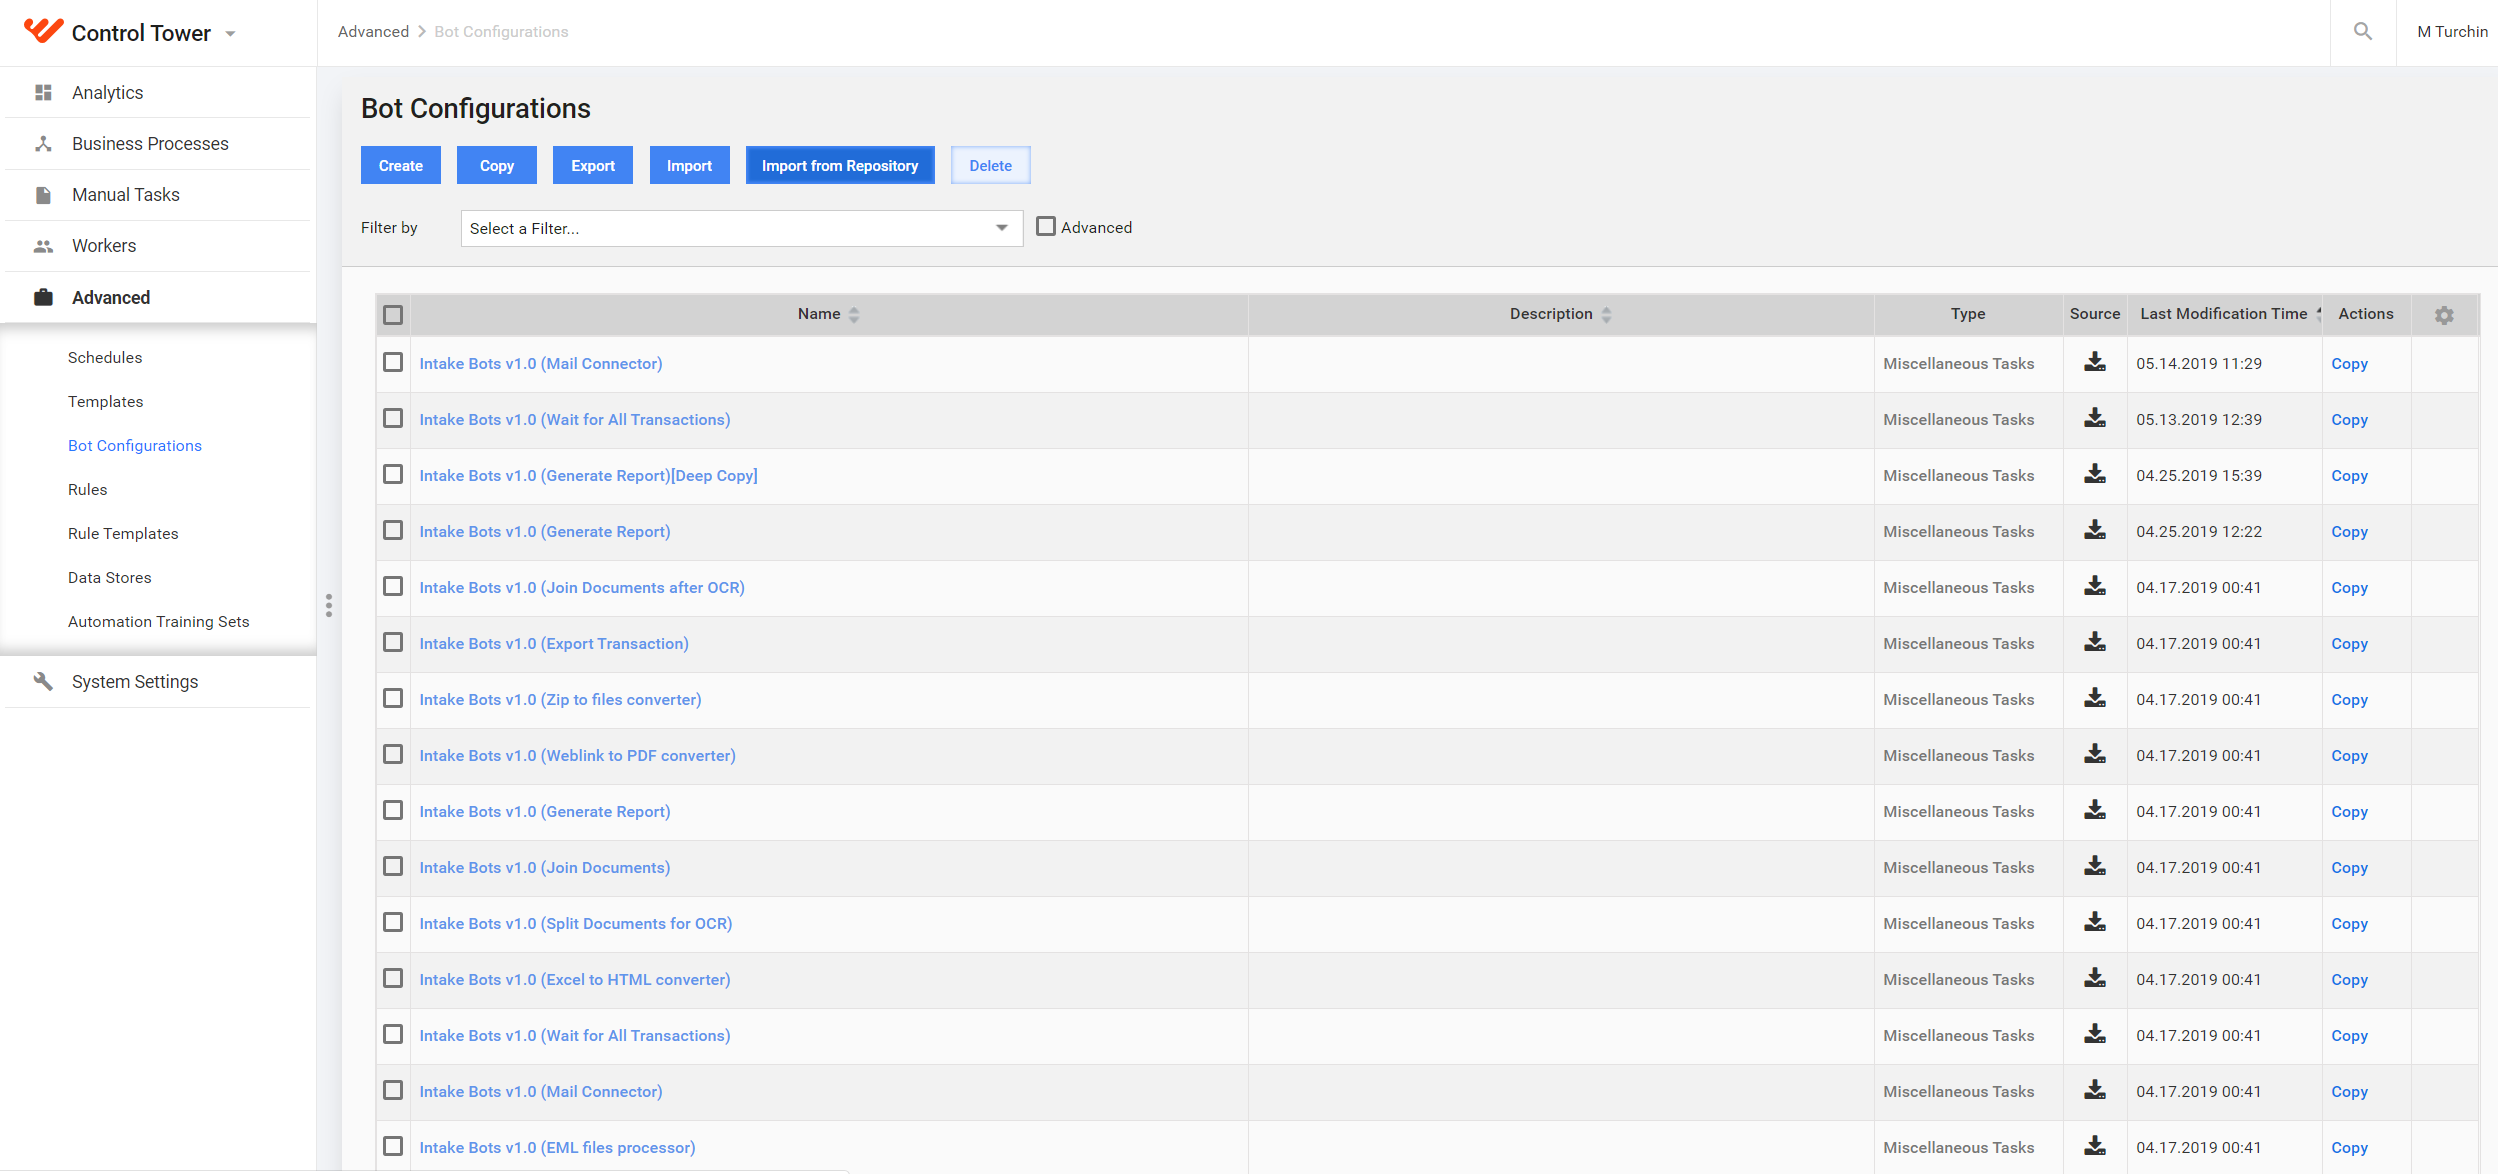
- In server Control Tower, navigate to Advanced > Bot Configurations.
- Click Import from Repository.
- Refresh the page and make sure that Intake Bots [VERSION] Bot Tasks are pulled into your Control Tower.
File Storage
Before you start, make sure that server Control Tower has write access on the doc-upload S3 File Storage bucket.
This step is optional. If your use case involves HTML to PDF conversion, this library is required. For more details, see HTML to PDF Converter.
Upload chrome-pdf-printer-0.2.18.jar into S3 under the doc-upload bucket, so it will be available under the following path: https://your-server.com/doc-upload/chrome-pdf-printer-0.2.18.jar.